Posts

Showing posts from June, 2019

Waterfront Whiz

Image
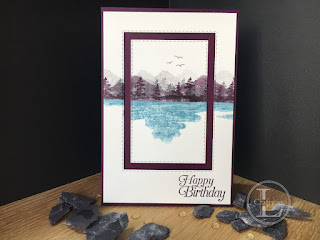
  I’ve been meaning to have a go with the Waterfront stamp set for a while since it gives the illusion of a water-coloured image with just some simple stamping – handy for those of us (like me) that can’t paint for toffee! There are some great images of mountains, land masses, water and trees which can be combined to create romantic, relaxing or vibrant scenes, depending on your chosen colour palette. My first card was inspired by the beautiful weather we’ve had on the South coast of the UK the past few days.  All along the seafront where we live are loads of beach huts and there’s a cute little beach hut stamp in the set which I stamped in Pretty Peacock, Real Red and Mint Macaron for a fun look. I went over the sea with clear Wink Of Stella to give that sparkle of the sun reflecting off the waves.  A Pretty Peacock layer on a Crushed Curry cardbase finishes the beachy, sunny card. My second card was inspired by Amanda Bates from the Craft Spa and her ‘out of the frame’ style c

Peacock Two Ways!

Image
  One of the new releases that caught my eye in the new Annual catalogue was the Royal Peacock bundle.  I really like the two-stage stamp for the peacock, although just the base stamp looks great on its own too.  Previously Sizzix used to make dies for Stampin’ Up! but the detailed peacock dies are made by a new company and I have to say I’m impressed.  Usually detailed dies like these are a complete pain when trying to get the card out of the die and I usually add a layer of wax paper to help with the release. No such problem with these dies.  They cut cleanly with a single pass through the Big Shot and the cut shape literally fell out of the die! My first card this week features the stamped peacock and an embossed background.  I began by stamping the peacock with Pretty Peacock ink and then stamped the second layer  with Versamark and applied copper embossing powder. The background uses the Layered Leaves embossing folder (retired) which I edged with strips of copper foil. I use

Wonderful Writing Workshop

Image
  Last Sunday, I attended a taster workshop to learn about dip pen and brush pen styles of modern calligraphy.  The course was hosted by the The Modern Calligraphy Co. and is one of Kirsten Burke’s range of classes.  I chose it after being inspired by Kirsten’s YouTube videos and trying out one of her books.   The workshop itself is set in an idyllic location in the West Sussex countryside and, despite looking a little austere from the outside (it’s a converted Victorian sub-station), the interior is stunning; bright and airy and adorned with inspirational artwork. The welcome was warm and friendly and was accompanied with mugs of tea, coffee and biscuits. Each of the wannabe calligraphers had a work area complete with hand lettered name tag, tools and worksheets.  I was on a table with two lovely ladies, Hilary and Barbara, and we managed to do a lot of nattering in addition to our calligraphy! Our fab instructor was Maisie and she had a relaxed, informative and en

Marvellous Metallics

Image
  Last week I used foil sheets and embossing folders to provide interesting focal panels.  This week, I’m still embossing but using metallic embossing powder and heat.  I love using the metallic powders on dark card stock, especially the heating part - watching the powder melt and transform from matt granules to glorious shine!  Line style stamps work best for this technique so I decided an outing for the floral elements of Tea Together was in order. I began by generously applying the Embossing Buddy over my Basic Black card front to remove static and oils from my fingers which would attract the embossing powder.  Next, I random stamped the various images using Versamark, rotating them and stamping off the edge too.  I also stamped another small flower on a scrap of black card, the sentiment and the large rose onto the liner.  I then applied gold embossing powder to the stamping and heat set it. For my mat layer, I didn’t have enough gold foil sheet so I manufactured

Farewell Dragonfly Dreams

Image
This week’s post says goodbye to the Dragonfly Dreams stamps and matching Detailed Dragonflies as they are one of the many items that has not made the cut to be included in the new catalogue, launching on 4 th June.  I’m sad to see them go although they will not be leaving my personal collection any time soon as they are one of my most frequently used sets and are so versatile.  I’ve made anniversary, birthday, sympathy and thank you cards and I’ve even been able to use them to make those tricky masculine cards too.   The stamps have been used to make lovely wrapping paper using brown ink on brown parcel paper, topped off with a fabulous tag sporting a die cut dragonfly. I saw the design for this card on Pinterest and thought it looked really stylish.  The key to this is using foil card in embossing folders, it gives a really stunning effect. For this card, I used the copper foil card and the planks embossing folder. The dragonfly topper was cut from black glitter