Posts

Showing posts from October, 2022

Snow Geese

Image
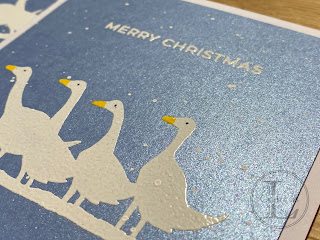
How is your Christmas card making coming along? I’m really enjoying making a few cards each month resulting in a variety of styles, depending what I’m into each month.   It’s taking the pressure off the usual panic crafting at the end of November anyway. This week’s theme is white heat embossing on blue card.   My featured stamp is Gaggle of Geese by Lavinia stamps and I’m using some lovely pearlescent card I found languishing at the back of the cupboard.   It’s from  First For Paper called Stardream and the colour’s called Vista. To begin, I stamped the geese in Versamark and heat embossed in white.   The sentiment is from Taylored Expressions Modern Holiday Greetings.  To give the geese a bit of dimension, I coloured the beaks with a yellow Posca pen.  I also added a dot for the eye using a Micron Archival black pen.   Then for the messy bit – creating snow by splattering with a white Posca pen!   It goes everywhere!!   It’s also a bit hit and miss and ended up with one of t

Electronics!

Image
  My card this week took me back to my school physics lessons – that’s a long time ago!   It seems that I do have a need to know about series and parallel circuits after all 😊 .   I did have to get some assistance from Mr L until I got my eye in.   If you do not have your own Mr L, there are some great YouTube tutorials to assist you. To begin with, I made a scene to light up using critters from Lawn Fawn Upon A Star and ink-blended a night sky using Distress Oxides.   The lit element was to be 3 stars so I die-cut the shapes and then traced the holes onto another piece of card the same size as my topper.   I applied self-adhesive copper tape to form the circuit and made a push switch using a piece of card wrapped around the battery.     The LEDs are self-adhesive from Chibitronics and just need to be firmly stuck onto the copper tape. Top tip from Mr L: If you’re using more than one LED, the circuit needs to be a parallel one, otherwise the battery won’t provide enough voltage.

Your Name In Lights!

Image
  I had these Pinkfresh Studio hot-foiled letters left over from a previous project and I just happened to have to correct ones to spell out my friend’s name – very handy!   I coloured them using the matching stencils and then die-cut.     I also hot-foiled a happy birthday sentiment, although I ended up not using that.   I’d had an idea to try, some ink-lifting to make some fairy lights on an inked background. To begin, I inked up a background with Distress Oxides and spritzed with some water to create the stars.   I then stamped the Lavinia Fairy Fir Tree twice, to hang the string of lights on.      The lights bulbs are from WPlus9’s Festive Greeting stamp set and were stamped in Versafine Clair Nocturn ink, which is waterproof.   I then used a paintbrush and some water to lift the ink from the bulbs and around them.   I blended a little yellow ink into the lifted areas.   The scene was completed with a selection of animals and foliage stamps from Lavinia Stamps.   The sentimen