Posts

Showing posts with the label fun fold

Stepper Into Christmas

Image
This week’s card is a fun-fold that is suitable for festive makes or any occasion year-round.   It’s a Centre Stepper card and you can find my template for the base and layers here .   I like the 4⅛” wide as I can get 2 cards from an A4 sheet but you can make it as wide as you like, subject to the size of card available to you. This was another card that featured the Pinkfresh Studio Magnolias that I made for my post back in November.   I began by cutting my card base and top layer from white and the mats from green. For the toppers, I wanted white but not plain so I used the Quilted Cover Plate die from Honey Bee Stamps to create a lovely stitched trellis background. The magnolias and sentiment were added using thin foam tape and I added rhinestones at the intersections of the trellis. This card is an example of a wider version.   For this one, I wanted a square centre panel and made the wings 1” wide.   Lastly, to ‘Stepper’ into Christmas, I used some...
Twist 'n' Pop

Image
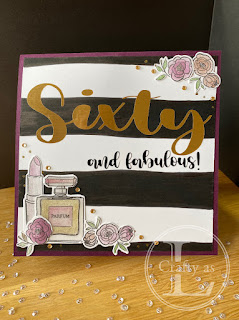
I’ve been binge watching fancy fold card videos on YouTube lately.  A fancy fold definitely adds a bit of WOW! to a card.  They usually take a little longer to make but are worth the effort.  This card was made using Sam Calcott’s (of Mixed Up Craft fame) tutorial.  Her instructions are really clear and easy to follow.   My theme for this week’s card was a 60 th birthday for my friend.  She’s a fun, bubbly and stylish lady so I wanted the same kind of feel for her card.   To begin, I wanted a black and white striped background.  I only had skinny striped paper so I drew some deliberately wonky lines with my black marker pen and coloured them in, several times, to give a rich black colour. Next, using my Cricut, I cut my sentiment from black and gold vinyl and stuck it onto the panel.  I added some gold dots in the corners where I would later add the decorative elements. For the decorative elements, I used Stampin’ U...

Meow Wiper Card

Image
This week’s card is inspired by a card made by Therese Calvird from www.lostinpaper.com in this  post - I really loved the repeat stamping of the kitties!  To make the card my own, I wanted to make the upside-down kitty into a wiper element on a Z-fold wiper card. First, I repeat stamped the kitty by using masks to protect the lower line of cats.  I used MFT’s I Knead You stamp set. Next, I adhered these panels onto my card base, which is 3” longer than my standard card front and scored at 1½” and 3” from one end.  The Z-fold section is 1¾” wide and the same length as the base and scored in the same places.  The extra panels were decorated using the Meow stencil from Newton’s Nook. The wiper element was next.  I coloured one of the kitties in greys (like my tabby cats) and cut out a small rectangle for the wiper mechanism. Now, I watched many YouTube videos to try to get my head around the wiper mechanism!  This way seem...

Fun Fold: Double Easel Step Card

Image
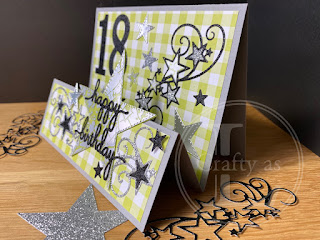
  My card this week is one I made for my God-daughter’s sister, Charlotte, who celebrated her 18 th birthday last week.  I picked these colours as they are similar to those she chose for her bedroom, so I’m guessing she likes them! The card is another ‘fun fold’ called a double easel.  It is built from a standard card base with an extra half sized piece fixed on the front.  First, I glued the extension piece on place and then attached my various decorative paper panels. Next, I die cut a bunch of decorative elements from the Stampin’ Up! Stitched Stars set.  I wasn’t exactly sure what I was going to use but I like to use this process to create.  I also die cut a ‘happy birthday’ sentiment and number 18. I stamped the piece to write on, which was going on the back, and the envelope with one of the star images from the So Many Stars set. Here’s the finished card. The great thing about this style of card is the added dimension given by the front fold....

Thoughtful Blooms

Image
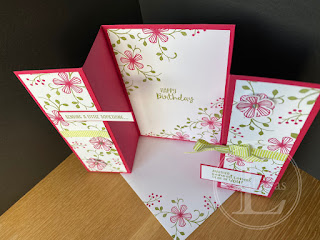
The weather here in the south of the UK has been particularly dismal for the past few weeks.  The eternally grey and rainy skies have really been getting me down so to cheer myself up, I thought I’d make a bright, happy, flowery card.  My stamp set of choice was the freebie from Sale-A-Bration called Thoughtful Blooms and the matching punch. I decided to do a gate-fold design so cut my card base from Lovely Lipstick and some Whisper White panels to decorate the front sections and inside.  The flowers and foliage were stamped using Lovely Lipstick and Old Olive inks. These panels were stuck onto the card base after attaching a strip of ribbon for some added texture and interest. The single flowers were cut out with the punch.  To give them extra dimension, I used my ball tool and the foam mat from my Stamparatus to curve the flowers. I added a medium sized rhinestone in the centre of the flowers and glued them on top of some of the flowers on the front of the ...

A Big Jar of Love for my Mum

Image
Back in November, my Mum reached a milestone birthday which warranted an extra special card.  For some time, I’ve been meaning to try out an easel card and also to create a floral wreath using the Jar of Love so I decided to combine the two. For this project, I used: Stampin’ Up! Jar of Love stamp set SU! Everyday Jars framelits SU! Large Letters Framelits & Letters For You stamps SU! Number of Years and Large Numbers framelits (sadly retired) 11½” x 5¾” Blackberry Bliss card scored at 5¾” and again at 2⅞” on one half 5¾” x 5¾” Blackberry Bliss card 5¼” x 5¼” Whisper White card 5½” x 5½” and 5” x 2” pieces of Always Artichoke (retired but I love it!) A couple of pieces of Smoky Slate card Silver embossing powder SU! Inks in Blackberry Bliss, Blushing Bride, Old Olive, Garden Green A 5½” x 2⅝” strip of DSP (I used one of the Frosted Florals pack) A scrap of silver glimmer paper Layered Leaves Embossing folder I started off by stamping ‘MUM’ in Blackberry Bliss ...