Posts

Showing posts with the label winter

Snowy Skies

Image
A couple of weeks ago, our cats were fascinated with watching the falling snow.   From inside, that was - they weren’t that keen on it when they went out!   That’s what inspired this week’s cards but I’ve also added a fox into the scene too. To begin, I taped down some watercolour card, wet it all over and then randomly daubed various shades of blue and grey paint onto the damp card.   Whilst the paint was still damp, I sprinkled a few grains of salt on each panel and set aside to dry naturally. It’s a bit hit and miss as to how it turns out as if the paper’s too dry, nothing will happen.   If it’s perfectly damp, lovely snowy effects will appear. If the paper’s too wet, the blooms will spread further so the snowy effect is lost. As I’d used watercolour paper, which is a bit textured, I used my MISTI so that I could repeat stamp the images to get good coverage.   I used Lavinia stamps - Mooch and one of the foxes from Set 1. To ground the animals, I li...

Winter Birthday

Image
Our Design Team theme this week is Winter Birthdays and for my non-card project, I’ve made a birthday tag.   Although it’s a birthday project, I’m stretching my stash by using a Christmas stamp set and making a male-themed tag to boot. To begin, I die-cut a large tag from an inky panel that I’d made using Distress Stain, Mica Stain and Distress Spritz sprays in various shades of blue.   It’s hard to tell from the photo but this panel has lots of lovely shimmer. After liberally dabbing the tag with an anti-static powder tool and using Christmas Eve stamp set, I stamped the row of trees, moon and stars with Versamark ink, added white embossing powder and heat set.   I then repeated the process for the large tree in the foreground and the sentiment, which is from Birthday Wishes . To make the ground different to the sky, I used a scrap of paper for a hill mask and blended white pigment ink below each mask, and below the tree line.   I also added some white in...

A Winter Cake

Image
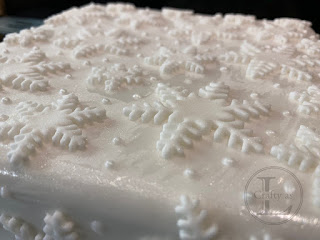
Happy 2021! We made it through 2020 and have emerged into a brand-new year.  Have you made any resolutions? My resolution for this year is to be kind to myself.  I’m a bit of a perfectionist and that leads to me being my own very harsh critic - so I’m now working on not being!  The other thing I intend to focus on is to enjoy whatever it is I’m doing, even if I can’t create a masterpiece.  With that in mind, this week’s post is a Winter Cake.  You may have heard them called Christmas cakes but if they’re not finished until January, it’s a Winter Cake!  It’s true!! With all the food we had to be eaten by less people due to the late Tier change rules, we really didn’t need the cake.  However, we’ve now ploughed our way through the festive goodies and so it was time for the cake to make an appearance. I made the fruit cake way back in October using Nigella Lawson’s Boozy Christmas cake recipe.  I also used a cake belt for the first time.  I...

Cool Yule Christmas Tags

Image
I never make enough tags for our Christmas gifts and usually end up frantically cutting out bits of card at the last minute!  To avoid the problem this year, I decided I would start making tags in batches.  I saw a YouTube demonstration of this technique and thought it ideal since you make 10 tags at a time and it allows you to use up a load of scrap pieces. For this project I used: A4 sheet of thick card for the tag backs Scraps of white card for the houses SU! Hometown Greetings Edgelits SU! Balmy Blue ink SU! Pacific Point ink Shimmer ink in Frost White ‘Merry Christmas’ greeting from SU! Half Full stamp set SU! Scalloped tag topper punch 2.5m ribbon In pencil, mark the half way mark on the short sides of the A4 card.  This is a rough guide for your blending as you want the central portion to stay white.  Sponge Balmy Blue ink into the card using circular motions, building up the colour from the long edges and fading toward the centre.  I added ...