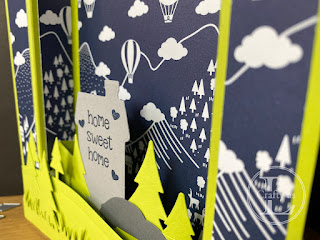
Posts

Showing posts from February, 2021

Jigsaw Love

Image
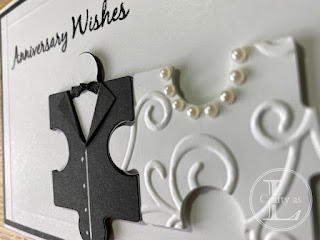
  It was my parent’s wedding anniversary last week.  They are avid jigsaw doers so we bought them a couple of new ones, one of which is Van Gogh’s The Starry Night.  That will keep them busy a while! To coordinate with their gifts, I decided on a jigsaw-based card.  I’ve made similar cards with hearts as the bride and groom.  I used my Cricut to cut out the pieces. For the ‘bride’, I dry embossed the piece and added a pearl necklace before gluing the 4 pieces together. For the ‘groom’ I chopped off the bobble, then cut down the centre and folded back the two triangles to form the lapels of the jacket.  I drew on the buttons with a white gel pen and the bow-tie is a small piece of ribbon with a knot tied in it. The pieces were glued together, adding in a white layer for the shirt. I like clean and simple background for these style cards so I simply scored a frame from the reverse and then added my greeting using black ink and clear embossing powder.  I prefe

Fancy Fold: The Bridge Fold

Image
  I do love a fancy fold card.  They always look impressive and aren’t always as tricky to make as you’d think.  This week’s design is called the bridge fold and was made for friends who have just moved into a new home.  It folds flat to fit inside a square envelope and can be simple or a little more complicated with an extra layer to add more dimension. To begin, I cut a 5¾” x 6” square and with the 6” length at the top of the score board, scored at 1”, 2”, 4” and 5”.  I added some very old DSP depicting country scenes in navy and white as this really popped with the lime green card base. Next, I die cut some hills, trees, grass, a house and a card and stamped my house with the greeting. My middle layer was cut to just under 5” and score at ½” at each end. I arranged the house, car and trees and the glued it into place, folding the lugs backwards.   The ‘bridge’ section was built by adding some trees and then finally the grass, which I raised on foam squar

Valentine Watercolour

Image
  I’ve been painting this week; a Valentine’s card for Mr L and an actual picture! There are some wonderful YouTube tutorials available for beginner painters and I’m a big fan of Karen Rice’s paintings, style and teaching. My card was a line and wash using another Anita Jeram stamp.  Those rabbits are so cute! I lifted out the paint in the sky to create the heart shaped clouds. When I die cut the panel, I had to use the partial die cutting technique and the die marked the panel so I had to add the ribbon, which unfortunately hides most of the cloud.  I decorated the envelope using a white gel pen. My painting was done following Karen Rice’s Silver Birch Trees Step By Step video.  I was first drawn to this particular tutorial because there’s no drawing involved.  The trees are masked using strips of tape (I used framing tape) and then the first stage of painting is done over the top.  There are some fun techniques to try during the painting.  Here’s a cl

Fancy Fold Pop-Up Card

Image
Triple cube pop-up cards are all over Pinterest at the moment but what struck me was why the top section isn’t taller.  I guess that would make the back section not a cube.  Or maybe two cubes? Who knows?! Anyway, this is my version - a tower cube pop-up card.  Despite the lengthy instructions, this card is quite simple but it is a bit time consuming. Stage 1: Making the base card To begin I cut out my bases, mats and DSP layers.  Mats are optional but if not using, cut the DSP in the mat sizes instead. Base: 6” x 8¼” scored at 2”, 4”, 6” and 8” and two pieces 2” x 8¼” scored at 2”, 4”, 6” and 8” (I trimmed the corners of the ¼” flaps to make assembling neater) Mats: eight 1¾” x 1¾”, two 1¾” x 3¾” and two 1¾” x 5¾” DSP: six 1½” x 1½” pieces, two 1½” x 3½” pieces and two 1½” x 5½” pieces. The fold lines on the bases were reinforced.  After gluing the layers together, I adhered them to the appropriate sections on the bases before assembling the cubes by gluing th