Posts

Showing posts with the label glitter card

Magnificent Magnolias

Image
  As you know, I’m a big fan of layering stencils.   This week’s card features Pinkfresh Studios Magnolias suite, which has a stamp set, layering stencils and die set which will result in a collection of elements to layer and create a dimensional card.  To begin, I stamped in Versamark and heat embossed using gold and silver powder.   Next, I shaded the leaves using blending brushes and just one green ink pad.   The detailed layer was done using the same ink pad and creates some depth. The flowers were next and I used a variety of colours, largely sticking to the natural colours of magnolias.   For the white ones, I just added a little grey for the shaping and shadows. The matching die is one unit and cuts out all the elements in one go.   Very handy!    This gave me 12 sets of magnolias for using on my next few projects. For this card, I wanted a circular card base.   I used to fold the card and partial die-cut, leaving a bit uncut at the top for the hinge.   However, I’ve no

Pet Sympathy Card

Image
Bereavement cards are always difficult to make, knowing that the person you’re making the card for has lost someone dear to them.  Our friends recently lost their beloved dog, Dooley, so I wanted to send a card to let them know that we were thinking of them.  The inspiration for this card was from a Pinterest post for a cat version. It’s quite a simple card starting with a heart die-cut from black glitter paper and then cut out the dog using Stampin’ Up! Dog Builder punch.  Using the same punch, I cut a heart from some red glitter card. The sentiment is from a set by Waffle Flower called Rainbow Bridge.  I like to stamp the sentiment on black ink and then add clear embossing powder on top. A black mat is the final step to frame the top layer.        

Expanding Accordion Card

Image
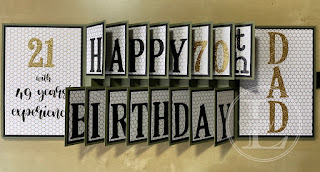
  As I mentioned earlier in the year, I have several ‘big’ birthdays this year, one of which was my father-in-law’s 70 th .  If you ask most card makers, the consensus will be that cards for blokes are difficult – I am no different!  My F-I-L is a very practical man and builds models (designed by him and printed on his 3D printer) so I figured he’d appreciate an interactive card.  I saw this video by Sam Calcott on YouTube and thought it’d be perfect for him. You can find the dimensions on Sam's website here . My card was to be a 5” x 7” so I trimmed 2 pieces of A4 card to 7” deep and scored them at 5” and then at ¾” intervals, trimming the last section off one panel.  These were then glued together using the small section as the glue tab. The number of folds can be adjusted depending on the number of spaces required for the sentiment, for example ‘CHRISTMAS’ would need an insert to give 9 mountain folds. Next, I cut my mats and layers for the flip panels and large pa

At An Angle

Image
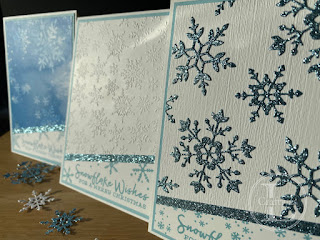
Sometimes, a jaunty angle can really add a new dimension to a project.  When I first tried this card, I cut it straight across and it looked… well… distinctly average.  However, make a diagonal cut and the whole thing is transformed.  I give you three options, depending how much work you want to put in! To begin, I stamped the greeting from Stampin’ Up! Snowflake Wishes on the bottom of my card front, just so I had an idea of how much to chop off.  I found a nice angle if I lined up the bottom right corner with the top of the grid section on my trimmer and the top right corner against the stop rail.  This also allowed me to repeat the cards at more or less the same angle. The top section was embossed using the Winter Snow folder and I covered the join with a ¼” strip of Balmy Blue glimmer paper, trimming the ends flush with the white panel. The whole panel was mounted onto a Balmy Blue layer and then onto a white card base. For an easier option, I cut a piece of Snowflake Splend

Brightly Gleaming

Image
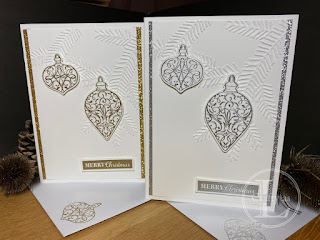
A couple of quick cards this week made using Stampin’ Up! Brightly Gleaming set.  I wanted to create some clean and simple style cards predominantly using white and metallics. First, I stamped two of the bauble images twice, embossed each pair in gold and silver and cut them out using the matching punches.  For my backgrounds, I wanted some texture so I embossed my card using the long-retired pine bough folder. Next, I cut some strips of gold and silver glitter card to edge my card fronts and liners and heat embossed the sentiment from the set. I heat embossed the smaller decoration onto the envelope and the liner and stuck the liner into the card base, adding the glitter strips to the edges. I repeated the glitter edging on the card front pieces. The last job was to add foam dimensionals to adhere the baubles and sentiments. The resulting cards were simple but elegant that I’d be happy to have on my mantlepiece.  

Hand Lettering Charity Cards

Image
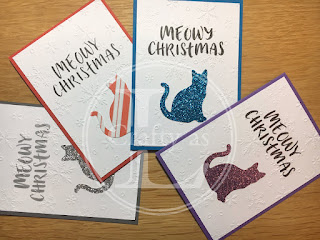
Aside from the actual enjoyment of doing hand lettering, part of my reason for attending the course on modern calligraphy earlier this year was to be able to create sentiments that aren’t available with stamp sets.  Never was this more applicable than when my friend asked me to create some simple but rude cards!  She didn’t want fancy writing as that was too nice(!) so I went for block lettering with a mix of lower case and capital letters. Another friend has just set up a cat rescue charity and is having a launch party and fund raiser at the end of the month so she asked me if I could create some cat-themed things for them to sell to raise money.  I started by sketching out the letters on graph paper and then traced over them onto tracing paper using a marker pen. The next stage was to put the card base and lettering template onto a light box and effectively trace the letters onto the card base.  I don’t concern myself if the letters aren’t perfectly traced – they are hand-lettere