Posts

Showing posts from June, 2023

Perfect Profiles

Image
My cards this week feature the Julie Hickey Happy, Birthday and Merry Profile die sets.   I love the font style of these dies and that they come with a shadow die too. To begin, I stencilled using Distress Oxide inks in Mustard Seed and Picked Raspberry using one of the stencils included with Simply Cards & Papercraft Magazine #243. Next, I blended another panel using the same inks and die-cut the lettering from this.   The shadow dies were cut from black card and the lettering adhered on top. For the top card, I cut the shadow die from the remnants of the panel after die-cutting the lettering to give a thin frame.   The negative spaces left from the lettering die-cut were also glued in place. The next card used Seedless Preserves and Peacock Feathers and the other stencil from the magazine. This time, after blending another panel for the lettering, I turned it around before die-cutting the lettering so the wording colour was opposite to the stencilling. Lastly, since i
Glorious Gardens

Image
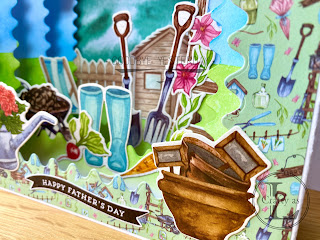
Today is Father’s Day in the UK so I’m sharing the cards I made for my Dad and Father-in-Law.   I was inspired by a floating die-cut card made by Jessica Rouke in Papercraft Essentials #225 and used the Potting Shed Luxury Paper Pad Kit to create gardening themed cards. To begin, I cut all my pieces for the cards and die-cut the inner pieces using Creative Crafts Products Rick-Rack Nesting Dies Hexagon & Squares.   You can make this card any size to suit the dies in your stash, just add 5” onto the width of whatever size card front you want and score at ½” and 2½” from each side.   Cut the inner layers a smidge under 1” wider than the card front size and score at ½” from each edge.   Cut another piece of card the size of the card front for the back piece. For the card fronts, I attached patterned paper using small dots of temporary adhesive and cut the aperture.   For all the following layers, I used the layer above to help line-up the die on the layer beneath, taping the die i

Black & White

Image
This style of card has been quite popular in one of my crafting Facebook groups recently and I like a ‘twofer’ (two-for-one) so I thought I’d give it a try.   After cutting 2 panels the same size, I used one of the large stamps from the Sheena Douglass Premium Box Kit #1 and heat embossed white on black and black on white. Next, I added the sentiment in the gap.   I used my Misti stamping platform for this procedure so that the images would be stamped in the same position on each panel. The next step is the one where there’s no going back from! I cut each panel in half vertically and switched the sides. To finish the cards, each pair of panels was mounted on a white card base and a few black and clear gems added to each side.