Posts

Showing posts with the label patterned paper

Paper Quilting

Image
Have you ever done any quilting?   My earliest memory was doing what I now know is English Paper Piecing when I was a child, using paper hexagons, folding and tacking fabric over them and then hand stitching them together to make a cushion cover.   Over the past few years, I’ve made a few quilts as gifts using half-square triangles (HST) to create the pattern and there are lots of patterns to chose from.   Here is one of the pinwheel quilts I made. I have quite a collection of patterned paper, that I tend not to use very often, and it occurred to me that I could make quilt cards with it.   For the first couple of cards, I cut 1½” squares of paper and white card and then cut the paper in half diagonally to make HST. Each triangle was glued to a square and then the squares glued onto a piece of paper.   I used an invoice from my paper scrap bin as it wouldn’t be visible, it is purely a carrier. The next stage is to dry emboss the panel to give it the look o...

Simple Sailboats

Image
My card this week is a masculine make, created using the yacht from the Tonic Studios Craft Kit Box 61 – Message in a Bottle.   I needed a card quickly so used patterned papers I had lying around for decoration. First, I die-cut three yachts from navy card and also cut several from patterned papers. Using different bits of patterned papers, I snipped the pieces out and adhered them to the navy bases to create three different looking boats. I cut mat layers to fit a DL card base from navy card and another from a vaguely sea-themed patterned paper.   The yachts were attached to the panel using thin foam tape. For the sentiment, I die-cut the two banners from the same kit and looked through my stash for a sentiment small enough to fit on the banner.   I added a small enamel dot to finish the sentiment strip.

Glorious Gardens

Image
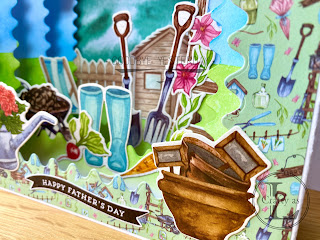
Today is Father’s Day in the UK so I’m sharing the cards I made for my Dad and Father-in-Law.   I was inspired by a floating die-cut card made by Jessica Rouke in Papercraft Essentials #225 and used the Potting Shed Luxury Paper Pad Kit to create gardening themed cards. To begin, I cut all my pieces for the cards and die-cut the inner pieces using Creative Crafts Products Rick-Rack Nesting Dies Hexagon & Squares.   You can make this card any size to suit the dies in your stash, just add 5” onto the width of whatever size card front you want and score at ½” and 2½” from each side.   Cut the inner layers a smidge under 1” wider than the card front size and score at ½” from each edge.   Cut another piece of card the size of the card front for the back piece. For the card fronts, I attached patterned paper using small dots of temporary adhesive and cut the aperture.   For all the following layers, I used the layer above to help line-up the die on the layer b...

Tartan Tabbies

Image
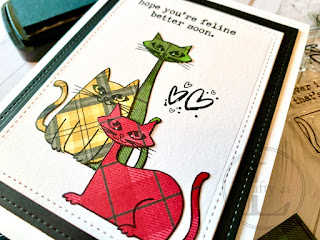
My card this week is a get-well card for my friend who’s had several eye operations, the latest of which was last week.  My friend likes cats and also moved to Scotland a few years ago, so that was my theme sorted. The set I used is That Lovin’ Feline by Visible Image. To begin with, I stamped three of the kitties onto tartan-style paper and fussy cut them. Next, I used the cut-outs to arrange the layout for the card.   Once in position, I placed the stamp on top, closed the lid of the Misti to pick up the stamp, removed the cats and then stamped the image.   This procedure was repeated for the other cats. Since I only needed the stamping for the whiskers and it didn’t matter that the cats would overlap each other, I didn’t bother with masking. The cats were paper-pieced and glued in place and I filled in any whiskers on the cats themselves with a fine liner.  The panel was layered onto black stitched rectangle and then glued to the card base.

Expanding Accordion Card

Image
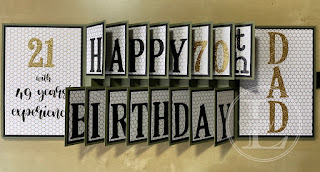
  As I mentioned earlier in the year, I have several ‘big’ birthdays this year, one of which was my father-in-law’s 70 th .  If you ask most card makers, the consensus will be that cards for blokes are difficult – I am no different!  My F-I-L is a very practical man and builds models (designed by him and printed on his 3D printer) so I figured he’d appreciate an interactive card.  I saw this video by Sam Calcott on YouTube and thought it’d be perfect for him. You can find the dimensions on Sam's website here . My card was to be a 5” x 7” so I trimmed 2 pieces of A4 card to 7” deep and scored them at 5” and then at ¾” intervals, trimming the last section off one panel.  These were then glued together using the small section as the glue tab. The number of folds can be adjusted depending on the number of spaces required for the sentiment, for example ‘CHRISTMAS’ would need an insert to give 9 mountain folds. Next, I cut my mats and layers for the flip...

A Card and A Cake

Image
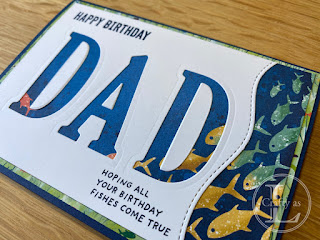
  As well as being a scorcher of a week in the UK this week, it has also been my Dad’s birthday.  It was sweltering in my craft room so I ended up making a quick fish-themed card, since fishing is one of my Dad’s hobbies. To begin, I die cut DAD using some large letter dies and cut the wavy, stitched edge to make the front shorter so that more of the patterned paper would show. For my card liner, I cut the same wavy edge and attached the offcut of patterned paper from the front of the card.  I found another offcut of the same paper so cut out the letters again to stick onto the envelope. The final steps were some simple sentiment-stamping and gluing the card onto the patterned paper and the counters (the cut-out bits) into the letter holes. I also made Dad a construction scene cake, inspired by one made by my friend Amanda, from Inspiring Inkin’.  (She also has an amazing chocolate buttercream recipe on the same blog post!)  Whilst I...

Gorgeous Gift Wallet

Image
  Giving money is thought, by some, to be lacking in thought.  However, I like it since it gives the recipient free reign to spend it wherever they want rather than being tied to a particular store with a gift card.  One of my colleagues managed to get married last year so the watch had a collection for him and his new wife.  Quite a substantial sum was collected and we didn’t want to present it in a tatty white envelope, so I was asked to make a presentation wallet. Making a presentation wallet (of any size) is fairly straight forward but needs a bit of planning out.  To begin, the finished size and depth is required to draw up a plan view.  This will help determine if your box can be cut from one sheet of card or not.  This is my plan for the box I made which was 3¾” x 5⅝” x ¼”.  Once the front, back and pocket sections are added, together with the top, base and sides (for the depth), the next thing is to work out where the tabs need to go i...