Posts

Showing posts with the label silhouette

Snowy Skies

Image
A couple of weeks ago, our cats were fascinated with watching the falling snow.   From inside, that was - they weren’t that keen on it when they went out!   That’s what inspired this week’s cards but I’ve also added a fox into the scene too. To begin, I taped down some watercolour card, wet it all over and then randomly daubed various shades of blue and grey paint onto the damp card.   Whilst the paint was still damp, I sprinkled a few grains of salt on each panel and set aside to dry naturally. It’s a bit hit and miss as to how it turns out as if the paper’s too dry, nothing will happen.   If it’s perfectly damp, lovely snowy effects will appear. If the paper’s too wet, the blooms will spread further so the snowy effect is lost. As I’d used watercolour paper, which is a bit textured, I used my MISTI so that I could repeat stamp the images to get good coverage.   I used Lavinia stamps - Mooch and one of the foxes from Set 1. To ground the animals, I li...

Christmas Magic

Image
More cards this week from the Tim Holtz/Sizzix vault release, this time using the Christmas Magic set of dies.   I do love a silhouette so I couldn’t wait to get playing with these. To begin, I started by die-cutting the buildings.   I cut them from black card and backed one with white card, slightly off-set, and another with white card which I’d left the windows in and coloured with a yellow marker. Next, I die-cut the sleighs.   Again, I cut these from black and also from silver glitter card which I offset behind the black die-cuts.   I then wondered what it would look like if I coloured it so cut it out of white card and coloured it with my markers.   I die-cut another sleigh from red card, added Wink of Stella and then decorated with a gold metallic marker.   After chopping off the runners, Santa and sack, the sleigh body was glued onto the coloured die-cut. I backed this one with black card. Last on the die-cutting schedule were the other bits in...

Follow The River

Image
It’s been all change at our house this week with the arrival of our 8-week-old Cocker Spaniel puppy, Delta.   She’s such a cuddle-monster and loves nothing more than going to sleep on your lap!   However, trying to get her to sleep in her bed is tricky as she’s such a nosey whatsit so I set her bed under my desk so she’s near me and she finally went to sleep.   As a result, my card making had to be quiet so no heat-embossing.   Argh!!   It’s good to have a little challenge now and again though. My plan was to use the Windswept stamp by Inkylicious which is a silhouette stamp so I needed to make a background.   Whilst it is technically summer, that cold wind has taken the edge off the summery feeling so I decided to create a sunset scene to warm me up!   To begin, I masked off the horizon and used yellow, orange and red Distress Oxides for the sky.   The sun was a negative mask, simply a hole punched out of a piece of paper.   For a bit more...

Daydreamer

Image
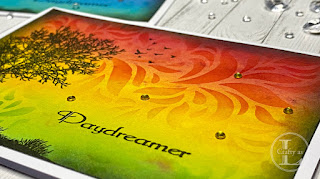
After another tidying mission in my new craft room, I rediscovered this stamp set, Daydreamer by Inkylicious, yet another that I bought a couple of years ago and have never used.   I had an inky background lying around which I thought would pair perfectly with it. These were one rainbow panel that I’d made using Distress Stain Sprays in Lumberjack Plaid, Mustard Seed, Twisted Citron, Broken China and Dusty Concord. Using my MISTI, I stamped the main image using Versafine Onyx Black ink. After stamping the sentiment, I stencilled ink around the panel, fading out to the stamped areas. To finish the cards, I blended black ink around the edges of the panel before attaching to a rectangular card base and embellishing with a few gemstones.

Easter Bunnies

Image
  Happy Easter!   I hope the Easter Bunny has been and delivered you lots of goodies.   My Easter cards this week were my take on the ‘inkbox’ technique, by Sarah Anderson, that I saw in the Lavinia For You Facebook group.   This involves using the lids of Distress ink pads as the starter frame for the stamping. For Easter colours, I chose to use Distress Oxides in Mustard Seed and Twisted Citron.   After dabbing the edges of the inkpad lid onto the inkpad, I stamped it onto watercolour paper.   Whilst the ink was still wet, I went around the inside of the square with a paintbrush and clean water, just catching the line to allow the ink to flow into the water. Next, using the Lavinia Featherleaf stencil and the same ink, I lightly applied ink through the stencil with a small brush, leaving the centre light. The next step was to stamp some small areas of text in the background before stamping the images.   For some stamps, I masked the bottom or s...

Missing Merlin

Image
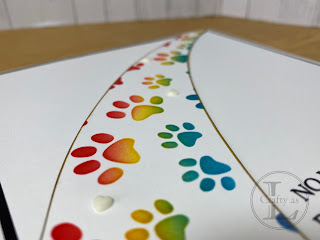
Making sympathy cards is invariably our least favourite task but they’re arguably the most appreciated of all the cards we send.   My card this week was made for my sister and brother-in-law who had to say goodbye to one of their cats last week.   This post is dedicated to the memory of Merlin. Merlin was such a lovely natured, friendly cat and loved nothing more that getting a lot of fuss - from anyone, he wasn’t picky!   His nickname was Merlie-Moos but was also affectionately known as the Fuss Sponge.   He was fortunate enough to live to almost 18 years old with very few ailments until about 18 months ago when he developed kidney troubles, a common problem in elderly cats. He had a great life in a loving home and will be dearly missed. For the card, I wanted the theme to be the rainbow bridge.   After drawing out a rainbow shape on scrap paper, I cut it out to create masks which were taped in place on a square panel.   I then used the Newton’s Nook ...