Posts

Showing posts from May, 2022

Shake My Tree

Image
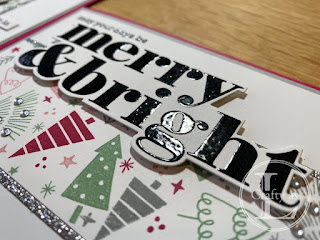
  This week's card is another entry into the Mission Christmas Card challenge to myself. The turnabout stamps from Concord & 9 th are a quick way to create your own patterned card.  I used the Tiny Trees turnabout for this panel.  It did start out as a square panel (just under 6” square) but I dropped the ink pad on it so it had to be trimmed down. After stamping the panel in Stampin’ Up! Blushing Bride, Mint Macaron, Smoky Slate and Pretty Peacock, I then die cut a Christmas tree shape from the panel for the shaker window. A piece of acetate was adhered behind the window before adding some foam dimensional strips, ensuring that the window was completely enclosed so the shaker elements can’t escape! Next, the backdrop for the shaker window.  Since the front panel is quite busy, I didn’t want too much pattern on the backdrop but didn’t want it to be plain either.   After stamping the sentiment for the front, I thought I’d try a repeat stamping of the senti

Three Amigos

Image
Our lovely Godson celebrated his first birthday recently so I looked through my stash to find something suitable for a 1 st birthday card.  The Three Amigos set by Mama Elephant caught my eye as I thought I could stack the critters to create a number 1.  Upon further consideration, I decided that it wouldn’t be obvious that the stack was number 1 so I created a one-shaped card in Design Space and cut it out on my Cricut Maker, together with a couple of layers. Next, I stamped the critters and coloured them with my Copic markers.  I stamped the sentiments and added a tiny heart from another stamp set. Using the matching dies, I cut out the critters.  Since the critters would stick out from the No.1 and the Copic markers bleed through the card, I cut additional die cuts from the card base to cover the back of the colouring. The animals didn’t reach the top of the card so I cut a little section of white card and stencilled clouds on it.  I die cut 2 lengths of ‘gr

Simple Bunnies

Image
These cards were another batch made for the Lavinia Birthday Club.  I had a few new purchases so wanted to have a play with them.  To begin, I masked off a section with sticky notes and added some pink ink using blending brushes. Next, I used the Leaf mask to add some pattern over and around the panel.   I stamped the bunny (well, I think it’s technically a hare...) in the corner and used a black fine liner to add some grass to ground the bunny.      Each panel was mounted onto black and coloured mat layers and the cards finished with a few Nuvo Drops. Quick, simple, pretty cards that would also work as Easter cards.      

Giraffe Shaker Card

Image
This card was for my friend who had recently painted a giraffe at her art class.  I’m not capable of drawing a giraffe but it was a good excuse to dig out a stamp set that I’ve not used for a while, Party Animal by W Plus 9.  To form the layers for the card, I die cut some stacking rectangles using Waffle Flower’s Lacy Layers Dies.  Since I wanted a shaker element to the card, I die cut the balloon using the dies that match the stamp set. The balloon was stamped on the background piece and I added a sentiment from one of the Anita Jeram sets.  I inked around the edge of the balloon to try to give some illusion of 3D form but once the sequins are in, this isn’t obvious so I’d probably skip this step next time. On the top layer, I stamped one of the giraffes and coloured him with Copic markers.  Using a fine liner, I added a few grassy patches and a string to the balloon tied to the giraffe’s tail. Rather than use foam strips to form the shaker window, I cut a w

Fa La La

Image
Continuing my mission to create a few Christmas cards each month, I’m back this week with another of Concord & 9 th ’s turnabout stamps, this time the Tiny Trees Turnabout.   The turnabout stamp is stamped 4 times, turning the card 90˚ after each stamp. Top row: 1. Blushing Bride, 2. Mint Macaron, Bottom row: 3. Smoky Slate and 4. Lovely Lipstick The pattern is quite busy so I decided to chop the panel into 3 strips and use the gigantic Big On Christmas sentiments to offset the ‘busy-ness’.  I stamped the sentiments with Versafine Clair Nocturne, heat set with clear embossing powder and cut them out with the matching steel dies. To add some bling, I cut two thin strips of silver glitter card to edge the panel.  The main sentiment is raised on foam squares. I performed some stamp surgery on the small stamp. It said "may your holidays be" but I wanted the words from the White Christmas song so I trimmed off the 'holi' section. The fringe tree ha