Posts

Showing posts from September, 2020

Festive Floating Window

Image
  I saw this card style on a YouTube video by Scrimpingmommy and thought it’d be fun to try.  As it transpired, I got completely carried away with it and made 4 bases ready for decorating!  I used Stampin’ Up! Perfectly Plaid, Stitched Stars and Brightly Gleaming for my decorative elements.  Although I've made Christmas cards, this style of card can be used for any occasion. My card bases are 5¾” x 8¼”, a little less than half a sheet of cardstock, and scored at 4⅛”.  For this card, the front needs to be cut into three so I cut mine equally at 1⅜”.  For the window section, I cut a piece of acetate 1¾” wide by a smidge under 5¾”.  I discarded the centre portion and applied thin adhesive tape to the top and bottom edges of the acetate. Next, I cut some layers from card and DSP to decorate the top and bottom panels of the card. The easiest way to line up the acetate panel is to clip the bottom section to the card base, line up the acetate with the edges of the card and overlappin

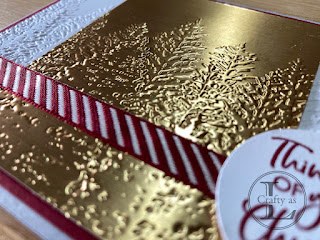
Glitzy Golden Forest

Image
This week’s star of the show is the Stampin’ Up! Evergreen Forest 3D embossing folder.  It’s super detailed and has so much dimension that it deserves to be the focal point of the card.  I paired it with the new Brushed Metallic cardstock for added glitz! To begin, I embossed a top layer of white card and a skinnier panel of metallic card.  I deliberately made my metallic panel longer so that I’d have some wiggle room when assembling the two together. As the embossing is so deep, it’s easy to ‘feel’ when the panels are aligned and the branches match.  Once aligned, I glued first the top half, holding the bottom in place, then lifted the bottom to adhere that.  I used lots of liquid glue to get into all the nooks and crannies of the trees.  Once dry, I trimmed off the excess metallic card. I wanted a pop of colour on the card so I applied a strip of adhesive tape across the panel to attach some coordinating ribbon. Lastly, I mounted the panel onto a Cherry Cobbler mat layer and t

Snowflake Shaker

Image
One of the dies in the So Many Snowflakes cuts out a stitched window, which is crying out to be made into a shaker card!  To make the scene through the window, I used the Snow Front stamp set. The first job was to cut out the window.  I eyeballed the position of the die to get it more or less in the centre. As my cutting plates are somewhat manky, the card was marked a little so I ran it through the Winter Snow embossing folder to disguise the marks.  Remember to stamp the sentiment before embossing! Next, I stamped my scene onto a smaller piece of card.  I drew around the die lightly to help with positioning my scene and erased the pencil marks afterwards.  Although the scene is navy in this picture, I changed my mind and did another in Basic Grey – to avoid any confusion in the later photos! To make the shaker element, I glued a piece of acetate onto the back of the window and then applied foam strips around the window.  It’s important that the strips meet up snuggly to preven

Misty Moonlit Trees

Image
  Welcome to September - it’s time to get started on Christmas projects!  This is my first Christmas card this year.  For best results, a stamp positioning tool is needed – this allows the trees on the two layers to be perfectly aligned. First, I cut a ‘moon’ layer of Whisper White and a Misty Moonlight layer ¼” shorter in height.  I positioned both pieces of card in my Stamparatus, added the trees from Stampin’ Up! Winter Woods and stamped on the blue layer, removed it and stamped the white layer.  The white layer was removed and I repeat stamped the trees on the blue layer to cover the front. Next, I masked the trees and sponged a little black ink to ‘ground’ my trees. I sponged a little white and silver ink too. The moon was made by punching a circle from the blue layer and to add some more wintry feel, I ran the blue section through the Winter Snow embossing folder to cover with snowflakes.  As I’d used the stamp positioner, my trees matched through the hole beautifully!  I wa