Posts

Showing posts with the label gingham

Baby Blue Bunnies

Image
Do you remember the bunny stencil I made for my Easter cards?  I wanted to challenge myself to use it again so when the need for a baby boy card arose, I thought that was the perfect opportunity to give it a try. My initial plan was for a landscape card so I cut my top layer and blended blue ink onto the stencil with my blending brushes before adding heat embossed tails. Next, after changing my mind to make the card a portrait orientation, I trimmed down the panel and layered the bunnies onto a blue mat and then a white panel, onto which I stamped the sentiment. I blended a single bunny onto the inner mat layer and onto the envelope, as I like these to match the card front. For the background, I used some gingham check DSP and added three rhinestones over the dots on the sentiment.       

Baby Bear

Image
  I loved making this week’s card for our friend that had her first baby recently.  I don’t have a lot of use for stamps aimed at making children’s cards but I bought the Baby Bear set as you’re never too old for a teddy bear!  This is a retired stamp set but I’ve kept mine as I really like that bear and how he comes to life with the three layers of ink.  I’ve also got a couple of handy tips on repeat stamping and extending the use of dies. This was a bigger card than usual as I wanted it to be a square Z-fold card.  I fancied a gingham style background but didn’t have anything in my stash that was pink so used the Buffalo Check background stamp and some Rococo Rose ink.  The stamp was a little small for my background so I used the Stamparatus to do some repeat stamping.  I first stamped the check background and marked an arrow on my grid paper where the edge of the stamp came to.  Next, I moved the card so that the left-hand edge of the stamped ...

Fun Fold: Double Easel Step Card

Image
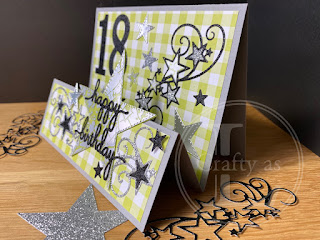
  My card this week is one I made for my God-daughter’s sister, Charlotte, who celebrated her 18 th birthday last week.  I picked these colours as they are similar to those she chose for her bedroom, so I’m guessing she likes them! The card is another ‘fun fold’ called a double easel.  It is built from a standard card base with an extra half sized piece fixed on the front.  First, I glued the extension piece on place and then attached my various decorative paper panels. Next, I die cut a bunch of decorative elements from the Stampin’ Up! Stitched Stars set.  I wasn’t exactly sure what I was going to use but I like to use this process to create.  I also die cut a ‘happy birthday’ sentiment and number 18. I stamped the piece to write on, which was going on the back, and the envelope with one of the star images from the So Many Stars set. Here’s the finished card. The great thing about this style of card is the added dimension given by the front fold....

Paper Piecing & Tea Together

Image
  This is a technique I was introduced to at the Stampin’ Up! team training last month. It uses outline stamps that you would usually colour in but patterned paper is used instead.  It requires some fussy cutting but the finished look is really quite effective. The demonstration used the Beautiful You stamp set which looked great but I don’t have that so I used the Tea Together set as it was the only suitable set I have that would work with the technique.  I also used some blue Gingham Gala DSP and a Balmy Blue card base. First, I stamped the cup image and then stamped it again on a Post-it Note to create a mask and fussy cut around the right-hand side of the image.  This is because I wanted to create some perspective by stamping the teapot so that it looks like it’s placed behind the cup. Sorry! This pic is a bit blurred  Once this was done, I stamped both images onto the gingham paper. I decided which parts of the images I wanted to have the g...

Could this ‘bee’ spring?

Image
  What a lovely few days of glorious weather we’ve enjoyed this week.  18°C in February is unseasonably warm but the sunshine was a welcome change from the gloomy grey cloud that’s been around for most of the winter.  The lovely weather inspired us to get outside and do some gardening and I ended up doing quite a lot of weeding.  Whilst this is a tedious occupation, I do like that you can see what you’ve achieved at the end! It was whilst I was on my hands and knees in the middle of the border that I saw my first bee of the year.  I love bees and find it fascinating watching them buzzing around collecting pollen.  It was a white-tailed bumble bee which flew past me to explore the camelia bush and it inspired my crafting this week. I used the bees from the Stampin’ Up! Dragonfly Dreams and Detailed Dragonfly thinlits. For my first cards, I die cut a couple of banners and stamped the bee and coloured it in using the Wink of Stella brush and so...