Posts

Showing posts with the label bokeh

Glittery Snow Front

Image
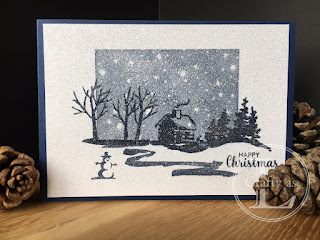
Glitter and Christmas are synonymous with each other, well, in my book anyway. What better way to ‘glitter-ify’ a card than to completely cover it with the sparkly stuff?!  Read on for how to bling up your card with some super festive sparkle. The Snow Front stamp set is the Christmassy cousin of Waterfront, also with the same water-colour styling.  For my sky, I used the starry background stamp from the Bokeh Dots set. I was excited when I first received the Bokeh Dots set as I love the bokeh effect.  However, when I went to use the background stamps, the results were just rubbish; no definition, too much ink, bare patches etc.  I was so disappointed ☹  So, I put them back on the shelf and moved onto something else.  A google search revealed that what I had encountered was a common problem.  Juicy ink pads are not your friend with these stamps.  Apparently, the trick is to apply the ink using a roller of some kind.  Heeding this advice, I...

Beautiful Bokeh Backgrounds

Image
  In case you’re unfamiliar with the term ‘bokeh’, it’s a photographic term for an aesthetically pleasing blur you get when the background is out of focus.  Bokeh is from the Japanese word ‘boke’ meaning ‘blur’ or ‘haze’ and as far as I can ascertain, it is pronounced “bo-kay”.  However, I may be wrong but, irrespective of how you pronounce it, it’s a fun technique to try out. To begin, choose 3 complimentary ink colours and, using sponge daubers or sponge pieces, smoosh ink onto cardstock in random places gradually blending the colours together at the edges.  Leave to dry. Next, you’ll need to make a bokeh stencil.  Cut a selection of circle sizes out of a sheet of acetate or glossy card.  You will need a pigment ink for the circles so that they show up on the coloured background. Using a clean sponge dauber, apply the white ink in circles, moving the holes around the background and overlapping other circles in places.  Leave to dry. The last p...