Posts

Showing posts with the label aeroplane

Things With Wings

Image
"Things With Wings" was the theme for the Visible Image August ATC swap and, with my background in aviation, my mind immediately went to planes.   Visible Image don’t have any actual aircraft stamps however, they do have paper aeroplanes.   Bingo!   This is my matching card I made to go with the ATC. For the background, I stamped the map from Scripted Streets in grey and added images from Destination unknown around the edge in black. Using my favourite Grungy Union Jack stencil, I stencilled red and blue Distress Inks through, rotating the stencil randomly.   I spritzed a little water on and blotted to distress the inks. I stamped a few of the paper planes in different sizes and fussy cut them. I’m not a huge fan of fussy cutting but these are very easy to cut out, having all straight lines. The planes were attached to the panel using thin foam tape for dimension.   I backed the panel with a square of black to give a thin border all round and then moun...

Flyby Greetings

Image
Working in the aviation industry, I do like to have a few plane-themed stamps and dies and I splashed out on the Flyby Greetings from Spellbinders after seeing a couple of great cards on Instagram. There’s a lot of die-cutting to begin with and some of the bits are quite fiddly! Once you start assembling though, they come together quickly. There are two sizes of clouds in the set which can easily be used for a background.   I supplemented the clouds with a little ink blending using my homemade cloud stencil. For a little dimension, I adhered thin foam tape behind the aircraft and the banner. To finish the card, I added a few white highlights, some enamel dots and matted and layered the panel using the same colour card I’d used for the die-cutting. This one was made with the opposite colour scheme.    

Plane Love You

Image
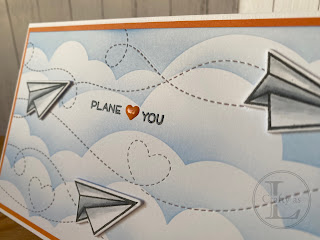
It was recently Mr L’s birthday and his main present was a voucher for an aerobatics flying experience – yes, there are people who want to do that kind of thing for fun!   Obviously, a voucher itself isn’t that thrilling so I like to make a presentation folder.   For this one, I opted to combine it with the card. Since it was a flying voucher, I wanted the theme to be the same for the card but with paper aeroplanes!   I used the Lawn Fawn Plane and Simple stamp set and matching dies to stamp and die-cut the aeroplanes.   They were shaded with Copic markers. For the background, I blended a little ink over my homemade cloud stencil - a mylar sheet cut on my Cricut. Next, to add texture to the background, I used the Lawn Fawn Stitched Trails dies. I stamped and clear heat embossed the sentiment and added an enamel heart before affixing the planes on foam tape and mounting the panel on an orange mat layer. The card/voucher holder was a whole A4 sheet cut to 2...

Word Art

Image
Pictures made up of words are all the rage now and I’m a huge fan.  I hope one day to be able to produce such things with my own calligraphy but for now, I’m happy to use my Cricut to create these works (or words!) of art.  I posted my latest project in the Cricut Facebook group and had a lot of comments asking how I did it, which prompted this blog post.  Apparently, there is a website or app you can use to arrange your words but personally, I think that takes all the fun and creativity out of the project. First, I drew in a heart the size of my intended project in Cricut Design Space.  I then listed words that I wanted to include in the piece.  Then it was simply a job of changing the fonts, sizes and alignments and fitting the words into the heart shape.  Where there were gaps too big to leave blank but too small for words, I added little images like hearts, stars, paw prints, cats and aeroplanes.  Once I was happy with the layout, I then changed t...