Posts

Showing posts from March, 2019

Fabulous Frosted Florals

Image
This Sunday in the UK is Mothering Sunday or Mother’s Day, so my cards this week are the ones I made for my Mum and Mum-in-law.  I’ve had the Frosted Florals set together with the matching Frosted Bouquet framelits but hadn’t got around to playing with them so I made them the star turn for this card.  I also used the Jar of Love set and matching Everyday Jars framelits.    Whilst this is a Mother's Day card, it could easily be adapted for birthday, anniversary, thank you or get well card - indeed anything for which you'd send a bunch of flowers!  I made a birthday card earlier in the year using Lovely Lipstick, Smoky Slate and Mint Macaron and I really like these colours together so I used that colour palette here too. Firstly, I stamped the card liner and the envelope with same designs.  I really like the thistle/teasel image (that was my reason for buying this set actually!) so that was my main focus.  I made it dual coloured by using sponge daubers to apply the ink. Next,

A Couple of Kitty Cards

Image
  I love cats so when the Nine Lives stamp set appeared in the spring/summer catalogue, I had to have it. I like that you can use just the outline kitty or stamp different fur pattern effects on top.  There’s a coordinating punch too which has been out for a while that saves some fussy cutting! At a recent Stampin’ Up! team event, I watched a demonstration on mirror stamping.  This technique does what it says on the tin in that it allows you to create a mirror image of the stamp.  It works best using line images rather than solid ones and needs a Stamparatus or other stamp positioning tool and a silicone mat. I thought the outline cat stamp would be suitable for this technique so to begin with, I mounted the stamp in the Stamparatus and stamped the image onto the silicone mat. Carefully place the card face down onto the mat and close the Stamparatus plate to use the stamp to transfer the ink from the silicone mat onto the card using firm pressure over the image.  Next turn the ca

Paper Piecing & Tea Together

Image
  This is a technique I was introduced to at the Stampin’ Up! team training last month. It uses outline stamps that you would usually colour in but patterned paper is used instead.  It requires some fussy cutting but the finished look is really quite effective. The demonstration used the Beautiful You stamp set which looked great but I don’t have that so I used the Tea Together set as it was the only suitable set I have that would work with the technique.  I also used some blue Gingham Gala DSP and a Balmy Blue card base. First, I stamped the cup image and then stamped it again on a Post-it Note to create a mask and fussy cut around the right-hand side of the image.  This is because I wanted to create some perspective by stamping the teapot so that it looks like it’s placed behind the cup. Sorry! This pic is a bit blurred  Once this was done, I stamped both images onto the gingham paper. I decided which parts of the images I wanted to have the gingham pattern and fuss

Cat Heart Card

Image
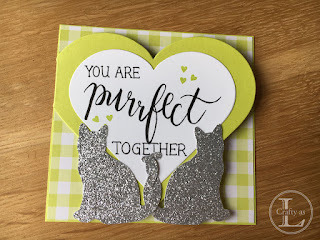
  The idea for this card came to me whilst trying to think of a quick project to make an anniversary card for Mr L.  It had to be quick as we were going on holiday for our anniversary and I had to make it in the hour before the taxi picked us up and I hadn’t even finished packing! Panic crafting at it’s best!! It uses the partial die cutting technique to get the opening heart shape and would be perfect for anniversary, valentine and wedding cards.  I also wanted to have a go at hand lettering for the sentiment to fill the heart spaces.     Since the card for Mr L was made in somewhat of a rush, it opens the wrong way (!) and the front heart overhangs the edge.  I had thought that was an error but when I made the MkII version, I realised it was due to the card stock not being wide enough so the second version is only single fold rather than bifold. I used a heart die but circle dies would also work. The partial die cut is made by placing the die in position on the car

Could this ‘bee’ spring?

Image
  What a lovely few days of glorious weather we’ve enjoyed this week.  18°C in February is unseasonably warm but the sunshine was a welcome change from the gloomy grey cloud that’s been around for most of the winter.  The lovely weather inspired us to get outside and do some gardening and I ended up doing quite a lot of weeding.  Whilst this is a tedious occupation, I do like that you can see what you’ve achieved at the end! It was whilst I was on my hands and knees in the middle of the border that I saw my first bee of the year.  I love bees and find it fascinating watching them buzzing around collecting pollen.  It was a white-tailed bumble bee which flew past me to explore the camelia bush and it inspired my crafting this week. I used the bees from the Stampin’ Up! Dragonfly Dreams and Detailed Dragonfly thinlits. For my first cards, I die cut a couple of banners and stamped the bee and coloured it in using the Wink of Stella brush and some Gold Glimmer Paint.  The