Posts

Showing posts from February, 2024

Multi-Coloured Mayhem

Image
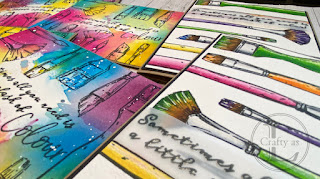
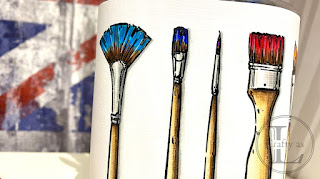
  My Colorado Craft Company Color My World stamp set was still out on my desk from the post a couple of weeks ago so I thought I’d have another play with it.   First, I decided to actually paint the brushes so I stamped onto hot-press watercolour paper and got busy with my watercolours.   To finish the cards, I heat-embossed the sentiment on vellum and wrapped it around the panel, affixed the panel to black card and then onto a kraft card blank. For the next cards, I was inspired by a tag that I made for a Facebook group challenge, the theme of which was “something you want to do more of in 2024” and mine was painting. Again, using hot-press watercolour paper, I stamped the brushes and the sentiment, although I found another stamp with the English spelling of ‘colour’ and used that instead. Next, rather than painting, I used ink-smooshing to add some colour to each panel.   On my craft mat, I smooshed several Distress Inks and sprayed water over.   I chose Distress Inks rathe

Lilies With Love

Image
Welcome to my latest Visible Image DT post.   This week, I’m using the brand-new, gorgeous Lilies With Love stamp set which also has  coordinating dies for the lilies. Since I was going to use the ‘Sending Love’ sentiment, I opted for a heart-shaped card.   White embossing powder on black card is very dramatic but also shows any stray powder so I liberally applied my Embossing Buddy before stamping with Versamark ink.   I applied Wow! Opaque white embossing powder and heat set it.   I also stamped the flowers too, ready for die-cutting later.   As I was going to colour with pencils, I coloured the flowers and leaves first with the white pencil from my Faber-Castell Polychromos set. Next, I selected 3 or 4 shades of coloured pencils for the leaves and flowers. I started with the darkest colours and worked my way to the lightest, finishing with a little white on the edges. After die-cutting the two largest flowers, I realised that there was quite a lot of embossed powder show

Golden Daffodils

Image
  This week, the little mini daffodils started to flower in our garden.   I love their cheerful blooms and they give you hope that spring will be on the way soon.   We do have the standard sized daffs too but our garden is very windy and the big ones often get a bit battered.  These daffodils inspired today’s card that I made for my mother-in-law’s birthday. I wasn’t sure where I was going with this but I wanted to start by creating a stained-glass effect.   I stamped and gold heat-embossed the main daffodil image from Visible Image’s Golden Daffodil stamp set onto vellum. On the reverse side, I coloured the blooms and leaves using alcohol markers.   They didn’t show up very much so I went over them again using Sharpie pens, which you can get to blend a little on vellum.   The colours were much more vibrant. To decorate the background, which was the square card blank, I lightly stencilled Distress Oxide Twisted Citron through the Leafy stencil. My original plan was to cut a ho

Rainbow Resist

Image
This week’s creations are the card and ATC that I made for the Visible Image ATC Swap group over on Facebook.   The theme for January 2024 was “Your Favourite Previous VI ATC Swap Theme” so I chose “Rainbow Joy” as I wanted to do some emboss-resist that I’ve not done for a while. I last did this almost 4 years ago and tried out pastel and bright colours.   The technique works so much better when using bright colours.   For my rainbow colours, I used Distress Oxides and blending brushes.   I set these aside to completely dry. The next step is to stamp and add clear embossing powder.   I used the Visible Image Bee Happy stamp set which is great for cards and ATCs as there’s such a variety of sizes of bee!    The final job was to blend black ink all over the embossed panels.   The embossed areas resist the black ink although there was some residue to be wiped away.   I wiped off the excess with kitchen towel and then buffed with a soft cloth to get into the little nooks and crannie

Black Ice

Image
The recent spate of freezing weather reminded me of the Black Ice technique so I thought I’d share this with you for this week’s DT post.  I’ve even made a quick YouTube video that you can find here .   The Black Ice technique was 'invented' by Melissa Kerman, who has lots of great YouTube videos about it.  It’s a simple technique, with only 3 steps, and minimal supplies.   When I last made Black Ice cards, I used silver foil card so I thought I’d try out coloured foil card this time. Not all foil card is created equal - have a quick test on a scrap of foil card to check that the foil isn’t going to curl up when you get your heat gun on it.   I used Craft Perfect foil by Tonic Studios and it worked fine.     The ink pad must be suitable for use on a non-porous surface so I usually use Stazon.   I know that some people don’t like to use Stazon with photopolymer stamps so I did make one card using Ranger Archival Ink in Jet Black instead, which also worked.   For Step 1, I appl

Paintbrush Pot

Image
Spurred on by the results of my creative cans upcycling project a couple of weeks ago, I thought I’d do a similar thing for my paintbrush pot, which started out life housing pork scratchings!   It was a first outing for the stamp set, Colorado Craft Company’s Color My World from their Big & Bold range, which was part of my COTY2022 prize.   I was inspired by this fantastic card by My Love For Paper, who also has a great video demonstrating her colouring. My colouring skills are not a patch on hers and I doubted that I could make the brushes look that realistic so I went for black stamped and clear heat-embossed lines rather than the no-line look on her card.   The panel is 14cm x 36 cm, long enough to wrap around my pot. To begin, I coloured the handles and ferrules using alcohol markers.   I realise the irony of colouring paintbrushes with markers and pencils but I didn’t have any watercolour paper that was long enough. Next, to add more definition, I went back over the