Posts

Showing posts with the label bunnies

Easter Baskets

Image
Having left my Easter makes until the last minute (i.e. yesterday!), I needed something quick to make.   After watching a few YouTube videos on this style of baskets, I realised that they would be quick to create and could be made in any size, subject to the available size of card to begin with. Start with a square of card, it can be in either cm or inches, it doesn’t matter.   Divide the measurement into 3 and score at 1/3 and 2/3 along one edge.   Next, turn the card 90˚, divide the measurement into 4, score at ¼ and ¾ and just make a little mark at the halfway point at the top and bottom.   Score from the mark to the intersection of the two score lines.   Here’s a template. This is what the card should look like when it’s scored.   Since I wanted to make my basket from a single sheet of A4 card, I began with a 21cm square, so scored at 7cm and 14 cm along the first edge, rotated the card, then scored at 5.25cm and 15.75cm, marking at 10.5cm. The b...

Love Bunnies

Image
  Today’s card is a simple anniversary card made using one of the bunny stamps from Colorado Craft Company’s Lots of Love set by Anita Jeram.    To begin, I stamped then image using MFT Hybrid ink onto Make-It colour blending cardstock , which was recommended to me for Copic colouring.   After colouring the bunnies, they were cut out using the matching dies.   I stamped the sentiment in Versafine Clair Nocturn and heat set clear embossing powder on top.   I didn’t want to create a scene behind these so used the stripes and dots stamps and grey ink to create the background, adding a few rhinestones amongst the dots.   The liner had the same lines and dots, together with the other bunnies from the set.   Lastly, I die-cut 3 more each of the bunny and sentiment shapes and stacked them before adhering to the card.

Simple Bunnies

Image
These cards were another batch made for the Lavinia Birthday Club.  I had a few new purchases so wanted to have a play with them.  To begin, I masked off a section with sticky notes and added some pink ink using blending brushes. Next, I used the Leaf mask to add some pattern over and around the panel.   I stamped the bunny (well, I think it’s technically a hare...) in the corner and used a black fine liner to add some grass to ground the bunny.      Each panel was mounted onto black and coloured mat layers and the cards finished with a few Nuvo Drops. Quick, simple, pretty cards that would also work as Easter cards.      

Easter Bunnies

Image
  For my Easter cards this year, I used the Anita Jeram Happy Easter stamp set, by Colorado Craft Company and Bunny Friends by Penny Black.  Those bunnies are so cute! First, after stamping with waterproof ink, I completed the pictures with some watercolour painting. The card bases are from a pad of pre-scored patterned card.  The polka dots make a fun background for the images. The watercolour finish was quite muted and I wanted to see how differently they’d look coloured with more intense colours.  I stamped with MFT hybrid ink and also stamped the same image onto some masking paper.  After applying the masking paper, I blended some green ink onto the ground area and used a cloud stencil and blue ink for the sky.  I then removed the masking paper and coloured with my Copic markers. To extend the scene, I sketched in some silver birch trees on the sides.  You can see the difference in the intensity of colours between the water...

Moonlit Anniversary

Image
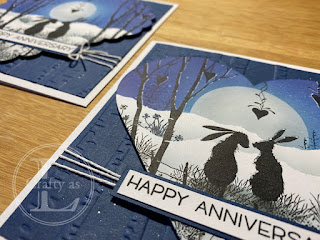
I have quite a few anniversary cards to make during the first 3 months of the year.  These 2 were made for my parents and some close friends – neither of which know each other so it didn’t matter that they were similar.  I used a variety of stamps by Lavinia Stamps and Inkylicious. To start, I die cut 2 hearts, one scalloped and one plain edged, and some masks from sticky notes.  I added a moon mask and then blended some Distress Oxide inks to the sky, then removed the moon mask and added some grey to the moon. After stamping some distant trees, I moved the masks down and blended a little ink to create the landscape and added some more stamping.  The bunnies were added and then the scene built up around them using various trees, shrubs and a fence. For the background, I used the Stampin’ Up! Woodland embossing folder and a square of navy card and a few Posca splats. The sentiment was stamped and mounted onto a navy rectangle. To assemble the card, I added some fun f...

Blended Bunnies

Image
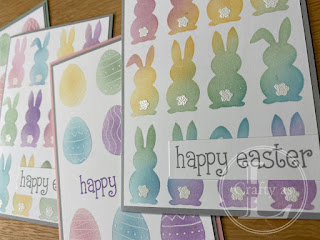
We don’t usually send many Easter cards but with the mad year we’ve had and not being able to see people in person for so long, it seemed a good way to let people know we’re thinking of them.  Since I don’t have a lot of use for Easter cards, I only have one stamp set and that has been sent to everyone already so I needed some fresh material! Hello Cricut! I found a free SVG file from Craft House, cut out some bunnies and tails and created this card. Whilst weeding the vinyl and seeing the outline of the bunnies, it occurred to me that I could make a stencil of the bunnies.  So, I created multiple bunnies in Design Space, arranged and sized them for my card and cut out two stencils from acetate – one for the bunnies and one for the tails! Using my new blending brushes, I added pastel colours to the bunnies through the stencil. Once the bunnies were complete, I added the tails using white pigment ink.  Unfortunately, this didn’t show up as much as I th...