Posts

Showing posts with the label punches

Pet Sympathy Card

Image
Bereavement cards are always difficult to make, knowing that the person you’re making the card for has lost someone dear to them.  Our friends recently lost their beloved dog, Dooley, so I wanted to send a card to let them know that we were thinking of them.  The inspiration for this card was from a Pinterest post for a cat version. It’s quite a simple card starting with a heart die-cut from black glitter paper and then cut out the dog using Stampin’ Up! Dog Builder punch.  Using the same punch, I cut a heart from some red glitter card. The sentiment is from a set by Waffle Flower called Rainbow Bridge.  I like to stamp the sentiment on black ink and then add clear embossing powder on top. A black mat is the final step to frame the top layer.        

A Whaley Good Birthday

Image
I really like the Whale of a Time DSP from Stampin’ Up! It makes it very simple to create a stunning background for cards. However, to avoid it looking like I’d just stuck a bit of paper on my card, I cut my DSP into panels and matted them.   Using the coordinating punch, I cut out a whale and glued it onto a whale cut from navy card to give more stability.   I heat embossed my sentiments in silver and also added the bubbles on the centre panel above where the whale would be.     The inside sentiment is from the Whale Done stamp set together with the shoal of fish, which I also stamped on the envelope.   The final job was to assemble the various elements.  The panels were glued onto the card base and I added foam behind the whale and the sentiments for some dimension.        

Fancy Fold Pop-Up Card

Image
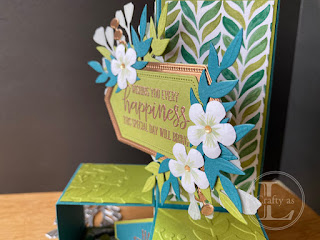
Triple cube pop-up cards are all over Pinterest at the moment but what struck me was why the top section isn’t taller.  I guess that would make the back section not a cube.  Or maybe two cubes? Who knows?! Anyway, this is my version - a tower cube pop-up card.  Despite the lengthy instructions, this card is quite simple but it is a bit time consuming. Stage 1: Making the base card To begin I cut out my bases, mats and DSP layers.  Mats are optional but if not using, cut the DSP in the mat sizes instead. Base: 6” x 8¼” scored at 2”, 4”, 6” and 8” and two pieces 2” x 8¼” scored at 2”, 4”, 6” and 8” (I trimmed the corners of the ¼” flaps to make assembling neater) Mats: eight 1¾” x 1¾”, two 1¾” x 3¾” and two 1¾” x 5¾” DSP: six 1½” x 1½” pieces, two 1½” x 3½” pieces and two 1½” x 5½” pieces. The fold lines on the bases were reinforced.  After gluing the layers together, I adhered them to the appropriate sections on the bases before assemblin...

Circle Christmas Tree

Image
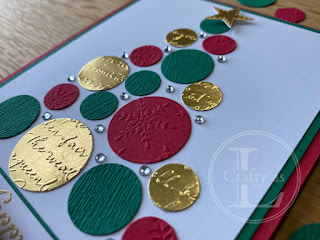
  The idea for this card came from seeing one of those Christmas tree ornaments made from baubles.  It got me thinking how I could make one using circles.  Here’s the result!  I think this would be a fun card to make with children. I began by drawing a triangular tree shape on my card top layer.  I used a tree stamp but any rough triangular shape will do.  Then, after dry embossing a selection of card in Shaded Spruce, Real Red and gold foil, I punched circles of various sizes.  If you wanted to use die cut circles, you’d have to cut first then emboss. The circles were roughly arranged in the tree shape.  To help me remember the placement for gluing, I took a quick shot of the layout and then removed the circles to erase the triangle. I glued all the circles in place, stamped and heat embossed my greeting, mounting it on a layer of Shaded Spruce and a length of Real Red ribbon.  To finish, I added a die cut star to the top on foam tape a...

Festive Floating Window

Image
  I saw this card style on a YouTube video by Scrimpingmommy and thought it’d be fun to try.  As it transpired, I got completely carried away with it and made 4 bases ready for decorating!  I used Stampin’ Up! Perfectly Plaid, Stitched Stars and Brightly Gleaming for my decorative elements.  Although I've made Christmas cards, this style of card can be used for any occasion. My card bases are 5¾” x 8¼”, a little less than half a sheet of cardstock, and scored at 4⅛”.  For this card, the front needs to be cut into three so I cut mine equally at 1⅜”.  For the window section, I cut a piece of acetate 1¾” wide by a smidge under 5¾”.  I discarded the centre portion and applied thin adhesive tape to the top and bottom edges of the acetate. Next, I cut some layers from card and DSP to decorate the top and bottom panels of the card. The easiest way to line up the acetate panel is to clip the bottom section to the card base, line up the acetate with the ed...

Misty Moonlit Trees

Image
  Welcome to September - it’s time to get started on Christmas projects!  This is my first Christmas card this year.  For best results, a stamp positioning tool is needed – this allows the trees on the two layers to be perfectly aligned. First, I cut a ‘moon’ layer of Whisper White and a Misty Moonlight layer ¼” shorter in height.  I positioned both pieces of card in my Stamparatus, added the trees from Stampin’ Up! Winter Woods and stamped on the blue layer, removed it and stamped the white layer.  The white layer was removed and I repeat stamped the trees on the blue layer to cover the front. Next, I masked the trees and sponged a little black ink to ‘ground’ my trees. I sponged a little white and silver ink too. The moon was made by punching a circle from the blue layer and to add some more wintry feel, I ran the blue section through the Winter Snow embossing folder to cover with snowflakes.  As I’d used the stamp positioner, my trees matched throug...

In The Spotlight

Image
  Sometimes you don’t need the whole picture presented to you, just snippets in spotlights.  That was my inspiration for my card this week anyway.  I like the Stampin’ Up! Field of Flowers for silhouette images but I’m not keen on the coloured version so I thought I’d play around with it to see how I could use the coloured stamps on a card using the spotlight technique. I began by stamping the leaves in Mint Macaron and the flowers in Rococo Rose, Highland Heather and So Saffron together with a few dragonflies in Smoky Slate.  Then I used various punches to cut circles to make my spotlights. Next, I made my background by stamping the sentiment and ink blending a few circles using my sponge daubers and my homemade circle mask. For the liner and envelope, I punched a circle from a post-it note and stamped the images into the hole so that the image would have a circular shape to mirror the spotlights on the fronts. Lastly, I assembled the card, gluing some spotli...

Playful Pets

Image
W e share our home with two rescue cats, one is very playful, the other is quite lazy.  Monty likes to sit in a shady spot and watch the world go by, occasionally coming over for a quick head rub.  Leia, on the other hand, goes everywhere at break-neck speed and is a prolific hunter.  During one of her recent outings, she came back with her eye closed and we could see what looked like a thick hair protruding from her eye but couldn’t get it out, so off we went to the out-of-hours emergency vet.  Now, Leia does not travel well! During the 25-minute journey in her crate, she had a wee, a poo, was sick and then had copious amounts of drool hanging down each side of her face.   We presented her, in the socially distanced handover in the vet’s car park, with a description of the emergency and an embarrassed apology for the state of the cat/crate!  I’m sure they’ve seen it all before…. Anyway, 45 mins later, a rather quiet Leia was given back to us together...