Posts

Showing posts from November, 2022

Nordic Noël

Image
My cards this week feature products from Gummiapan and are cased from tags I saw on their Pinterest feed, which prompted my purchase in the first place.   They are a Swedish company but, very helpfully, if you scroll to the bottom of the page, you can view the website in English. To start, I die cut two Snowflake Circles and stamped them with the Worn-out Calendar December stamp and grey ink.   I didn’t want the stamp to go on the ‘arms’ of the snowflake so I used the negative of the die-cut as a mask when inking the stamp. I mounted these onto grey stitched circle die-cuts. For one, I die-cut the small and big Nordic Reindeer and shaded them using brown and gold inks and brushes.   I used a tiny make-up brush to add the gold onto the antlers and tail.   Blending ink onto the die-cuts can get really messy so I find it easier to position the cuts into the negative spaces whilst inking. For the second card, I used the Jumping Gnome dies and blended red ink onto the clothing, coloured

Fluttering Friends

Image
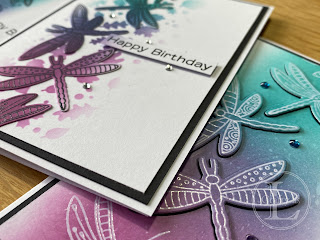
I’m not usually one for batch making cards.   I’m not against it, I just find it a bit dull.   What I do like is partial batch making.   That is creating the base card but then finishing them off to create different cards.   The stamps I’m using this week are the dragonflies from Fluttering Friends by My Favorite Things. A stamping platform is really useful when batch making cards.   I positioned the 3 dragonflies and the sentiment in my Misti and stamped with Versafine Clair Nocturne and added clear embossing powder and heat set.   The heat embossing isn’t necessary but I like the shiny look. Next, I repositioned 2 of the dragonflies and repeated the stamping and heat embossing. Now, for my favourite part – ink blending!   I used Distress Oxides in Seedless Preserves and Peacock Feathers and blended over the dragonflies.   The lavender colour in the middle is the overlap of the two colours.   I then spattered a little water to distress the ink.   The card was finished by mountin

Magnificent Magnolias

Image
  As you know, I’m a big fan of layering stencils.   This week’s card features Pinkfresh Studios Magnolias suite, which has a stamp set, layering stencils and die set which will result in a collection of elements to layer and create a dimensional card.  To begin, I stamped in Versamark and heat embossed using gold and silver powder.   Next, I shaded the leaves using blending brushes and just one green ink pad.   The detailed layer was done using the same ink pad and creates some depth. The flowers were next and I used a variety of colours, largely sticking to the natural colours of magnolias.   For the white ones, I just added a little grey for the shaping and shadows. The matching die is one unit and cuts out all the elements in one go.   Very handy!    This gave me 12 sets of magnolias for using on my next few projects. For this card, I wanted a circular card base.   I used to fold the card and partial die-cut, leaving a bit uncut at the top for the hinge.   However, I’ve no