Posts

Showing posts from January, 2023

‘Twas the Night

Image
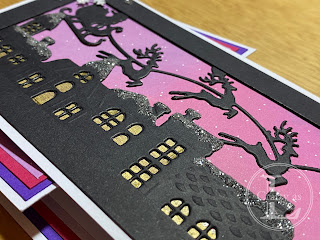
My Christmas card mission last year, which was to make some cards for my last blog post each month, was very successful and resulted in much less stress and panic-crafting in December.   I really enjoyed the variety of cards I had to choose from and actually got them written and sent by early December, which was doubly handy since the Royal Mail were often on strike.    My opening post for this year’s mission uses the Crafter’s Companion ‘Twas the Night Before Christmas die, which was free with Simply Cards and Papercraft 233 on 28 th July 2022. To begin, I die cut the scene using my precision plate before using the embossing mat to get the details on the roof tops. In an attempt to use my huge stash of patterned paper, I selected a non-traditional pinky-purple background paper for the sky.   I marked the top of the windows in pencil before colouring the window areas with a gold marker pen. Some snow was added to the sky using a Posca pen and glitter for snow on the roof tops.  

Foiled!

Image
This week’s card has no stamping at all but is foiled.   I used the Spellbinder’s Glimmer Hot Foil System and Birthday Candle Background hot foil plate. To start, I cut the panel for my card and hot foiled the candles using a rainbow foil.   I’m still learning the foiling system and, despite chanting the layering order, I still sometimes put the foil the wrong way up, hence my rainbow candles!   Fortunately, this does no harm to the foil plates, it just wastes your foil. I then foiled more candles and the sentiment, which is Spellbinder Be Bold Glimmer Sentiments.   The candle plate comes with 2 dies so I die-cut a few candles together with the sentiment.  As you can see, I've foiled the sentiment plate too - doh! To add dimension to the card, I popped-up the die-cut candles and sentiment on foam tape.   The panel was matted onto black card before attaching to a top-folding card base. Quite simple but I love that rainbow foil!        

Missing Merlin

Image
Making sympathy cards is invariably our least favourite task but they’re arguably the most appreciated of all the cards we send.   My card this week was made for my sister and brother-in-law who had to say goodbye to one of their cats last week.   This post is dedicated to the memory of Merlin. Merlin was such a lovely natured, friendly cat and loved nothing more that getting a lot of fuss - from anyone, he wasn’t picky!   His nickname was Merlie-Moos but was also affectionately known as the Fuss Sponge.   He was fortunate enough to live to almost 18 years old with very few ailments until about 18 months ago when he developed kidney troubles, a common problem in elderly cats. He had a great life in a loving home and will be dearly missed. For the card, I wanted the theme to be the rainbow bridge.   After drawing out a rainbow shape on scrap paper, I cut it out to create masks which were taped in place on a square panel.   I then used the Newton’s Nook Paw Prints stencil, red, yell

Bee Happy

Image
My cards this week were inspired by a card I received from Sue in our Facebook Birthdays group.   I just loved the giant bee and found the stamp set, following a quick bit of googling!   It’s called  Bee Happy by Visible Image and I also got the  Honeycomb Hex stencil to go with it. This post contains affiliate links and I may earn a small commission if you purchase via the links, at no additional cost to you.  Thank you :-) First, I stamped and coloured the bees using a tiny blending brush and ink pad.   The wings were made sparkly with Stickles Stardust - I squirted a small amount onto my craft mat and painted the glitter glue onto the wings. These were to be slimline cards so I cut the panels and blended Distress Oxide Mustard Seed ink onto the card then added more through the stencil.   I also stamped the smaller background elements using grey and orange inks using second-generation stamping. The big bees were fussy cut and smaller bees and the sentiment were stamped onto