Posts

Showing posts with the label roses

Rennie Roses

Image
  There was another outing for the Altenew Rennie Roses stamp this week.   Whilst looking for Rennie Mackintosh roses on Pinterest, I saw lots of art deco glass panels and wanted to recreate that look on a card. Since I couldn’t decide what colour to use, I heat-embossed the roses on two panels, one in silver and the other in gold. Next, using a Versamark pen, I drew in the characteristic sets of parallel straight lines and boxes. Again, these were heat-embossed in the appropriate colour powder.   My pen was running out so I dipped the nib into some embossing ink.   Unfortunately, I was a bit heavy handed with it and some seeped under the ruler which is why the silver one is a bit blotchy. To colour the roses, I wanted a bit of sparkle, so I used some Distress Mica stain and a fine paintbrush to colour the roses. For the green parts, I used watered down re-inker.  I looked through my stash to find a sentiment that would fit in the gap and heat-embossed...

A Bunch of Roses

Image
This week’s post stars some Altenew goodies that I bought a while ago but hadn’t got around to playing with.   I’ve got the die version, called Rolled Roses, but I really liked the look of these Charles Rennie-Mackintosh style roses and I loved the fact that they also came with stencils for easy colouring and coordinating dies. As I planned on batch making a few of these cards, I set up the stamps in my Misti and stamped each image twice, rotating 180˚.   The stencils come with both the positives and negatives so I used these as masks when stamping the overlapping roses. I stamped and clear heat-embossed 6 panels plus some of the smaller roses that I could die-cut later. The stencils made the colouring super-easy! After stamping the sentiment, I used the Wavy Grid stencil and a very light blending of black ink to lightly stencil the pattern.   The tiny roses were die-cut and fixed in place with foam tape. To add a more organic feel to the panels, I put them in...

Kiss From A Rose

Image
My cards this week started by the need to make an anniversary card for my parents.   They’ve been married for 55 years and although sadly, dementia has robbed my Mum of this knowledge, it’s still nice for Dad to get a card and some choccies.   I’d made these sheets of card as part of a 100-day Instagram challenge and the first week’s prompt was to use sprays.   I realised that I didn’t have many, just some Nuvo shimmer sprays so I sprayed a couple of sheets of white card with those.  I die-cut a heart from my yellow and gold creation and dry embossed it with Altenew Garden Roase 3D embossing folder.   I then used a piece of sponge and dragged gold ink over the high spots to add a little highlight.   Using a larger sized heart die, I cut two to make the card base and gold-heat embossed the sentiment.   I love the finish of this – it reminds me of meringue on top of a Baked Alaska! Next, I cut a bunch of white and black panels and embossed all of the...

Garden Roses

Image
My cards this week were inspired by this tutorial by Ishani S and her ideas for this embossing folder.  I received the Altenew Garden Roses embossing folder in the Craft Your Life Project Kit as part of my Cardmaker of the Year 2022 prize from Practical Publishing and Craftworld.  This is my first play with the kit and I'm loving this folder and the double embossing technique! To begin, I dry embossed a white and a navy panel before moving on to the double embossing.  The dimension from this folder is amazing!   One of the cards was to be for my Mum-in-law so I asked Mr L which he preferred and he chose the inked one.   On the white panel, I used small blending brushes and Altenew Mixed Media pigment inks in Frosty Pink and Coral Berry to add some colour to the roses and Distress inks to the leaves - I can't remember which ones though! The panel was matted onto pink and green layers and mounted onto a 7" square card base.  I spattered the card wi...

Rolled Roses

Image
My cards this week use Altenew Rolled Roses dies and are a two for one: the roses I die cut for the first card gave me left overs that I used to create a second. To begin, I adhered a sheet of adhesive to the back of some cream, red and green card before die-cutting several of the roses and leaves.  I wanted to use the outside frame of the cream and inlay with the coloured cards. After infilling the roses, I realised that I could use the coloured frames to create another card.  I used coloured roses and leaves to be the focus images but added cream frames to fill the gaps. For the inside, I used an offcut and stamped the envelope with a cute little Anita Jeram stamp I got free from Seven Hills Crafts with a recent purchase. To finish, I heat embossed some gold dots on the panel.  The sentiment was also heat embossed in gold and mounted on a piece of gold card. The second card was finished with some gold coloured rhinestones and a senti...

Quaint Quilling

Image
Have you heard of quilling? It’s been around for hundreds of years and used to be the pastime of genteel ladies during the Georgian and Victorian times and was also practised by nuns and monks to decorate religious artefacts.  Modern papers and adhesives have changed the work produced but the techniques are based on old ideas. My book showed some Charles Rennie Mackintosh style roses and they looked to be the easiest of the Closed Loose Coils, since they started with a fold rather than rolling.  I glued a strip of pale and dark pink together at the end and started the folding. Once I’d got to the end, I released the tension and then glued the other ends in place to secure the rose shape.  I made several of these and some with darker pink strips.  The leaves were made using a different technique called Wheatear Coils.  As I haven’t done this before, I experimented with trying to make the leaves in different ways.  The flowers didn’t seem to sit ...

Flower Shadow Box

Image
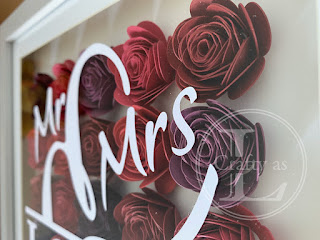
  At the end of last month, my in-laws celebrated their 40 th wedding anniversary.   I had seen these box frame projects on Pinterest and wanted to make one in reds and purples since traditionally 40 years is a ruby anniversary. To begin, I downloaded a flower file and cut it out on my Cricut.   It was a bit large to fit under the glass but a good practice.   I then cut out 25 flower templates in a mix of red, pink and purple card.  Using my bone folder, I gently curved the first 3 petals and then, using my tweezers, started rolling up the petals.   Once rolled, I released the tension slightly until the flower was the right size and then glued the base on with my hot glue gun.    The next stage was to cover the back of the shadow box with white card and then glue the flowers in place. I used the Cricut’s Design Space to make my vinyl decal, which I stuck onto the front of the glass, and then assembled the box frame.