Posts

Showing posts from April, 2023

Frosty Friends

Image
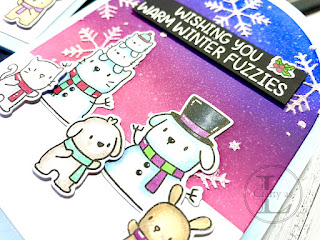
The last post of the month continues my Christmas card mission.   This month, I’m using a Mama Elephant set called Snow Friends that I’ve had for years but never gotten around to using.   For a change, I used some Spellbinders Essential Arches dies for a fancy shaped card. For a non-traditional look, I started by masking the snowy ground and ink-blending a dramatic sky using Distress Oxides in Picked Raspberry, Seedless Preserves, Villainous Potion and Blueprint Sketch.   After blending, I spritzed with a little water to give the faux bleached effect. For some added texture, I then used Ranger grit paste and a Lawn Fawn snowflake stencil, adding some glitter to the paste after removing the stencil but whilst the paste was still wet. The translucent panel was made with stencil paste rather than the grit paste with glitter added. I acually did this panel first but since the stencil paste was runnier, it seeped under the stencil a little and didn;t give as clear results so I swit

Midweek Make: Safari Creations

Image
My MWM to day features a card I made for Creative Stamping Issue 121.  The stamp set with this isse is HUGE and the cheetah pattern embossing folder is right up my street.   I've not got a written tutorial for you this time (that's in the magazine!) but I do have a YouTube tutorial to share with you showing how I made this funky zebra card.  I hope you enjoy it!   This cheetah card is one of my all-time favourute makes!  It features double embossing, copic colouring, stamping, heat embossing and fussy cutting.   It's a full-on workout! I really enjoyed making this collection of cards. Pop off down the shops now to get your copy of the magazine or order online here .

In The Cat House

Image
Yes, I know it's usually the dog house but these cards feature cats instead!   The set I used is Spellbinders 3D Vignette Pet House and it has both a dog and cat that can go in the house.   My cards were ‘Thank You’ cards for my sister and Dad for looking after our moggies whilst we had a lovely short trip to Rome. To start with, there’s a lot of die-cutting to make the 3D version.   I like to do this all in one go at the beginning, then start on the assembly. To colour my cats, I put the die-cut back into the negative space and use small blending brushes to add the colour.   Our old boy, Monty, is a long-haired tabby and Leia is a tortoiseshell, so I blended a mix of brown, black and orange for her. The finished house is lovely! So intricate but also sturdy. Plus, it folds completely flat to fit in a standard envelope.   This card features our youngest two cats, both tabbies but one has vertical stripes and the other horizontal.   They’re a bit dim and can’t work out t

Midweek Make: Flip Folds

Image
I was sent these dies, together with the star version, for a commission last year for Die-Cutting Essentials magazine. They are really useful for creating quick, interactive cards. You can make your own inky or stamped card for the mats or for an even quicker make, use patterned paper. When folded, they fit nicely in a 5” x 7” envelope but you do need a wide platform die-cutting machine as the largest die is 7” square. This card was for one of the veterans from Project 71 who was celebrating his 99 th birthday.   His sight is very poor now so I thought a card with some movement might be appreciated.   I also chose bold colours and a metallic card for the lettering as that might catch the light. To begin, I cut the card base from red card and the mats from a very old, long retired Stampin’ Up! Paper.   These were simply glued in place on the card base. The flip around section needs decorating on both sides and the back side of it is actually the front when the card is closed.