Posts

Showing posts with the label colored pencils

Another Mice Wedding

Image
  The Colorado Craft Company Happily Ever After features a scene and critters created by Anita Jeram and is a lovely set but can’t really be used for anything else but weddings.   I bought it last year, as I was going to 2 weddings, so it was good to be able to use it again for this commission. To begin, I stamped the scene and the wedding couple and coloured with Copic markers and coloured pencils.   The bride and groom were die-cut, together with a small gift.  The main requirement I’d been asked to include was the bride and groom’s names.   I used My Favourite Things Stitched Alphabet Banner dies to cut out their names.   There isn’t an ampersand so I used a tiny heart die for between the names. I like the main scene in this set but when it’s all coloured in, I feel that the bride and groom get a bit lost so I played around to see if I could make that more of a background by creating a frame around it.   I don’t have any large frames that are ...

Mother's Day Moggies

Image
Happy Mother’s Day!  My cards this week are the ones I made for my Mum and Mum-in-law using the Colorado Craft Company For Mom stamp set, another one by Anita Jeram. Firstly, I stamped the main image and coloured it with my Faber Castell Polychromos pencils.  I tried to add some variety of shade but didn’t bother to blend the colours. My plan was to blend the pencil colour using Zest-it Pencil Blend and some paper stumps.  It’s my first time using this and it worked well.  It’s an oily texture and I poured some onto a sponge I’d put in a small jar so I could dab the stumps onto the sponge.  This was a tip I got from a Sandy Allnock video.  For the background, I repeat stamped one of the smaller stamps from the set with Versamark and heat set with clear embossing powder.  I also added this stamp to the envelope and liner of the card. To finish the card, the panel and sentiment were mounted on a stitched panel before being adhered to the background and ...

Another Anniversary

Image
A few weeks ago, Mr L and I celebrated our wedding anniversary at home, unusually for us.  We normally like to go away somewhere sunny for our anniversary but obviously that’s not been an option this year.  We often go to Thailand as we love the food as well as the weather so we celebrated with a Thai takeaway.  It was delicious although not quite the same as eating with your feet in the sand and the sound of waves lapping at the shore.  Oh well, maybe next year. For my card for Mr L, I used my Cricut.  There was a project in Design Space of a heart shaped jigsaw so I cut out a bunch of these in black and white, together with some purple as this was our wedding colour. I wasn’t quite sure what I was going to do so I cut out plenty so I could play around with them. After adhering the black frame, I decided to stack the jigsaw pieces but dry embossed the top layer to add some interest without it getting to busy. The lettering was from black vin...

Poignant Poppy

Image
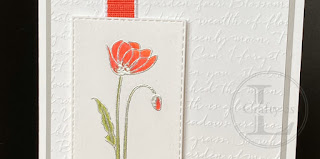
  Poppies are synonymous with remembrance so are a perfect image for a card, the very reason of which is to let someone know you’re thinking of them.  Whilst I made this a condolence card for my Mum to give to her friend who had lost her husband, it is also suitable for a birthday or thank you card. To begin, I cut two stitched rectangles and stamped, then embossed in silver, the single poppy image and the sentiment.  The image was then coloured with pencils. Whilst I had the stamp out, I partially stamped the image again using Smoky Slate on the envelope and liner.  I usually stamp these in the bottom right corner but because of the direction of the flower, I thought the left-hand side suited it better. The Scripty folder provided the dry embossing and then I stuck a length of Tear ‘n’ Tape on to adhere my ribbon.  I always get ribbon wonky so I used the grid paper to help line it up. After sticking on my ribbon, I glued the embossed layer to a Smoky Sla...