Posts

Showing posts with the label ribbon

Golden Daffodils

Image
  This week, the little mini daffodils started to flower in our garden.   I love their cheerful blooms and they give you hope that spring will be on the way soon.   We do have the standard sized daffs too but our garden is very windy and the big ones often get a bit battered.  These daffodils inspired today’s card that I made for my mother-in-law’s birthday. I wasn’t sure where I was going with this but I wanted to start by creating a stained-glass effect.   I stamped and gold heat-embossed the main daffodil image from Visible Image’s Golden Daffodil stamp set onto vellum. On the reverse side, I coloured the blooms and leaves using alcohol markers.   They didn’t show up very much so I went over them again using Sharpie pens, which you can get to blend a little on vellum.   The colours were much more vibrant. To decorate the background, which was the square card blank, I lightly stencilled Distress Oxide Twisted Citron through the Leafy stencil. ...
Thoughtful Blooms

Image
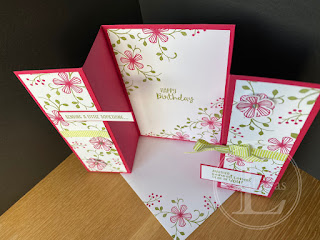
The weather here in the south of the UK has been particularly dismal for the past few weeks.  The eternally grey and rainy skies have really been getting me down so to cheer myself up, I thought I’d make a bright, happy, flowery card.  My stamp set of choice was the freebie from Sale-A-Bration called Thoughtful Blooms and the matching punch. I decided to do a gate-fold design so cut my card base from Lovely Lipstick and some Whisper White panels to decorate the front sections and inside.  The flowers and foliage were stamped using Lovely Lipstick and Old Olive inks. These panels were stuck onto the card base after attaching a strip of ribbon for some added texture and interest. The single flowers were cut out with the punch.  To give them extra dimension, I used my ball tool and the foam mat from my Stamparatus to curve the flowers. I added a medium sized rhinestone in the centre of the flowers and glued them on top of some of the flowers on the front of the ...

Sip Sip Hooray!

Image
  This week, Mr L and I have discovered how to make homemade nut butters.  It’s remarkably simple requiring nuts, salt, a food processor and about 10 minutes of your time.  Mr L eats peanut butter like it’s going out of fashion.  I’m an avid label checker when shopping and nut butters often have a lot of other stuff added to them and the ones that don’t have a layer of oil at the top that is almost impossible to stir in.  The solution? To make our own in small batches that get used before the separation occurs.  I began by making cashew and sunflower seed butter which then spurred on Mr L to make some peanut butter.  He even managed to not eat it all straight out of the blender and put some in a jar for later! I’m not a huge fan of nut butters as they are but I like to use them as a base for sauces and dips.  I found this great  recipe for homemade nut butter granola.  This is currently our favourite breakfast! Arm progress is still...

Peacock Two Ways!

Image
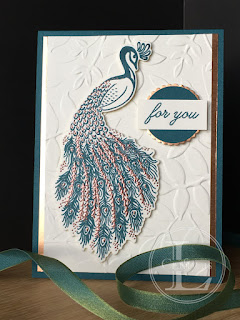
  One of the new releases that caught my eye in the new Annual catalogue was the Royal Peacock bundle.  I really like the two-stage stamp for the peacock, although just the base stamp looks great on its own too.  Previously Sizzix used to make dies for Stampin’ Up! but the detailed peacock dies are made by a new company and I have to say I’m impressed.  Usually detailed dies like these are a complete pain when trying to get the card out of the die and I usually add a layer of wax paper to help with the release. No such problem with these dies.  They cut cleanly with a single pass through the Big Shot and the cut shape literally fell out of the die! My first card this week features the stamped peacock and an embossed background.  I began by stamping the peacock with Pretty Peacock ink and then stamped the second layer  with Versamark and applied copper embossing powder. The background uses the Layered Leaves embossing folder (retired) which I edged w...

Cool Yule Christmas Tags

Image
I never make enough tags for our Christmas gifts and usually end up frantically cutting out bits of card at the last minute!  To avoid the problem this year, I decided I would start making tags in batches.  I saw a YouTube demonstration of this technique and thought it ideal since you make 10 tags at a time and it allows you to use up a load of scrap pieces. For this project I used: A4 sheet of thick card for the tag backs Scraps of white card for the houses SU! Hometown Greetings Edgelits SU! Balmy Blue ink SU! Pacific Point ink Shimmer ink in Frost White ‘Merry Christmas’ greeting from SU! Half Full stamp set SU! Scalloped tag topper punch 2.5m ribbon In pencil, mark the half way mark on the short sides of the A4 card.  This is a rough guide for your blending as you want the central portion to stay white.  Sponge Balmy Blue ink into the card using circular motions, building up the colour from the long edges and fading toward the centre.  I added ...