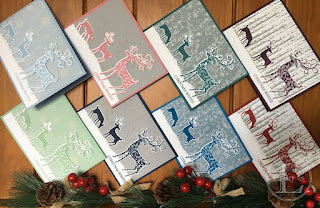
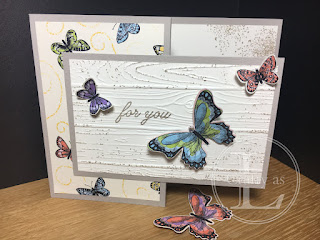
Posts

Showing posts from August, 2019

Ice, Ice Baby

Image
I was first introduced to the Black Ice technique at Team Training back in January this year.  One of the other demos, Stella, did a demonstration of this and I thought it looked quite intriguing.  I made a note of it, thinking I’d try it out soon and then promptly forgot all about it! Sadly, Stella passed away earlier this month but thinking of her reminded me that I hadn’t given the technique a go.  I didn’t know Stella well but first met her a few years ago at a card making class and subsequently met her a few times at demonstrator events.  She was always very friendly, so full of life and had a great sense of humour.  She will be missed and I dedicate this post to her. The technique was ‘invented’ by an American demonstrator called Melissa Kerman.  She has lots of great videos on YouTube, not only on this technique but lots of other cool ideas too.  Anyhow, here’s my first crafting journey onto Black Ice! First of all, shiny card is needed for this technique: foi

Dearly Dashing Deer

Image
  Yes, I know it’s only August and your eyes are not deceiving you – this is a Christmas card! If you’re making all of your own cards for the festive season, it’s better to get started early rather than be frantically crafting in the middle of December to meet the Post Office’s last posting dates.  Ask me how I know this! The Dashing Deer stamp set and matching Detailed Deer Thinlits are the perfect set for creating quick but stunning cards.  I really enjoyed getting busy with the glitter again too!! The original The first step was to stamp each of the deer using Night of Navy ink and cut them out with the matching dies. I made a ‘snowbank’ by ripping a strip of Whisper White card and then ran a thin line of glue along the torn edge and applied glitter.  I stamped the greeting in navy on the bottom of the snowbank. Next I embossed a piece of Smoky Slate using the Woodland embossing folder.  I glued right-hand half the snowbank to the background. I wanted the soli

Gift Card Holder

Image
Gift cards are a marvellous invention!  They’re easy to post/transport and recipient gets to buy exactly what they want.  Win, win!  What they are not is very inspirational to look at.  A lovely handmade gift card holder solves this problem.  The beauty about these is that the theme can be changed to suit any occasion so are great for birthdays, Christmas, thank you, congratulations etc., the list goes on.   Here’s how it’s done. You will need: 4⅛” x 10½” card base, scored at 2¼” and 5” 3⅞” x 5¼” card liner 3⅞” x 2½” patterned paper/DSP/card 4¼” x 2¾” mat layer (same colour as card base) 4” x 2½” card front At the end of the card base with the extra score line, mark the centre of the short edge of the card base and use a punch to cut out a semi-circle. Apply Tear ‘n’ Tape along the top and bottom edges of the section with the punch out, just to the first score line.  Remove the backing from the tape pieces, fold down and press the edges well.  This makes the pocket for the gif

Rainbow Butterfly Beauty

Image
      The Stampin’ Up! Butterfly Beauty die set has everything you need to cut out lots of butterflies.  I particularly like the two large dies that can be used individually or layered on top of each other. I started by cutting out the two layers in Whisper White and Lovely Lipstick and stuck them together.    To add further dimension and interest, I added Dimensionals on the back… …and then mounted the whole thing on a Smoky Slate layer embossed with the Layered Leaves (retired) embossing folder and then onto a Basic Grey cardbase. After making this card, I wondered how it would work making an inlaid butterfly, like I did previously with the retired (sniff!) dragonfly from the Detailed Dragonfly die set.  As you’ve probably realised about me by now, I like a bit of ink blending so I inked up a panel in a rainbow palette.  Top tip for these dies: stick some double sided craft adhesive sheet on the back of your card before die cutting - it saves faffing about tryin