Posts

Showing posts with the label fox

Your Name In Lights!
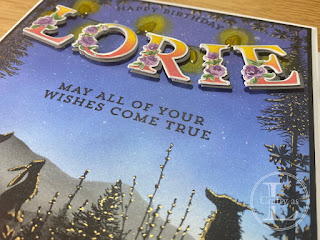
Image
  I had these Pinkfresh Studio hot-foiled letters left over from a previous project and I just happened to have to correct ones to spell out my friend’s name – very handy!   I coloured them using the matching stencils and then die-cut.     I also hot-foiled a happy birthday sentiment, although I ended up not using that.   I’d had an idea to try, some ink-lifting to make some fairy lights on an inked background. To begin, I inked up a background with Distress Oxides and spritzed with some water to create the stars.   I then stamped the Lavinia Fairy Fir Tree twice, to hang the string of lights on.      The lights bulbs are from WPlus9’s Festive Greeting stamp set and were stamped in Versafine Clair Nocturn ink, which is waterproof.   I then used a paintbrush and some water to lift the ink from the bulbs and around them.   I blended a little yellow ink into the lifted areas.   The scene was completed with a selection of ani...

Draw A Blank

Image
  Do you ever feel intimidated by the blank sheet in front of you?  Apparently, it’s quite a common to sit down with a white sheet of card in front of you and for your mind to go blank. I purchased a gel press plate to make backgrounds in the hope that they would provide some inspiration that would spark an idea. These cards were for ladies in the Lavinia Birthdays group so they feature Lavinia Stamps.  I began with these two panels to create two cards.  I wanted them each to have a moon and I hadn’t left space in the printing so had to create one. For the purple panel, I brushed on white pigment ink through a circular stencil, adding a little silver and some white gel pen. Using a landscape stencil, I added some distant hills and near ground and also blended some ink to darken the sky and make the moon more prominent. After seeing a lovely card with a bokeh sky, I thought I’d give it a go using a few different colours.  I don’t think it wor...

Diamond Pop-Up Card

Image
  This week’s card is a fancy fold that I happened across on Sam Calcott’s YouTube channel and was intrigued to try it out so used it for a 60 th birthday card I needed to make. To begin, I made a template so I’ve got a guide if I want to make any of these in the future.  I make templates for all of my fancy fold cards.  The dimensions on this are so that it can be made from a UK sized A4 sheet of card.  It can also be made using any size square card blanks, just mark the mid points on the long sides and one end. The whole mechanism is simply made by folding in the appropriate directions (mountain or valley) and gluing the top triangle down onto the base piece. To decorate the triangle base pieces, I stamped and heat embossed in silver the dandelions stamp from Lavinia Stamps on Stampin’ Up! Blackberry Bliss card and layered with a white mat. Next job was to make the topper panel.  I used a hill mask and blended ink to form the landscape, da...

Double Gatefold Christmas Scene

Image
  The background for this was made during one of my experiments with my gel press.  I rolled distress oxide inks onto the press before printing the snowflakes from Colorado Craft Company Slimline Nordic Snowflakes on top and then taking a print.  I cut this piece into panels for a gatefold card and stuck them to my grid paper with some temporary adhesive whilst I stamped my scene. To begin, I stamped the pine cones onto the card and onto the sticky part of a Post-it note.  I fussy cut the pinecones and stuck them onto the card so that the branches would sit behind when I stamped them.   Next, after inking in some hills, I used a selection of stamps from Lavinia Stamps to create the scene of the animals looking at the beautiful tree, which is actually a feather!    The feather tree was decorated with a tiny star stamp and heat embossed with silver powder.   Some fairy charm stamps were added to decorate the overhanging bran...

Pressed Backgrounds

Image
    As I’ve mentioned previously, I’ve been suffering from a loss of mojo recently.  This is due to being ill and I am now awaiting surgery.  Now that I’ve got my head around what’s wrong and how it’s going to be fixed, I actually feel like creating something again.  I’ve read that making backgrounds can prompt some creative inspiration so I got out my gel press and got inky! The gel press is new to me so I’m still learning what to do with it.  I began by applying some Oxide ink onto the gel plate with my brayer and then splattered on some Brusho (mixed with water).  After this, it’s simply a case of laying the card onto the press and rubbing over it to transfer the ink and paint.  Before printing, patterns can be added by using stencils, stamping onto the plate or even pressing a leaf from the garden onto the plate.  Every press is a surprise – you never know what you’re going to get! I cut the pieces down to 9cm x 20cm ...