Posts

Showing posts with the label avery elle

Glorious Gardens

Image
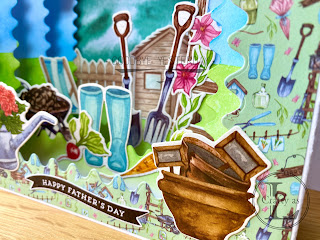
Today is Father’s Day in the UK so I’m sharing the cards I made for my Dad and Father-in-Law.   I was inspired by a floating die-cut card made by Jessica Rouke in Papercraft Essentials #225 and used the Potting Shed Luxury Paper Pad Kit to create gardening themed cards. To begin, I cut all my pieces for the cards and die-cut the inner pieces using Creative Crafts Products Rick-Rack Nesting Dies Hexagon & Squares.   You can make this card any size to suit the dies in your stash, just add 5” onto the width of whatever size card front you want and score at ½” and 2½” from each side.   Cut the inner layers a smidge under 1” wider than the card front size and score at ½” from each edge.   Cut another piece of card the size of the card front for the back piece. For the card fronts, I attached patterned paper using small dots of temporary adhesive and cut the aperture.   For all the following layers, I used the layer above to help line-up the die on the layer b...

Stunning Stencils

Image
  I’ve fallen in love with stencils over the past year and layering stencils are my absolute favourites.   The set I used for this week’s card is no exception.   It starts off looking rather insipid but then suddenly comes to life!   It’s fabulous for single layered cards too as it creates such depth. The stencils in question are Golden Days by Altenew.   It’s a set of 4 stencils but the 4 th one also has the flower centre so it’s 5 layers really.   Having been lucky enough to receive a fair number of magazine commissions since being one of the winners of Cardmaker Of The Year 2022, I’ve had scant time to play with any of the goodies that I won so I took the opportunity to use the ink pads from Altenew’s generous prize.   These blend together wonderfully!   The stencils create quite a large flower so I only used part of it – a look which I prefer anyway.   Here’s stencil no.1 with Frosty Pink.   Stencil no.2 using Coral Berry....

Here's To You Dad!

Image
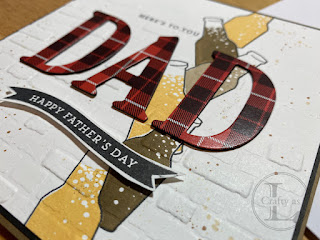
It’s Father’s Day here in the UK so my projects this week are the cards I made for my Dad and my Father-in-Law.  Continuing my efforts to use some older sets I’ve had for years, I pulled out The Man by Avery Elle.  I have previously only used one sentiment from this set so it was time to get creative! My plan was to emboss the front panel but I wanted a little decoration on it.  I stamped the empty bottles onto the sticky part of a sticky note and cut them out on the stamped outline to use as a mask.  I then stamped a series of bottles in a roughly vertical line.   After stamping the bottle outlines, I then used the infill stamp and Stampin’ Up! So Saffron, Sahara Sand and Soft Suede inks to fill the bottles with beer. I partially stamped the HERE’S TO YOU DAD in black ink. I’m really liking the stacked sentiment look at the moment so I die-cut 3 layers to place under each letter.  The top layer was some tartan style paper. The fro...

Easter Bunnies

Image
  For my Easter cards this year, I used the Anita Jeram Happy Easter stamp set, by Colorado Craft Company and Bunny Friends by Penny Black.  Those bunnies are so cute! First, after stamping with waterproof ink, I completed the pictures with some watercolour painting. The card bases are from a pad of pre-scored patterned card.  The polka dots make a fun background for the images. The watercolour finish was quite muted and I wanted to see how differently they’d look coloured with more intense colours.  I stamped with MFT hybrid ink and also stamped the same image onto some masking paper.  After applying the masking paper, I blended some green ink onto the ground area and used a cloud stencil and blue ink for the sky.  I then removed the masking paper and coloured with my Copic markers. To extend the scene, I sketched in some silver birch trees on the sides.  You can see the difference in the intensity of colours between the water...

Fond Farewell

Image
These days, when you buy a voucher for someone, particularly if it’s purchased online, you get an emailed voucher for you to print out.  Giving someone a sheet of paper for a gift is not very inspiring!  So, when my friend and colleague, Stu, retired recently, I was asked to create a presentation folder for said sheet of paper.  Inspired by the London skyline pop-up card I made my friend a few weeks ago, I decided to try an air traffic pop-up card.  I made it airfield themed, even though we are Area Controllers, as an Area Control building is not quite as interesting or recognisable as a control tower! First, for the front of the card, I repeat stamped and heat embossed the bi-plane and clouds from Avery Elle’s ‘Fly By’ stamp set and stacked several die-cut ‘congrats’.  I popped one of the bi-planes up on foam tape. To begin the inside, I cut out a control tower, some random airport buildings, a city skyline, some fighter aircraft, smoke trails, an ...

A Trio of Textures

Image
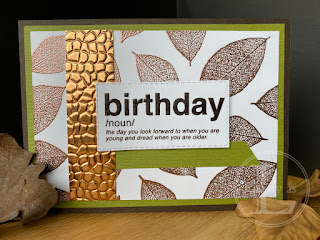
My challenge to myself this week was to make a masculine card.  I used the skeleton leaves from Stampin’ Up! Rooted In Nature for my background design but didn’t fancy the trees as the focal image.  Instead I opted to make the sentiment the focal image and add interest with texture with heat and dry embossing. First, I random stamped the skeleton leaves with Versamark, added copper whisperembossing powder and heat set.  Texture 1 complete! The second texture was created by using copper glimmer paper and the hammered metal 3D embossing folder.  The third was Old Olive paper and the Subtle embossing folder. Many of the Stampin’ Up! sentiments are quite scripty and not necessarily what I would use for a bloke’s card; I prefer thick brush script or block lettering.  Instead, I used an Avery Elle set which always makes me smile.  I stamped with Early Espresso ink and then applied clear embossing powder over the top to give some extra oomph since it was the...