Posts

Showing posts with the label vinyl

Retirement Fly Past

Image
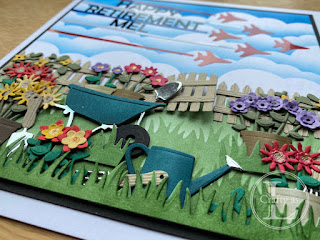
This week’s card is another commission I received from a friend for a retirement card.  The intended recipient had been involved in organising air shows but also loves gardening, so that was my brief. To begin, I started with the air show element.  The background was made by blending some Distress Oxide Salty Ocean over my cloud stencils to create the sky.  The fly past, made with red jets to represent the Red Arrows display team, smoke trails and sentiment were cut from vinyl using my Cricut Maker. Now for the gardening element.  I cut a cardboard stencil using the Lawn Fawn Grassy Border die and blended some green ink over in layers to create the ground. Next, I die cut a fence using the WPlus9 Fence Border dies, running the parts through a wood grain embossing folder for some added texture.  I left the gate section unstuck so it looked like the gate was ajar. The plants and tools were die cut using the MFT Spring Garden set....

Wow! Wedding Card

Image
This week’s card is a commission I received from my sister for a wedding card.   The only request was that it was personalised.   I’d been wondering how the 3D frame (Flower Shadow Box from 14 June 2020) I made for my in-laws’ 40 th wedding anniversary could be remodelled into a card, so that’s where I started. In Design Space, I rejigged the design to add a heart frame and changed the name and date.   I cut out a base layer from card and a vinyl layer for the lettering.    After gluing a piece of acetate on the back, I used the negative space cut out to position and adhere the lettering onto the acetate.   The plain white looked a little dull so I added a stencilled pattern.   The stencil wasn’t big enough to cover the whole panel so I did in in two halves, taping the edge of the stencil to avoid inadvertently inking vertical lines along the edge of the stencil.    I then repeated this for the other half for the front. Next, I added th...

Cricutting Christmas

Image
Have you made all your Christmas cards yet? Every year, I think I’ll make a few each month so that by December, I can just write and send.  It never works out like that. I did make two in January but then didn’t make any more until October or November and ended up ‘panic crafting’ in December.  The trouble with that is, it’s not always much fun.  Maybe I’ll do better next year…? In the Black Friday sale, I purchased a few cutting files to use with my Cricut Maker machine to create some Christmas cards so I have not one, but six, cards to share with you this week.  To begin, here’s a card I made last year when I didn’t know much about cutting files!  I used the Cricut to write the skinny letters and draw the holly and cut out the big words in metallic vinyl. This next one was a free download called minimalist trees.  I switched the stars from the original as I prefer 5-pointed stars.  The infills made a bonus tag! My sister loves th...

OMG! You're how old?

Image
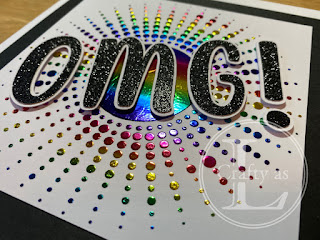
My year of big birthdays is now at an end.  There’ve been five 50 ths (including my own), two 60 ths and one each of 70 th and 18 th .  I bought the Sunburst stencil from Sweet Poppy Stencils as I thought it might be useful for making masculine cards.  Indeed, it was when I made this one. It was whilst I was making this card that I thought it’d be fu n to try it with the deco gel and some foil.  The trickiest part with the gel was the circle in the centre – it’s quite hard to get an even layer of gel over that section.  Anyway, after it dried, I applied some rainbow foil and ran it through the laminator. I never grow tired of the reveal! Next, I got busy with the Cricut and made my letters and backgounds.  I use Inkscape for designing my lettering and the shadow outline is created by making an offset to the text and then import into Cricut Design Space.  There are really good tutorials for how to do both of these things on YouT...

Expanding Accordion Card

Image
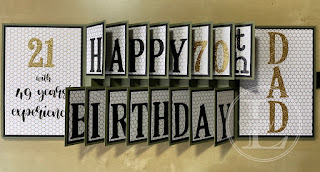
  As I mentioned earlier in the year, I have several ‘big’ birthdays this year, one of which was my father-in-law’s 70 th .  If you ask most card makers, the consensus will be that cards for blokes are difficult – I am no different!  My F-I-L is a very practical man and builds models (designed by him and printed on his 3D printer) so I figured he’d appreciate an interactive card.  I saw this video by Sam Calcott on YouTube and thought it’d be perfect for him. You can find the dimensions on Sam's website here . My card was to be a 5” x 7” so I trimmed 2 pieces of A4 card to 7” deep and scored them at 5” and then at ¾” intervals, trimming the last section off one panel.  These were then glued together using the small section as the glue tab. The number of folds can be adjusted depending on the number of spaces required for the sentiment, for example ‘CHRISTMAS’ would need an insert to give 9 mountain folds. Next, I cut my mats and layers for the flip...

Fond Farewell

Image
These days, when you buy a voucher for someone, particularly if it’s purchased online, you get an emailed voucher for you to print out.  Giving someone a sheet of paper for a gift is not very inspiring!  So, when my friend and colleague, Stu, retired recently, I was asked to create a presentation folder for said sheet of paper.  Inspired by the London skyline pop-up card I made my friend a few weeks ago, I decided to try an air traffic pop-up card.  I made it airfield themed, even though we are Area Controllers, as an Area Control building is not quite as interesting or recognisable as a control tower! First, for the front of the card, I repeat stamped and heat embossed the bi-plane and clouds from Avery Elle’s ‘Fly By’ stamp set and stacked several die-cut ‘congrats’.  I popped one of the bi-planes up on foam tape. To begin the inside, I cut out a control tower, some random airport buildings, a city skyline, some fighter aircraft, smoke trails, an ...