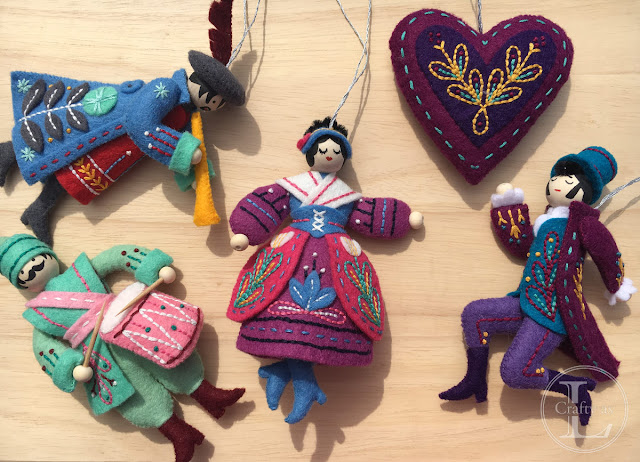
12 Days of Christmas Ornaments
You may recall my post back in February when I had started my set of the 12 Days of Christmas felt ornaments stating that I had started early in the hope that I might get them all finished in time for Christmas? Well, I’ve finished them already – shock, horror!! I’m completely amazed myself to be honest. I think the main reason for this success is because the pattern is so well written it makes it easy and the ornaments are sooooo cute that as soon as one was finished, I immediately wanted to move on to making the next! Whilst it’s the 12 days, there are actually 15 ornaments as the partridge has a pear, the goose has an egg and Mr. Leaping has a heart, bless him! Well, the song is about true love after all. In case you're thinking I've gone completely doolally and numbered the last 4 wrongly, there are several variations of the carol; these ornaments are based on the original carol from 1780.
Firstly, and unusually for me, I did what the pattern said and purchased wool blend felt. I have a stash of acrylic felt but the pattern specifically said that you wouldn’t get good results without using wool or wool blend felt. I can see now how that might happen as the edges are whip stitched with a tiny seam so the acrylic felt probably wouldn’t have held. The absolute most important step was to preshrink the felt which was done by soaking each sheet in cold water for a few minutes then placing on a towel, lightly pressing to remove excess water then leaving to dry naturally. Each 12” piece shrunk by at least an inch so the pieces would have been all sorts of shapes had I skipped this step.
The designer recommends using the catchily titled Sulky™ Printable Sticky Fabri-Solvy, now renamed to Sulky™ Printable Stick ‘n’ Stitch. I got mine from Amazon from a US craft shop but there are craft shops in the UK selling it now. This stuff is absolute GENIUS! After printing out the pattern on normal paper and checking that the print was scaled properly by using the handy measure guide on the pattern, you just put in the sheet of Sulky™ and print. All of the pieces required are printed and it’s simply a case of rough cutting around them and removing the backing to adhere them to the felt colour of your choice.
The embroidery is designed to be the star of the show so the pattern encourages you to choose contrasting floss that really stands out. I found choosing the felt and floss colours to be one of the hardest jobs. My threads were a bit of a mess, all bundled up together in an old wash bag so I treated myself to a floss organiser, complete with thread bobbins. This made my floss selection process a lot easier I can tell you.
Next job was to sew the embroidery. It’s mainly back stitch, a bit of running stitch and lots of French knots. I used to hate French knots and did substitute some with seed beads for the first few but I guess I became better at them with all that practice and I don’t mind them at all now. Once the embroidery was complete, the pieces were carefully cut out...
...then soaked for 15-20 minutes in cold water to dissolve the stabiliser and then left to dry face up on a dry towel.
One day, when I was feeling particularly brave and artistic(!) I decided to try my hand at making the heads for days 8-12. The pattern offers great tips for eye and mouth placement. After lightly drawing the features with a pencil, I then coloured them in with fabric marker pens. These were great as they didn’t bleed into the wooden beads at all so the images are really crisp.
 |
| Shrunken heads! |
The construction is largely the same in that all pieces are sewn with wrong sides together using a whip stitch and matching floss. Depending on the ornament, interfacing, cardboard, pipe cleaners, wooden beads, fabric markers and cocktail sticks may be needed in addition to fibre stuffing and fabric glue. The instructions for constructing the ornaments are really clear and easy to follow.
So, a mere 2½ months after I began, the whole gang is finished. Woohoo! And here they are…
A closer look at Days 1-4...
Days 5-8...
Days 9-12...
Even the backs look great too!
I’m now working on a storage box for the ornaments as they are too precious to be thrown in with the rest of the Christmas decs. Watch this space for that post!
These ornaments are a bit fiddly to make at times but not so much so that it put me off finishing. In fact, I’ve enjoyed making them so much, I’m going to make another set in a more limited colour palette.
If you like the look of these you can find out more on Larissa’s website, where there are links to her shop to buy the patterns together with lots of tips, techniques and colour scheme ideas. There are also lots of inspiring colour palettes on Instagram at #twelvedaysornaments and #mmmcrafts.


I love the 12 Days of Christmas ornaments, so much that I made the set for my son and daughter-in-law for Christmas this year. I noticed you mentioned making a storage box for these beautiful decorations, but I couldn't find a post for it. Did you make a storage box? Where might I find it? Thanks
ReplyDeleteHi Judy. Thanks for your message. I buy the wooden boxes from Hobbycraft, decorate them with pyrography and line them. You can see one of the boxes I made in this post: https://craftyasl.blogspot.com/2022/08/folk-art-wedding.html
Delete