Posts

Showing posts from February, 2023

Perfect Poinsettias

Image
Last post of the month is the Mission Christmas and this month’s offerings are made using Spellbinders Holiday Blooms dies.   They’re not quick makes but if you’re in the mood for cutting, colouring and assembling, making them is a very relaxing, mindful activity. To begin, I dry embossed the panels using the Holiday Floral Swag embossing folder.   For the green one, I dabbed the green ink pad on the inside of the top before embossing it to give a tone-on-tone look.    I die-cut lots of the foliage and flowers from coloured card.   If you can’t be bothered to add colour, you can just use coloured card, but I like the additional interest a little variation in colour adds to the design.   For the gold elements, I didn’t want a mirror finish so I used Red Gold and Light Gold from the Gansai Tambi Starry Colours on a piece of card, applying 2 coats to get good colour.   After die-cutting and colouring, the elements were assembled. After playing around until I was happy with the arran

Garden Roses

Image
My cards this week were inspired by this tutorial by Ishani S and her ideas for this embossing folder.  I received the Altenew Garden Roses embossing folder in the Craft Your Life Project Kit as part of my Cardmaker of the Year 2022 prize from Practical Publishing and Craftworld.  This is my first play with the kit and I'm loving this folder and the double embossing technique! To begin, I dry embossed a white and a navy panel before moving on to the double embossing.  The dimension from this folder is amazing!   One of the cards was to be for my Mum-in-law so I asked Mr L which he preferred and he chose the inked one.   On the white panel, I used small blending brushes and Altenew Mixed Media pigment inks in Frosty Pink and Coral Berry to add some colour to the roses and Distress inks to the leaves - I can't remember which ones though! The panel was matted onto pink and green layers and mounted onto a 7" square card base.  I spattered the card with some gold Finetec paint

Geo Blocks

Image
This week’s cards use Pinkfresh Studio Geo Blocks hot foil plate and layering stencils.   When hot foiling, the best results are obtained using smooth card.   I’ve been getting good results with Marker Geek’s Make ‘it’ Colour Blending Cardstock, which is super smooth. I wanted to make a rainbow effect on the blocks which is quite easy to achieve using small blending brushes.   I used a range of Distress Oxides and applied the ink heavily on the first stencil to make the ‘shaded’ side of the block. For the lighter side, I simply used the same inks but only used the ink that was left on the brush.   The top was left white.   Since the blocks pattern is the main event on the cards, I didn’t want to put much over the top.   I hot-foiled some sentiments and popped them up on foam tape and finished with a scattering of enamel dots. These cards were for ladies but it’s easy to transform into a man’s card by changing up the colour scheme. I didn’t have a matching stamp to decorate th

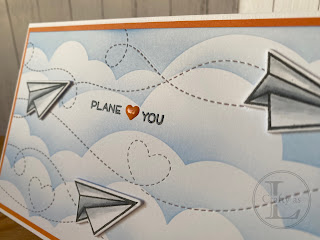
Plane Love You

Image
It was recently Mr L’s birthday and his main present was a voucher for an aerobatics flying experience – yes, there are people who want to do that kind of thing for fun!   Obviously, a voucher itself isn’t that thrilling so I like to make a presentation folder.   For this one, I opted to combine it with the card. Since it was a flying voucher, I wanted the theme to be the same for the card but with paper aeroplanes!   I used the Lawn Fawn Plane and Simple stamp set and matching dies to stamp and die-cut the aeroplanes.   They were shaded with Copic markers. For the background, I blended a little ink over my homemade cloud stencil - a mylar sheet cut on my Cricut. Next, to add texture to the background, I used the Lawn Fawn Stitched Trails dies. I stamped and clear heat embossed the sentiment and added an enamel heart before affixing the planes on foam tape and mounting the panel on an orange mat layer. The card/voucher holder was a whole A4 sheet cut to 21cm wide and scored