Dearly Dashing Deer
Yes, I know it’s only August and your eyes are not deceiving you – this is a Christmas card! If you’re making all of your own cards for the festive season, it’s better to get started early rather than be frantically crafting in the middle of December to meet the Post Office’s last posting dates. Ask me how I know this!
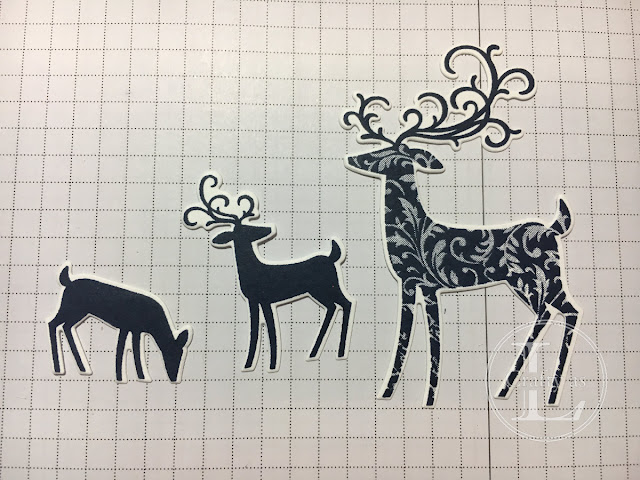
The Dashing Deer stamp set and matching Detailed Deer Thinlits are the perfect set for creating quick but stunning cards. I really enjoyed getting busy with the glitter again too!!
The original
The first step was to stamp each of the deer using Night of Navy ink and cut them out with the matching dies.
I made a ‘snowbank’ by ripping a strip of Whisper White card and then ran a thin line of glue along the torn edge and applied glitter. I stamped the greeting in navy on the bottom of the snowbank.
Next I embossed a piece of Smoky Slate using the Woodland embossing folder. I glued right-hand half the snowbank to the background.
I wanted the solid deer to be in the background behind the snowbank, but I didn’t want the head of the one eating to disappear. Attaching half the snowbank allowed me to glue the deer into the correct spot. Once they were in position, the remaining section of snowbank was stuck down.
Lastly,
the background was adhered to a Night of Navy card base and the
patterned deer, mounted on Dimensionals, was placed just above the
greeting. I love how the solid deer seems to be looking in awe the
patterned guy - he is magnificent though!
The Same But Different
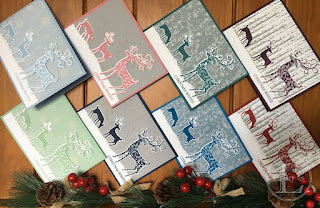
I was really pleased with how this card turned out so I thought I'd try recreating it in various other colour schemes and using slightly different backgrounds. This is another one in the original style, this time using Rococo Rose, a rather non-traditional Christmas colour (unless you're in Next! ?).
 |
| Rococo Rose & Night of Navy |
Vellum works really well in embossing folders so makes for great backgrounds. The challenge is getting it adhered successfully as the glue shows through. You need to either have a pattern on it to glue behind or add a decorative element on top to cover the glue.
For the background for these two, I used some snowflake printed vellum that I've had in my stash for donkey's years! I put lots of glue behind the snow bank and deer and then tiny dots in the centre of the snowflakes, which wasn't entirely successful but just about looks OK.
 |
| Seaside Spray & Mint Macaron |
My next two feature my own printed vellum. I used White Stazon ink and the tiny snowflakes from last year's Snow is Glistening limited release set. This vellum is thicker so the glue isn't as obvious.
 |
Pacific Point & Pretty Peacock |
For
the last pair, I eschewed the embossing folder and instead used the
silver birch tree trunks stamp from Winter Woods. When using this
stamp, a deeper snow bank is required to cover up the bottom edge of the
trunks as it looks a bit weird otherwise. The card on the bottom has
no separate snow bank: I just ran the glue along the bottom edge of the
trunks and added glitter. It was more difficult to get the deer to be in
the background with this one; I had to chop off their feet! 😮
 |
| Cherry Cobbler & Blackberry Bliss |
I really like trying out these ‘same but different’ ideas. Sometimes they work, sometimes not, but you can inadvertently discover a stunning combination when playing around like this. I really like all of them and can’t choose a favourite. Which one's your favourite?


Comments
Post a Comment