ATC Memorabilia
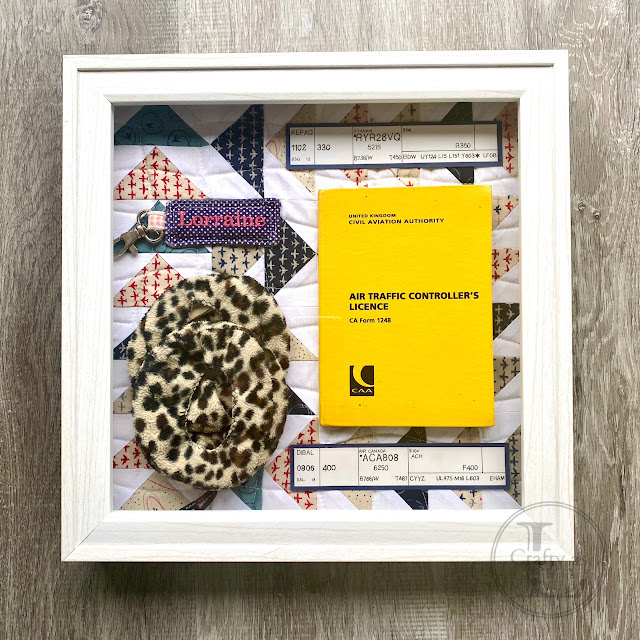
This week’s project is one that I meant to make last year when I took early retirement but never got around to. You’d think retiring would give you more time to do stuff but that doesn’t seem to be how it works! In my job, almost everything we used was set in place in the Ops room. We didn’t have our own individual spaces, sharing radar screens, desks, keyboards and even pens. We were issued with our own headsets which many controllers identified as theirs by covering the ear pieces with patterned “knickers”. Mine were leopard print velour and were home-made, obviously! My other homemade thing I had was a pager tag, which you put in the pager rack so the Supervisor would know which pager to ring if they wanted to call you back to the sector. I made a few of these for other controllers to raise funds for charity. Another of my memorabilia is my Air Traffic Controller’s Licence (the “Yellow Book”) which holds all the validations, ratings, medical and other paperwork issued by the Civil Aviation Authority which had to be with you whenever you were on duty. The last two bits are the flight strips for the last aircraft I controlled. When I started my career, we used these when controlling as they contain all the relevant information needed; callsign, SSR code, aircraft type, speed and route, and were annotated with flight levels and headings as the flights progressed. We moved to using electronic strips and tools in 2011. I worked the Air Canada (ACA) on the sector over the North Sea and I transferred him to Amsterdam control centre. On my other sector over the north of England, the Ryanair (RYR) was the last aircraft that I actually spoke to before unplugging and handing in my headset, minus the knickers!
A friend had given me a large box frame as a retirement gift and I wanted to use it to display my personal ATC memorabilia. I decided I wanted to do a quilted backing and the only pattern to use had to be Flying Geese, of course! I’d never made any Flying Geese quilt blocks so I had to search You Tube for some guidance. Handily, I found this really useful video demonstrating how to make 4 units at a time and downloaded Erica’s very useful cheat sheet. I started by cutting out all of my fabric squares, both patterned and white. The patterned ones are from a collection I bought years ago called Flight by Janet Clare for Moda. These were pinned together, as instructed in the sheet, and sewn ¼” from the diagonal line.
After cutting down the drawn line, another plain square was clipped in place and sewn together as before.
Again, these were cut apart along the line and, once pressed, formed the Flying Geese units. What I liked about the instructions was that you had some wiggle room so the units could be trimmed down so they were all exactly the same size, which makes for a neater quilt.
After trimming my ‘geese’, I arranged them and then systematically stitched them together; first into twos, then into fours, then into strips of eight and finishing by sewing the strips together to make a mini-quilt.
I adhered the quilt to some Bosal foam and did some quick wavy line quilting (for contrails!). Unfortunately, I forgot to photograph it before I attached all my bits and bobs. Once I’d worked out where all the bits were going, I hand-stitched the knickers and pager tag in place and added some elastic to mount the licence cover onto. The quilt was glued into the frame using Distress Collage Medium and then the strips adhered on top.


Comments
Post a Comment