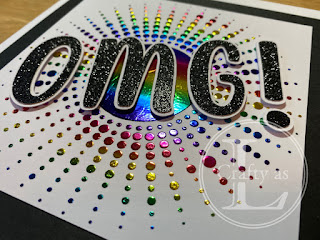
OMG! You're how old?
My year of big birthdays is now at an end. There’ve been five 50ths (including my own), two 60ths and one each of 70th and 18th.
I bought the Sunburst stencil from Sweet Poppy Stencils as I thought it might be useful for making masculine cards. Indeed, it was when I made this one.
It was whilst I was making this card that I thought it’d be fun to try it with the deco gel and some foil. The trickiest part with the gel was the circle in the centre – it’s quite hard to get an even layer of gel over that section. Anyway, after it dried, I applied some rainbow foil and ran it through the laminator. I never grow tired of the reveal!
Next, I got busy with the Cricut and made my letters and backgounds. I use Inkscape for designing my lettering and the shadow outline is created by making an offset to the text and then import into Cricut Design Space. There are really good tutorials for how to do both of these things on YouTube. I used some rainbow vinyl to make the inside lettering.
Working out the next step nearly blew my mind! I’m normally quite good with this kind of thing but brain fog has blighted me the past few months so this took me literally HOURS (and loads of binned pieces of card) to work out. Got there in the end though! This would be simpler if you’re OK with a fold in the centre of your pop-up but I didn’t want that. If it’s just a small pop-up, or number like I did on my other card, a simple mechanism like the right-hand one will suffice. I needed more of a wiper pop-up mechanism so I cut out the pattern on the left.
Fold the corners up into a triangle shape and trim the flaps. Ensure the flaps face the card and put the point of the triangle on the fold inside the card. I glued my banner onto the mechanism and then glued that in place inside card. I made my life much more difficult by creating such a ginormous pop-up banner – I should have checked the size before cutting it out!
Adjusting how wide the sides go will determine if the triangle lies flat when the card opens or if it sits up. I wanted mine to be popped up, although I find this stage is very much trial and error and I use Blue Tac to hold the pieces roughly in place to check it will work before adhering.
Anything overhanging the triangle on the left (shown by the arrow) can catch on the card base. I just got away with this but had to place the banner there otherwise it wouldn’t have been hidden within the card when it was closed.
The final job was to adhere the decorations and mount the front panel onto a black mat then onto the card blank. I’m loving the 8” x 8” card blanks for celebratory cards!
Here’s a video showing the whopper pop-up in my friend’s 50th card in action.
Here’s the one I made for my God-daughter’s 18th birthday. I put her name on the front as OMG! didn’t seem appropriate.


Comments
Post a Comment