D-I-Y Wedding

I really resent paying someone to do what I am perfectly capable of doing myself. Never was this feeling more evident that when Mr. L popped the question and we began to get prices (seemingly complete with the wedding tax!) for the various wedding paraphernalia. So we decided that we would do as much as possible ourselves so that we could have the day we wanted without feeling that we'd been fleeced!!
We met at work and were friends before romance blossomed. We used to play (well actually we still do) the online Scrabble game Words With Friends and it was messaging each other through this that we started to move from friendship to 'lurve' 💜! So we thought it apt that our wedding theme would be Scrabble and, somewhat bizarrely, air traffic control!
Mr. L is a reluctant crafter but still got stuck in with helping with the invitations......

CAS (Clean & Simple) is mostly my card making style so a simple design was drawn up and full production started at our dining table. Unfortunately, the wedding invitation is the only thing that I don't have a photo of.
As we were getting married in a barn which was beautiful in itself, we decided to keep the decor CAS too. I bought plain white, purple and purple & white gingham polycotton fabric and spent a very pleasant afternoon with my friend Simone, chatting away and making many lengths of bunting.

The outside of the barn was quite plain so we made a bunting to hang outside which also had our initials on so guests knew they were in the right spot. Mr. L got his crafting mojo on again for the big Scrabble letters for this .......

......and for the 'Just Married' photo shot. (These letters kept our guests entertained whilst they tried to see how many rude words they could display using those letters!)

A Scrabble board welcome sign was displayed in the courtyard.....

and Mr. L and his crafting mojo were back at work again producing a postbox for the cards


The venue stipulated that we had to have real petal confetti so we bought some online in the appropriate colours and I made simple cones from half a doily, added the petals and put them into a hessian lined basket.


We
didn't want the table centres to be too high so people could chat
across the table so we bought glass bowls to fill with purple and white
tulips with a wicker heart wreath above with the table name suspended
from the top of the heart. The hearts were decorated with purple ribbon
and fake ivy and I glued a piece of metal coat hanger to the bottom with
my hot glue gun which would make it stand up amongst the tulips by
being stuck into a tea light candle in the bottom of the bowl. Despite
trying this out successfully at home, setting up the day before the wedding was somewhat fraught
when the tulips were tiny so we needed twice the amount but more
worrying was that the glue holding the tea lights in place came unstuck
when water was placed in the bowls. Aaaarghh!!!! Luckily the barn owner
was big into flower arranging and supplied us with some florist tack - a
waterproof form of blue tack. Absolute genius! Fortunately we'd ordered twice the amount of tulips so that we could have some in vases around the place so we were able to use these for the table centres .... and we didn't miss the vases of flowers.

So you may now be wondering what a LAMSO is. You remember I said that our theme was Scrabble and air traffic control? Well this is the air traffic bit. LAMSO is a reporting point which is a navigation aid used by pilots and air traffickers as a way point along a certain route (a bit like junction numbers on the motorway). Reporting points are always 5 letters long so suited our purpose perfectly.
A simple mat of hessian decorated with lace and ribbon, a mirror, a few wooden hearts and a scattering of bling finished off the table centres.
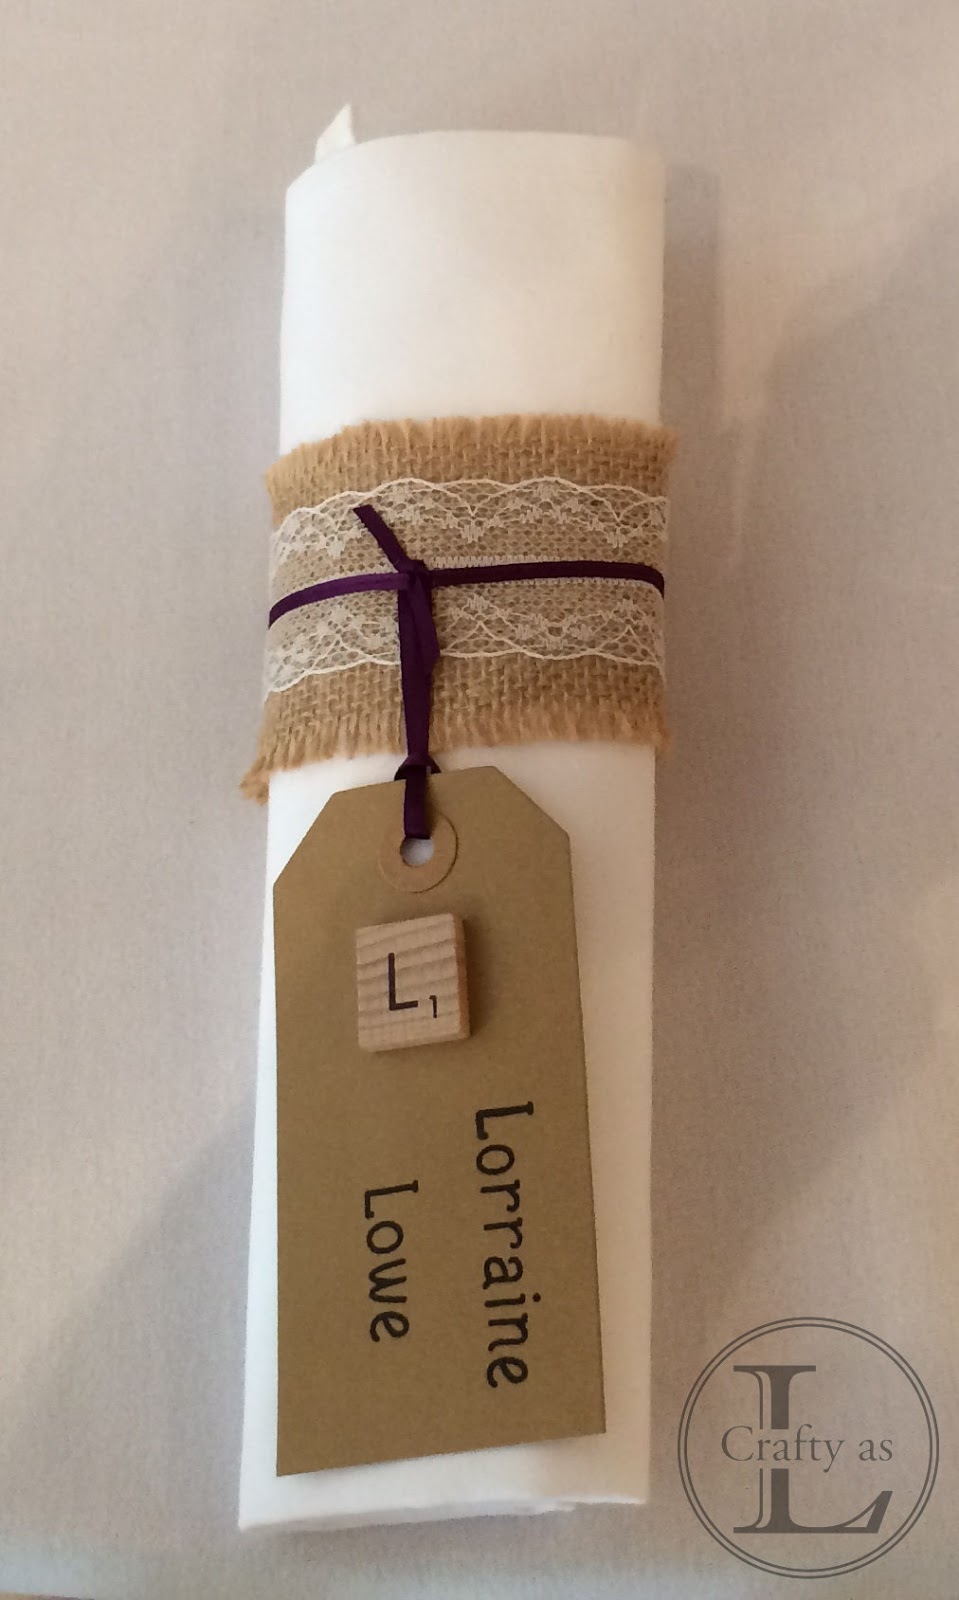
Place setting were made along similar lines. I bought some burlap ribbon, attached the lace and ribbon, and then added a tag stamped with the guest name and a scrabble tile for their first initial. As we gave our guests a choice of meal several months earlier, I also stamped their food selection in the reverse of the tag, which many people appreciated!

Making the cake was my biggest workload. I wanted a 4 tier cake but we didn't have enough guests to shift that quantity of cake. I attended a one-to-one cake decorating course and the tutor suggested using polystyrene blocks not only to practice on, but to use for the other tiers too. The plan was from the top polystyrene-sponge-fruit-polystyrene but a disastrous sponge cake icing day (which had me stomping round the house uttering some most unladylike words!) meant we ended up with just the fruit cake layer being actual cake. This was OK though as we still had something to cut into for the photo! There are many bonuses of icing polystyrene blocks; you can do it well in advance; the fondant icing also sets quite hard so it's less likely to be damaged in transit; and supporting each layer is not an issue either as the blocks are solid. So winner all round since nobody is any the wiser that it's not an actual cake.....until now that is! I made some Scrabble type tiles for the cake topper and used one of my stamp sets to make the imprint of the letters and then drew in the letters with an edible marker pen. I've decorated a few cakes using wires to support cut outs above the cake and I like the look so that's what I went for here. I cut out lots (and I mean lots!) of ivy leaves and pushed them around a bit so they weren't dead flat and then left them to air dry for a couple of days, and then stuck them onto the cake with royal icing. The other layers were decorated simply with royal icing dots, which is easy to do but looks so effective. Ice your board for a professional look and add ribbon around the bottom of your tiers so you don't have to worry about the bottom edge being completely perfect.


So you can do it yourself if you want. Don't get me wrong, there were tense moments along the way when I thought "What was I thinking?? Am I completely mad??", especially the sponge cake icing day and the table centre fiasco, when my future in-laws were about to set off to B&Q to try to find some waterproof adhesive before the florist tack came to the rescue! In the end though, everything looked lovely and just how we'd wanted it to. I don't know how much money we saved but we had the time to do all these things, enjoyed making all the bits and pieces and had the immense satisfaction of seeing all our hard work come together at the end. So if you're thinking about doing something similar, my advice to you would be, if you have the time - do it!! Plan ahead well, give yourself plenty of time so you don't end up rushing, rope in your friends and relatives to help, but most of all, enjoy it!


Comments
Post a Comment