Mistletoe Season Card - with a bunny ears bow!
With the Christmas season fast approaching, it's time to get making your Christmas cards - although I have been making mine since July! The stamp set comes with a bow that you can stamp but I thought it looked a bit flat so decided to add a real ribbon bow instead.
If you'd like to watch my YouTube video tutorial, please follow this link .
The video is unedited and contains all my mistakes for added entertainment value! Please be kind, it was also my first ever go at a YouTube tutorial!! Apologies for the lighting, I’m sorting it out for future videos.
For this card, I used:
Green card base, 4” x 11¾” and scored at 5¾” in Always Artichoke (retired)
Red mat layer 5⅝” x 3⅞” in Real Red
White inner 5⅝” x 3⅞” in Whisper White
White card front 5½” x 3¾” in Whisper White
Strip of Designer Series Paper (DSP) 5⅜” x ¾” in any design you like
2 scraps of green and white card for the labels
A strip of green card left over from cutting your card base. Cut an A4 sheet in portrait at 4” and again at 4”. You should be left with a strip just over ¼” wide. Cut it in half lengthways to give you the strip of card.
Stampin’ Up! Mistletoe Season stamp set
Real Red ribbon, about 10”
Everyday Label punch
Shimmer Ink – Champagne Mist
SU Garden Green ink
SU Old Olive ink
Memento Tuxedo Black ink
Adhesive pearl embellishments
With a sponge dauber, apply a little (and I mean a little – it goes a long way!) shimmer ink to the green strip. Punch out a label from your scrap of green and cut it in half along the straight edge. Dab some Shimmer Ink on the curvy edges of the label. If you don’t have Shimmer Ink, you could stick glitter on or leave it plain.
Adhere the DSP to the left of the card front layer, setting it in about 1/16th from the left edge.
Stamp the open leaved mistletoe sprig with Garden Green and the solid leaved sprig with Old Olive (although I did this the other way around on the video).
Partially stamp the liner and the envelope in Old Olive by stamping off the edge of the page. Stamp the sentiment on the scrap of white card and cut out with the punch.
Your green glimmer decorative strip should be dry by now so stick it onto the card front, just overlapping the edge of the DSP.
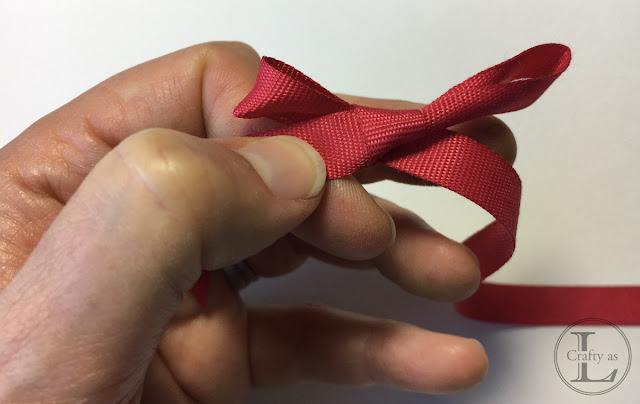
Make the bow. This method of bow making is called the Bunny Ears technique and is used as the bow loops stay at the top and the tails go to the bottom naturally. It takes a bit of fiddling about but produces a nice-looking bow.
Begin by making a loop...
...and then make another the same size.
Tie the loops together in a knot. It will probably look a mess at this stage.
Pull the tails of the bow to make the loops smaller and pull the loops to tighten the knot. Keep repeating this process until you’re happy with your bow then trim the ends of the ribbon and use a glue dot behind the knot to stick the bow in the gap between the mistletoe stems.
Cut the green label in half and stick each half to the back of the sentiment label, allowing the glittered edges to protrude. Trim off any green that’s overhanging the top or bottom of the white label. Apply foam Dimensionals to the back of the label and attach it to the bottom of the card.
For the mistletoe berries, add a few self-adhesive pearl embellishments.
Finally, adhere the card top onto the red mat layer and then onto the card base and add the liner.


Comments
Post a Comment