Ombre Sunset Card
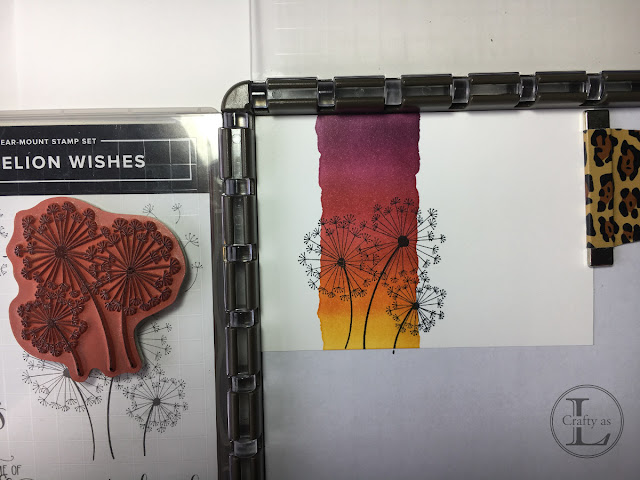
This idea came to me one evening as I was gazing out of my craft room window at the sunset. It was a beautiful sunset, with very rich pink, orange and yellow colours but only a strip of it was showing. It was obscured at each side by huge cloud banks which framed the sunset. It was stunning! As the colours intensified, the trees in the foreground became silhouetted which made the whole scene look even more spectacular. As such, I was inspired to create this card. As you’ve no doubt gathered, I’m a bit in love with the Dandelion Wishes stamp which works really well for this card, but any stamp which has a good silhouette image will do the business too - have fun trying out different images! I find that a black mat layer or just a black card base (if you’re not matting it) frames this card the best.
If you’d like to watch my YouTube video tutorial for this card, please follow this link.
For this card you will need:
Card base: 11½” x 4⅛”, scored at 5¾”
Mat layer: 5⅝” x 4” (optional)
2 White layers: 5½” x 3⅞” (one for the card front and one for the liner)
Two 5” x 3” post-it notes
Stampin’ Up! Dandelion Wishes stamp set
Stampin’ Up! Ink Pads in: Crushed Curry, Pumpkin Pie, Cajun Craze, Cherry Cobbler, Rich Razzleberry and Blackberry Bliss
A piece of sponge or a sponge dauber for each different ink colour
Stampin’ Up! Dandelion Wishes stamp set
Memento Tuxedo Black Ink
Versamark Ink Pad
Clear Embossing Powder
Scrap paper for working on – it will get a bit messy!
Using small pencil marks, mark on your white topper layer where you want your coloured panel to be. I did 1” and 2½” from the left-hand side. Tear a narrow piece from the sticky edge of the post-it note, ensuring there’s still some sticky area left.
Apply the post-it masks to the topper, roughly in line with your pencil marks and press down well. Erase the pencil marks if you can still see them. Put this onto a piece of scrap paper as you’ll be sponging off the edge of the card.
Stage 1, going up! Using Crushed Curry first, dab the sponge onto the ink pad and apply the ink using small circular movements and ALWAYS starting on the post-it note, start at the bottom of the card and work onto the card. Work the sponge across the card making a small section of yellow. You will be going over this again so don’t worry if it looks a bit patchy. Next, use the Pumpkin Pie ink and using the same technique, sponge a small section of orange just above the yellow, overlapping slightly. Repeat this until you’ve used all your colours and are at the top of the card. You’ll probably still have some light sections between the coloured bands. This is fine, they’ll get blended out in stage 2.
Stage 2, coming down! Continuing with the Blackberry Bliss, start working your way back down the panel. This time when you start a new colour, start in the colour above and work your way down to the bottom of that colour section but not into the lighter colour below. You always want to start your lighter colours on top of the darker coloured section above as this is how you’ll get the blended ombre look. Continue blending until you’ve reached the Crushed Curry layer again. Once you’re happy with the effect, carefully remove the masks and leave to dry a little.
Then ink up your stamps again this time using Versamark Ink (which is stickier that normal inks and takes longer to dry) and then remove from the Stamparatus and add the embossing powder. Pour off the excess, give the card a tap, I like to give it a couple of flicks on the reverse too and carefully put it down whilst you get your Heat Tool warmed up (30 seconds or so). This just helps the embossing powder to melt quicker to minimise the warping of the card. Once hot, hold the Heat Tool over the embossed areas and watch the magic happen! You will see the powder melt and go from opaque to shiny. Don’t hold the Heat Tool too close to the card, you could scorch the card (or even set it on fire!!) and move on as soon as one section has melted as you don’t want to overheat the powder, it will lose the shine and texture. If your card has warped, gently heat the reverse side as this can help straighten it out again.
Layer up the card. Adhere the topper to the coloured mat layer (if using) and then adhere to the card base. The card front will be warped slightly due to the embossing so it’s best to use some form of wet glue like Tombo. This is a strong adhesive and will help the card front regain its flatness (is that even a word??) which will then be further helped when sticking it onto the card base. This is why I generally add a mat layer if I’ve heat embossed. Adhere the liner to the inside.
You’re all done!
All images ©Stampin’ Up!


Comments
Post a Comment