Posts

Showing posts from October, 2018

Polar Pumpkin Carving
Image
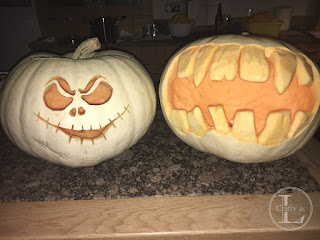
  Every year, Mr L and I have our very own little carving competition.  When I say competition, it’s not really as there are no winners, losers or even prizes, it’s just a bit of fun and has become a yearly tradition for us. The rules are simple: you are free to case ideas from the internet or just wing it and you can’t look at the other one’s work until it’s finished!  We have had guest carvers on occasion too - my sister joined in the fun a couple of years ago. This year we are using our home-grown pumpkins! They are a variety called Polar Bear that have white skin but orange flesh inside.  We had a bumper crop due to the hot weather this summer and these two were the second and third largest at 16kg and 17kg – the biggest was just over 20kg!! Whilst Mr L cooked our tea, I did the prep work, removing the seeds and hollowing out the inside (yielding 5kg of pumpkin flesh for yummy soup making later)  and then the carving began. I got the idea for mine from ...
Shiny Super Snowflake Card

Image
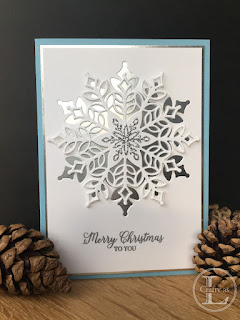
  I love snowflakes, so when I set eyes on the Snow Is Glistening stamp set and Snowfall thinlits which are part of the Snowflake Showcase (the new time limited release from Stampin’ Up!) I just had to have them! For my first card using this set, I opted to use the giant snowflake die as my focal point and to use the negative space as the background.  It’s clean and simple, stylish and effective.....and dead easy to produce! The Snowfall Thinlits die set is huge and includes loads of different sizes of snowflake, a snowflake flourish and some leaves and berries - 20 dies in all.  To complete the showcase, there are two coordinating stamp sets; Snow Is Glistening, Happiness Surrounds, flocked paper and other accessories.  This suite of dies and stamps is only available to purchase from 1-30 November so if you like the look of it, you’d better get your skates on! For this card I used: 11½” x 4⅛” Balmy Blue card base, scored at 5¾” 5⅝” x 4” silver foi...

Cool Yule Christmas Tags

Image
I never make enough tags for our Christmas gifts and usually end up frantically cutting out bits of card at the last minute!  To avoid the problem this year, I decided I would start making tags in batches.  I saw a YouTube demonstration of this technique and thought it ideal since you make 10 tags at a time and it allows you to use up a load of scrap pieces. For this project I used: A4 sheet of thick card for the tag backs Scraps of white card for the houses SU! Hometown Greetings Edgelits SU! Balmy Blue ink SU! Pacific Point ink Shimmer ink in Frost White ‘Merry Christmas’ greeting from SU! Half Full stamp set SU! Scalloped tag topper punch 2.5m ribbon In pencil, mark the half way mark on the short sides of the A4 card.  This is a rough guide for your blending as you want the central portion to stay white.  Sponge Balmy Blue ink into the card using circular motions, building up the colour from the long edges and fading toward the centre.  I added ...

More clucking chickens - apologies for the fowl language!

Image
My good friend, Lorie, and I had a day out at the Knitting and Stitching Show at the Ally Pally last Thursday.  I had gone with the intention of not buying a load more fabric and yarn, since I already have stacks of both, but to look for something different.  I bought a couple of embroidery sets which I really liked, even though embroidery isn’t usually my thing, and a couple of metres of a fabric with a dandelion print - you’ll probably have realised by now how fond I am of dandelion silhouettes so I couldn’t leave without it! My main purchase was a block printing kit for printing designs onto fabric.  It was purchased from Block Craft who had a well-designed stall with demonstrations of the technique, lots of examples of the paint colours, stamps, stamped tea towels, bags, clothing and wrapping paper and all that sold it to me. Whilst I realise this is not different as such since it’s very similar to card stamping, I’ve never really done anything with fabric so I was ...

Tool Kit Card - retired but not forgotten!

Image
I guess it’s unusual for a Stampin’ Up! demonstrator to be using retired products and I appreciate that it may be a little frustrating if you fancy making this card but the products are no longer for sale, apologies for that.  However, there will be many people, like me, who purchased this set and would like some ideas – hence the ‘retired but not forgotten’ slogan.  As soon as I saw this set, I had to have it as my Dad is a retired joiner so it is the perfect set for cards for him – although I’m not sure how many cards with tools I can get away with sending him! My Dad is the most practical and capable person I know and I like to think that my crafting genes have descended from his practical ones! Mind you, my Mum’s no slouch in the crafting department either, particularly if it comes to knitting which I’m certain she can do with her eyes closed!  Anyhow, “Nailed It” and the accompanying die set “Build It” are a great set for masculine cards, which I find are rather a t...

Dragonflies & Dandelions Card

Image
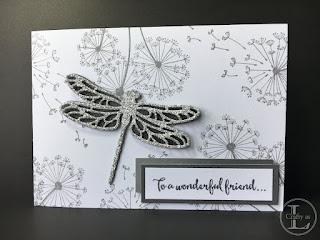
  After spending (erm...wasting!) many hundreds of £££ buying stamp sets that I liked but didn't have any ideas for, I now only buy stamp sets that I can immediately think of 3 projects or cards that I could use them for. This was the case with Stampin' Up!'s Dragonfly Dreams and more recently Dandelion Wishes, the latter being one of my all-time favourite sets.  I thought that the two sets would complement each other well  and decided to use the dandelion stamp to make my version of DSP (Designer Series Paper).  Here's the card.     I wanted a monochrome look so stamped in grey ink but you could use any colours you fancy.  Here's another I made using light turquoise ink and a scrap of ice blue glitter card I found in my large box of card offcuts.  You can really see the wing detail of the stamped image. This is another different look using Crushed Curry and Pumpkin Pie inks together with gold glimmer paper. If you'd like to watch my YouTube v...