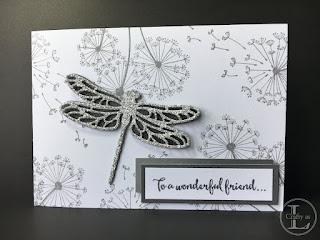
After spending (erm...wasting!) many hundreds of £££ buying stamp sets that I liked but didn't have any ideas for, I now only buy stamp sets that I can immediately think of 3 projects or cards that I could use them for. This was the case with Stampin' Up!'s Dragonfly Dreams and more recently Dandelion Wishes, the latter being one of my all-time favourite sets. I thought that the two sets would complement each other well and decided to use the dandelion stamp to make my version of DSP (Designer Series Paper). Here's the card.

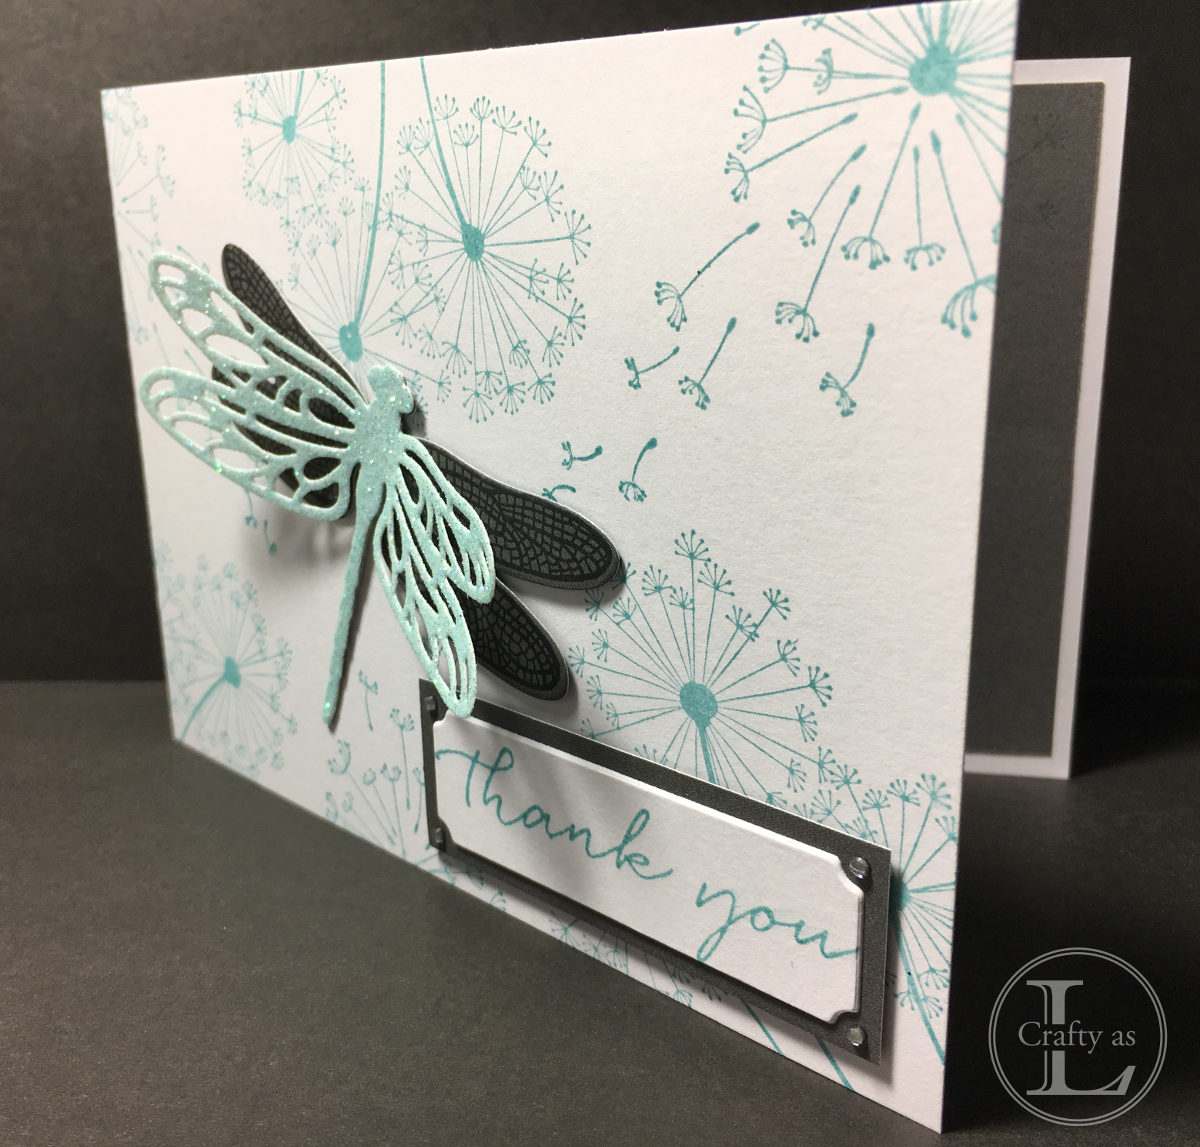
I wanted a monochrome look so stamped in grey ink but you could use any colours you fancy. Here's another I made using light turquoise ink and a scrap of ice blue glitter card I found in my large box of card offcuts. You can really see the wing detail of the stamped image.

This is another different look using Crushed Curry and Pumpkin Pie inks together with gold glimmer paper.

If you'd like to watch my YouTube video tutorial on making this card, please click here.
To make this card, I used:
- Stampin' Up! Dragonfly Dreams stamps and Dragonfly thinlits
- Stampin' Up! Dandelion Wishes stamps
- 11.5" x 4 1/8" white card base, unscored (you will score it later)
- 5.5" x 3 7/8" card lining piece, I used grey
- 3.5" x 3" pieces of silver glitter card and grey card for the dragonfly cut outs
- Scraps of white/grey for the sentiment
- Co-ordinating ink pad
1. Stamp the dragonfly showing the wing details onto the small grey piece of card and then cut out using the solid framelit.
2. Cut out the detailed dragonfly framelit using the glitter card.
3. Stick the glitter dragonfly onto the grey stamped dragonfly image, only adhering the body and tail. Gently bend the glitter wings up a little to give the 3D effect.
4. Measure 5.75" along your card base and put a couple of tiny pencil marks. Stick a post-it note along these marks, positioned to the left of the marks.
5. Stamp your background image using the Dandelion Wishes stamps. Less is more - you don't want to entirely cover the card. Ensure you stamp off the edges too. Whilst you've got your ink out, add a little stamped detail to your card inner and the envelope and stamp your sentiment on the scrap of white.
6. Remove the mask, erase the pencil marks then score the base at 5.75" and fold in half.
7. Adhere the liner to the inside of the card.
8. Cut out your greeting and add a backing if you want. You can flag the ends, add a mat, add a small offset mat (which I did) - the choice is up to you! It's one of the ways you can make the card your own. I added a grey mat the same size as my sentiment, positioned offset slightly above and left of the sentiment. I thought it looked a bit bare so added a couple of rhinestones - well who doesn't like a bit of bling?!
9. Add some foam dimensionals behind the sentiment and the dragonfly body and head and add to your card front.
And you're all finished!

Try changing things up by trying out different colourways, changing the sentiment and/or changing the position of the elements. In this one, I used the large detailed dragonfly thinlit and flagged the sentiment banner.

Inlaid Dragonfly Directions
If you wanted to use the glitter cut outs from your glitter dragonfly wings to make another card topper, the inlaid dragonfly, here's what you do.
1. Stick a piece of double sided adhesive sheet onto another piece of grey 3.5" x 3" card stock and cut out the solid dragonfly and also cut a detailed dragonfly out of grey card.
2. Remove the adhesive backing paper and adhere the detailed dragonfly to it. The adhesive is quite unforgiving so try lining up the body and head first and the wings should follow suit. (You can always trim off any adhesive backing showing on the front if necessary.) This will leave the holes in the wings with a sticky surface.
3. Using your silver glitter dragonfly and trying to keep all the pieces together, lay the glitter dragonfly directly on top of the one you just made and using tweezers, a cocktail stick, pokey tool or the like, push the cut out pieces through into the adhesive lined holes underneath. You will have to press quite firmly.
4. Carefully remove the glitter dragonfly, capturing any cut-outs that haven't stuck and relocate them.
5. Press the glitter inserts firmly onto the dragonfly base to ensure they're properly adhered.
Lo and behold! 2 dragonfly card toppers for your projects!

Another project
You can also make this into a cute picture using a shadow box frame. I used a 10cm x 10cm white shadow box for this.

Thanks to Liz Yuille of Old Stables Crafts for the inspiration for the inlaid dragonfly.


Comments
Post a Comment