Posts

Showing posts from May, 2019

Multi-Layered Stamping

Image
  When I first started card making, I was completely flummoxed as to how these kinds of cards were created!  Little did I know that it’s actually quite straight forward and just requires some precise cutting of layers but looks super impressive. I started off cutting my layers, mats and card base as follows: The next job is to use temporary adhesive to stack up the layers to be stamped.  I used a tiny bit of snail adhesive that I patted on my clothes a few times to reduce the stickiness as the layers will need to be taken apart again later without damaging them. I stamped the greeting onto the front panel and then used an All Adorned stamp (from Sale-A-Bration) and Sahara Sand ink for background interest.  As I wanted a light background pattern, I used second generation stamping by stamping off first onto scrap paper and then stamping onto the card layer.  I found it necessary to press a little harder that usual to get down the ‘drops’ at the ...
Creative Card Class

Image
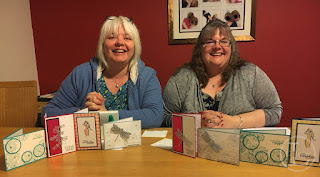
As you are no doubt aware by now, I love to craft.  What I have discovered is that I also love to share crafting with others.  My hope is that they will get the same enjoyment and reward from it as I do.  So last week, I spent a fun couple of hours one evening teaching these lovely ladies how to make beautiful greetings cards to send to their nearest and dearest – or not as it seems they were so taken with the finished products that they were keeping them all for themselves! The ladies in action! I try to make the class interesting by introducing different techniques for each card.  The cards we made at this class were as follows: Dragonfly and Dandelions This featured on my blog in October 2018 and has become one of my most pinned items on Pinterest :-)  It entails simple stamping and a couple of die cuts. Paper Pieced Lady This idea was from Amanda, my SU! team leader.  I used the technique with a teapot and cup stamp in my blog post...

Floating Frames

Image
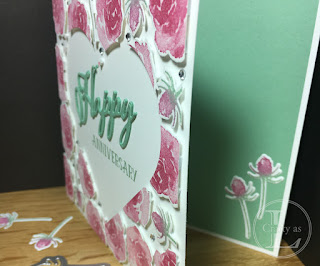
    My cards this week use a technique called Floating Frames, which I saw on Jennifer McGuire’s YouTube channel.  She is a very talented crafter and makes everything look so effortless!  The technique uses lots of die cuts mounted on foam adhesive to create a frame which looks like it is floating above the card.  It has the added bonus in that the process also creates a decorative panel for another card – two for the price of one! I used the large rose and thistle images from Frosted Florals and their matching thinlits to create my die cuts, using Lovely Lipstick and Mint Macaron inks. The next step was to position these die cuts over a piece of scrap card cut to the size of my required frame and then covered with a layer of GLAD Press’n Seal (available from Amazon).  This holds the pieces in place by temporarily adhering them to the scrap card. I then cut around the scrap card to create the outside of the frame and then positioned the die to cut out ...

Varied Vases

Image
  This week’s post has been inspired by the beautiful sights of swathes of wisteria, tulips and daffodils that seem to be everywhere. I love flowers, in particular scented flowers, and I like to cut some from the garden to put in vases in the house.  Just a few scented flowers in an arrangement can fragrance the whole downstairs of the house. For this project, I used the Varied Vases stamps and the matching punch. The vase options are an outline to colour in yourself, solid or a patterned style.   I opted for the patterned style and stamped them in Bermuda Bay ink and then punched them out. After stamping the scalloped edging, I roughly positioned the vases so I knew where to stamp the flowers that would be in the vases.  The flowers have an outline stamp that you can colour in or there is a matching solid stamp to fill them in, which is what I used with Cherry Cobbler ink. The card was finished by stamping the sentiments and mounting onto a ...