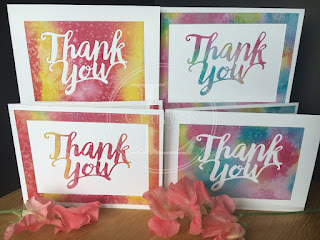
2-for-1 Thank You Cards

Having had fun doing the ink ‘smooshing’ technique for last week’s blog post, I thought I'd try my hand at some watercolour backgrounds this week, although I used calligraphy ink rather than watercolour paint. I’ve watched many, many YouTube tutorials on making water colour washes but it’s not quite as easy as it looks – well, not for me anyway! Using the Stampin’ Up! Thank You die, I wanted to use the positive and negative spaces of the background to make 2 cards, hence the 2-for-1 title. For an even speedier set of cards, use patterned paper instead of making a background.
I began by taking my piece of watercolour paper and wetting it thoroughly with clean water. I then painted stripes of pink and yellow ink and let them blend together. I then spritzed the piece with some Frost White Shimmer paint (mixed with isopropyl alcohol) for some shine, although the nozzle of the sprayer was a bit iffy so its more splotches than mist!
For my second sheet, I wet the paper and then just dropped in pools of blue, pink and yellow ink and sprayed with a little more water to get them to mix. Again, I spritzed (splotched!) Frost White Shimmer Paint on and then left to dry.
As the water colour paper got very wet, it was a bit crinkly when it dried but I was planning to run it through the Big Shot so that flattened it out a bit. I used the largest and third largest stitched rectangle dies to cut the background and a border and cut the Thank You from the central piece.
In the interests of using up as much of my inked background as possible and to give a co-ordinated look to the inside of the card, I cut the left over background ⅜” around the rectangular cut-out, cut this rectangle into 4 (2 tops and 2 sides) and then used these pieces to edge my card inner.
I adhered the negative piece onto my card base and then, whilst all the bits were still in the die, applied spray adhesive to the back and placed the die into the ‘hole’ on the card and pressed out the tiny pieces to make the words complete. This made card no.1.
Card no.2 was made by sticking the frame onto the card base and then adding the Thank You cut out to the centre.
These are the cards made with the second background using the same technique.
The sweet peas in the shot are called 'Terry Wogan' and are prolific flowerers. They're providing me with many gloriously scented vases of flowers around the house at the moment!


Comments
Post a Comment