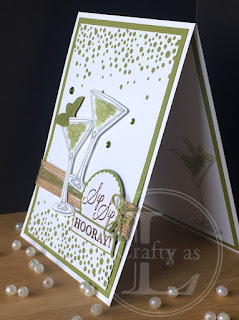
Sip Sip Hooray!
This week, Mr L and I have discovered how to make homemade nut butters. It’s remarkably simple requiring nuts, salt, a food processor and about 10 minutes of your time. Mr L eats peanut butter like it’s going out of fashion. I’m an avid label checker when shopping and nut butters often have a lot of other stuff added to them and the ones that don’t have a layer of oil at the top that is almost impossible to stir in. The solution? To make our own in small batches that get used before the separation occurs. I began by making cashew and sunflower seed butter which then spurred on Mr L to make some peanut butter. He even managed to not eat it all straight out of the blender and put some in a jar for later!
I’m not a huge fan of nut butters as they are but I like to use them as a base for sauces and dips. I found this great recipe for homemade nut butter granola. This is currently our favourite breakfast!
Arm progress is still slow to almost none existent but I’ve soldiered on with some crafting none-the-less. This week I’m using the new Stampin’ Up! Sip Sip Hooray stamps with the matching Sip & Celebrate dies. These are such a versatile and fun set and I look forward to doing lots with them.
The inspiration for this card was my favourite cocktail, the Mojito. I appreciate you wouldn’t usually have a Mojito in a martini glass but this is crafting – there are no rules! The dies come with a ‘bubble’ panel which I cut from the top and bottom of some Whisper White card. I mounted this onto a piece of Old Olive.
Next, I stamped the glasses using Smoky Slate and stamped the water coloured-effect drink in 2nd generation Old Olive. I went over the drink with some clear Wink Of Stella for a light glittery look. I also stamped some mint leaves. All of these were cut out with the matching dies. I repeated the glass, drink and leaves stamp on the inside of the card.
To give more texture to the card front, I added a piece of burlap ribbon and wrapped some Old Olive linen thread around that, finishing with a small bow.
The sentiments were stamped with Versamark and finished with copper embossing powder. The ‘sip sip’ element was punched with the 1⅜” scalloped punch and mounted on 1½ circle. I cut out the ‘hooray’ element with scissors.
Then it was just a matter of combining all of the pieces to create the card. I added in some coloured rhinestones from the Noble Peacock rhinestones pack for some extra bling. Sip Sip Hooray! covers many celebrations; birthday, wedding, engagement, anniversary, new job etc. Just change up the design using different colours and different glasses. Cheers!


Comments
Post a Comment