Posts

Showing posts from June, 2020

Forever Fern

Image
  I’m going to start today’s post not with ferns but garlic!  We’ve been harvesting the first of our garlic and using it ‘wet’, which only means using it straight away and not leaving it out to dry.  The first bulbs I dug up were a new variety to us called Lyubasha, which is originally from the Ukraine and is quite a spicy garlic.  Aside from being very tasty in itself, it’s a hardneck variety which produces flower spikes called scapes – a bonus crop if you know what to do with them. After a quick google search, I discovered that you can make pesto with these weird curly things, using the scapes in place of basil leaves.  The result was some delicious, uber-garlicky pesto.  I just love bonus crops! My card this week uses the newly released Stampin’ Up! Forever Fern stamps and the coordinating Forever Flourishing dies.  Rather than standard leafy green colours, I decided on Pretty Peacock and Mint Macaron for my colour scheme.   First, to mak...

Posh Graffiti

Image
  This week, a parcel from Stampin’ Up! was delivered so I got to play with some goodies from the new catalogue.  I really liked the look of the 'Nothing’s Better Than' stamp set and thought it would make a great card designed to look like a graffitied wall, albeit quite posh graffiti! First, I stamped my image and writing in black ink. Next, I used the block coffee cup to add some colour to the image.  I didn’t want a plain colour so applied Pool Party and Pretty Peacock using sponge daubers to give an ombre look. To get card looking like a wall, I ran the piece through my Big Shot in a brickwork embossing folder. The final stage was to mount the front onto a black layer and then a Bermuda Bay card base.  I stamped the coffee cup on the liner and envelope to finish. For my second card, I used a cocktails theme, and did the same ombre inking for the drink, using So Saffron and Poppy Parade. Lovely, quick cards but fun and stylish too!  

Flower Shadow Box

Image
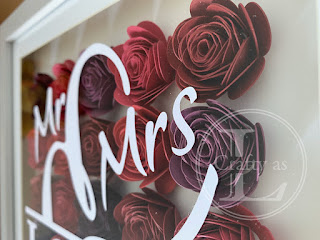
  At the end of last month, my in-laws celebrated their 40 th wedding anniversary.   I had seen these box frame projects on Pinterest and wanted to make one in reds and purples since traditionally 40 years is a ruby anniversary. To begin, I downloaded a flower file and cut it out on my Cricut.   It was a bit large to fit under the glass but a good practice.   I then cut out 25 flower templates in a mix of red, pink and purple card.  Using my bone folder, I gently curved the first 3 petals and then, using my tweezers, started rolling up the petals.   Once rolled, I released the tension slightly until the flower was the right size and then glued the base on with my hot glue gun.    The next stage was to cover the back of the shadow box with white card and then glue the flowers in place. I used the Cricut’s Design Space to make my vinyl decal, which I stuck onto the front of the glass, and then assembled the box frame.  

Faux Torn

Image
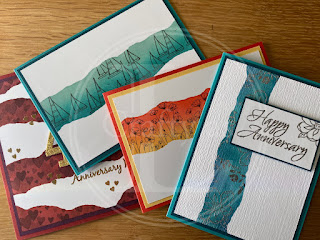
  This week, I learned that a technique that I’ve been using for years actually has a name!  It’s called the Faux Torn technique, as the finished card looks like it has a torn strip of patterned paper stuck to the card when it’s actually an inked panel.  It’s very simple to do and a change of the inked colours or stamped images completely alters the look. To begin, I tore the edges off the sticky edge of a post-it note although torn copier paper will do just fine too. Next, I blended two or three complementary colours into the torn gap, followed by some simple stamping. Lastly, I added a greeting and mounted the card on layers to match the blended colours. This is another version done in different colours and stamp. For this card, rather than just simple stamping, I heat embossed the design and then used the Subtle embossing folder for some texture. My last card was a card for my in-laws’ 40 th wedding anniversary.  I repeated the torn panel to cover more of th...