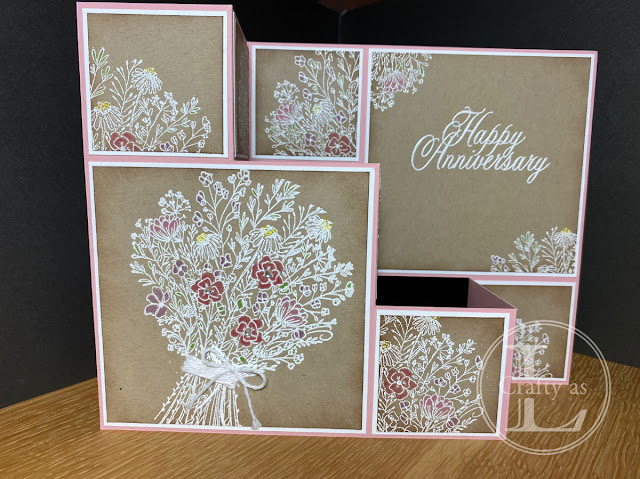
Fancy Fold: Triple Step Card
I saw this design on Pinterest whilst searching for fancy fold ideas. As both cards I saw were on foreign websites, I couldn’t get the name of the design so I’ve called mine the Triple Step Card as I think it looks like 3 steps!
I’ve made a template so I can remember what to do in future! It’s in inches but if you wanted to use cm and an A4 piece of card, cut the card base to 22½cm x 13½cm and instead of 2”, cut and score at 4½cm intervals. Actually, the metric sized card would probably fit in a shop bought 6” square envelope – mine was a bit tight!
For added interest, I wanted to add mats and layers to decorate my card. My cut pieces were as follows:
Top layers: two 3½” x 3½” and seven 1½” x 1½” pieces
Mat layers: two 3¾” x 3¾” and seven 1¾” x 1¾” pieces
To begin, I stamped my images using Versamark and added white embossing powder before setting with my heat gun. I used the SU! Hand Drawn Blooms stamp and Crumb Cake card.
After stamping, I used coloured pencils to add some colour to the bigger flowers and leaves. I didn’t worry about fully colouring everything, just the odd splash of colour here and there. I used a sponge dauber to add a bit of ink to the edges of the pieces, to give an antiqued look, before mounting on the white mat layers.
My card base was Blushing Bride and I added a panel onto the back for space to write my message.
The final job was to adhere the panels onto the card base. I felt that the bow didn’t really stand out very well so I added some white twine and a bow to finish and a few rhinestones onto the main panel.
It was only when I’d finished that I realised it was a bit of a squeeze to get the card into my square envelope so I used my envelope punch board and some DSP so make an envelope that would accommodate the card comfortably.
I do love 3D cards - they make a real statement!


.JPG)


Comments
Post a Comment