Posts

Showing posts from June, 2021

Slider Pop-Up Card

Image
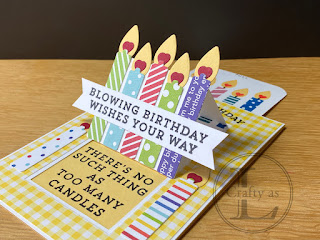
This week’s post features a great interactive card, the slider pop-up.  It does what it says on the tin - you slide it and it pops up!  I made this following using a Jennifer McGuire YouTube tutorial for the mechanism and MFT Make A Wish stamps and dies. First, I cut my card base and layers.  My white layer is the same size as the card front and the checked DSP is ⅜” smaller.  Into the white and checked pieces, I cut a flap, that will be the pop-up element, using my paper trimmer. Another option for this is to use a rectangle die and partial die cutting.  I scored the remaining side of the rectangle and also across the middle of the flap. I cut a hole in the checked piece to make a frame. After embossing the sentiment, I glued the check DSP onto the white layer before marking the opening of the flap onto the front of the card base.  This line is to show where to stamp the inside element.  I went for a fun phrase that I had to mas...
Papa Bear

Image
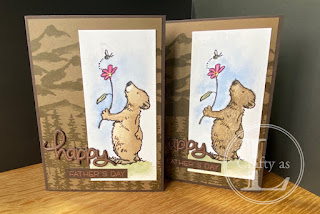
  Today is Father’s Day in the UK so I’m sharing my cards that I made for my Dad and Father-in-Law.  I wanted to use the cute bear from the stamp set ‘Happy Day’ from the Colorado Craft Company - I thought it’d be a great focal image for a masculine card. First, I stamped the bears using Versafine black ink, which is waterproof once it’s dry, and then water-coloured them.  One was a hairy bear, the other a more smooth coated bear!  I cut them down into slim panels. Next was my mat layer and background for my bear panels.  I used Stampin’ Up! Snow Front and Waterfront stamp sets to create the mountain and forest backgrounds.  Whilst these are a different illustrative style to the bear, they fit nicely with the bear’s habitat. For my sentiment, I used Lawn Fawn’s Happy Happy Happy, heat embossed with copper powder.  I triple stacked the ‘happy’ die cuts for a little extra dimension. Here are my final cards.  I stamped th...

A Wedding Honour

Image
  Towards the end of last year, my friend asked me if I would help her with her wedding invitations.  I was really honoured to be asked! She and her fiancé didn’t really have any ideas with regard to the style of invitations but that their wedding colour would be purple.  After trawling Pinterest to see what is fashionable now, I made 8 invitations for the couple to choose from.  Some were stamped, some were from Cricut’s project library and some I designed from scratch.  I was so chuffed when they chose my own design. My design was based on the bride and groom’s initials and an ampersand, all woven together.  I used my Cricut to cut these out of purple card and also cut out the initials themselves from silver card. Since the card would be a gatefold, I wanted a belly band to hold the card closed.  This was decorated with a glitter heart and some purple and white ribbon. The wording for the inside was done on the computer and p...

Happy Hearts

Image
  I love making cards for a special occasion so when Mr L requested a card for his friend who had just got engaged, I went straight to work.  Hearts are perfect for engagement and anniversary cards so I used the Stampin’ Up Detailed Hearts Die (now retired), which is great for 2 for 1 cards as you can use the frame on one card and the hearts on another! To begin, I added a sheet of Stick-It adhesive to the pink card and cut two using the die.  The adhesive makes it much easier to stick down thin die-cuts like this but before doing so, I glued one on top of the other to give a stacked look. Next, I adhered this onto the card base and inlaid some white hearts (left over from a previous use of this die!) to give a pop.  I also stamped the sentiment. As there were a LOT of self-adhesive hearts created by the two die-cuts, I used some for the card liner and envelope. For the final assembly, I popped the sentiment up on foam squares and added a ...