Posts

Showing posts from January, 2024

Getting Glassy

Image
This week, Mr L and I tried out a glass fusion taster workshop with local artist, Sue Watson at  Wat’s On Glass . I spotted the workshop advert on a post in a local Facebook group and we were on a day off, so I booked it. Neither of us had done anything glassy before so we complete novices and had no idea what to expect.  To begin, Sue explained about the tools and demonstrated how to cut some greenhouse glass. This is cheap (a lot of it donated from local allotments) and just for practice. We started by learning how to do straight cuts and then moved on to wavy cuts.  After this, we stopped for a cuppa, a slice of cake and a moment to decide what we wanted to make. The advert was to make a sun catcher or similar. Mr L and I each opted for a decorative panel that would stand in a wooden plinth. Mr L chose to make a circular design featuring beach huts and an aeroplane. I was inspired by one of Sue’s works of art on display that featured a wave.   We started by...
Somebunny Loves You!

Image
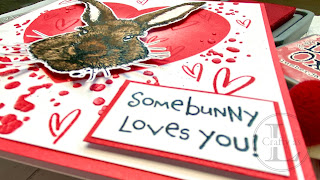
Welcome to my Visible Image DT post and, as Valentine’s Day approaches, I’ve gone all romantic!   You could easily make this a non-Valentine’s card though by switching up the colour scheme. To begin, I blended Lumberjack Plaid Distress Oxide ink through the Heart Ink stencil, with heavy coverage on the edge but blending out to leave the centre white.   Next, I placed the heart stencil into the aperture and applied Nuvo Crackle Mousse Rose Hip through the holes.   The panel was set aside to dry fully and develop the crackle. The main focal element was to be the large bunny from the Happy Bunny stamp set.   I stamped the bunny with black Versafine, added clear embossing powder and heat set.   He was then water-coloured and fussy-cut once dry. The sentiment was stamped and clear heat-embossed then trimmed.   I cut another panel slightly larger than the sentiment to back it.   Lumberjack Plaid was blended around the edge then the sentiment adhere...

Creative Cans

Image
One of my fellow Visible Image DT members, Jane, recently showed her upcycled storage cans which she had decorated with stamps.   My blending brushes were stored in a motley collection of jars and cardboard boxes so I decided to revamp their storage following Jane’s lead. My cans were Heinz tomato soup, but I think they’re mostly the same size.   I cut some 160gsm paper to 4” x 9⅛” and went through my VI collection of stamps to find suitable ones to use.   Most of them, as it transpires!! Well, I’ll need more cans so that’s not a problem!   To start, I made the backgrounds for my wraps.   Fearless Tiger was going to feature on the first can so I opted for a background of yellows and orange. To give a stripy texture that wasn’t actually stripes, I used one of my favourite stencils, Graffiti, and stencilled with orange and red.   The card was quite wet then so I set it aside to dry and started on wrap #2. For this can, I was going for an underwater ...

Noughty Minion

Image
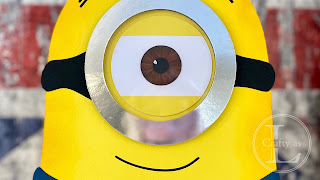
  This week saw Mr L celebrate a “noughty” birthday – the ripe old age of 40! He is a massive Minions fan so, having moved my Cricut Maker into my craft room, I purchased a SVG cutting file from Etsy to make a Stuart the Minion card. To begin, I scaled the file so that the card would be approximately A4 sized and cut out all the pieces, cutting an extra body for the back of the card.   I cut the mouth and hair from vinyl   since they were quite skinny. To give the Minion some definition, I blended some ink around the outside of the body, the dungarees and the dungaree pocket. All the bits were adhered in place and he really started to come to life. For the eye, I added some different shades of brown alcohol markers onto the iris and a white highlight onto the pupil. The goggle was backed with acetate and I used foam tape to adhere it onto the face.   I’d thought the card was finished then but realised there was no differentiation between the body and the ar...

Good Times

Image
Hello and welcome to my first Visible Image DT post for 2024.   My cards this week are a variation on a theme using the  Glitch Numbers stencil as the main image.   I’ve experimented with different media to make 4 cards that are essentially the same but different! To begin, I ink blended some backgrounds using Distress Oxides.   If you want an even quicker make, you could use some patterned paper instead but I love ink blending so that’s where I started.   Making backgrounds like this makes this card very versatile and suitable for men or women. Next, I took one of the backgrounds and simply blended Memento Tuxedo black all over.   My panels were 5¼” square so the stencil overhung the edges so I could secure it with tape. For the rest of the backgrounds, I heat embossed and also used Ranger Distress Paste in Snowfall together with glitter and embossing powder – full details of each card later. The sentiment is one of my all-time favourites and ...