Eclipse Card and Minion Trousers!
This week, we have been celebrating Mr. L’s birthday. It wasn’t a big one but still a birthday so warrants some celebrating! Amongst his presents were two pairs of homemade house trousers. I don’t know what other people call them but they’re the comfy trousers you put on to doss around in and they’re known as House Trousers in our house. He had asked for some for Christmas but I ran out of time so he got them for his birthday instead. Now, I had never made trousers before so I was a bit concerned but, since the pattern was a simple pyjama style, they ended up being quite straight forward to construct. His request for trousers was “the more outrageous the better!” and he loves the Minions so that’s what he got! Here he is sporting the two designs….
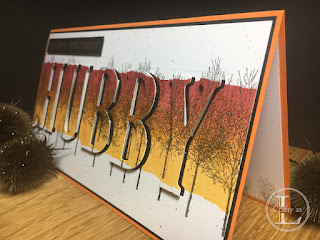
For his card I used my newly acquired Winter Woods stamp. The bare winter trees are great for Christmas cards but can also be handy for those tricky male cards. This card is a variation of my ombre sunset card but the inked panel is horizontal instead of vertical. I’m also currently in love with eclipse cards and Mr. L has been coveting the ones I’ve made for others so I made one for him too.
I began by tearing some Post-It notes along the sticky edge and positioning them to make the area to be inked. I made it just narrower than the height of the trees as I wanted them to go into the white areas at the top and bottom of the panel. Using sponge daubers, I blended Crushed Curry, Pumpkin Pie, Cajun Craze and Cherry Cobbler to give the sunset look.
I stamped the bare trees image using Memento Tuxedo Black repeatedly across the panel and then flicked a bit of (retired) shimmer paint in copper and gold over the panel to give a bit of added interest.
Using the large letter dies, I lined the word ‘HUBBY’ up on my grid paper (I had to sub in a P to keep the space for my other B!) and taped the dies together with Post-It tape. After much trial and error, I’ve found this is the easiest way to keep them lined up!
I ran it through the Big Shot and then positioned the second B and cut that out too. I then stuck down the panel onto a Basic Black backing and adhered the negative spaces from the Bs.
The SU! Foam Adhesive Strips are brilliant for eclipse cards as the strips are narrow so fit easily on the back of the die cut letters. After applying the adhesive strips, I stuck the letters into their appropriate positions and mounted the card on a card base of Pumpkin Pie, since orange is Mr. L’s favourite colour! For the sentiment, I heat embossed some gold powder onto a strip of Basic Black and mounted using dimensionals. I used some Whisper White card for inside liner and just stamped the tops of the trees along the bottom edge in Smoky Slate ink. Here’s the finished card.


Comments
Post a Comment