Posts

Showing posts from December, 2019

Quick Celebratory Cards

Image
  Need a last minute Happy New Year card? The Sip Sip Hooray set is a great set for these and also for any celebratory cards where you might raise a toast. My birthday cards are CASEd from a post on Pinterest by Karen Spreckley. I really loved her bold colour choices. I used Night of Navy for the card base and bubble cut out and Rococco Rose and some leftover pink foil from SAB earlier this year. A panel of pink card served as the backdrop for my glass of pink fizz and I heat embossed the sentiment.   A few rhinestones finished the cards with a bit of bling! A quick tip for stamping skinny photopolymer stamps that need cutting out with dies. In order to not bend the stamps so they don’t cut out neatly, place the stamp in the die before mounting it on the block. Glasses of champagne are a great image for celebratory cards for an anniversary, wedding, engagement or new job. The colours can be themed for a ruby, silver or golden wedding anniversary or to match a wedding de...
Merry Christmas!

Image
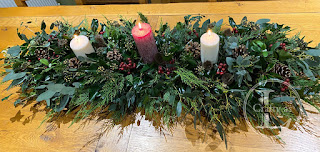
  Are you ready for Christmas then? I don’t really know how (since December always follows November!) but December has suddenly crept up on me this year.  It’s been hectic getting cards and presents made, wrapped and delivered, together with going to work and also, sadly, having to return to Derbyshire for a few days for a family funeral.  However, the end of this week saw me being able to just relax and do some Christmassy things for me.  Firstly, my sister has come to stay for a few days so we started by visiting the local garden centre to see the reindeer that they have each year in December.  This year they were called Glacier and Cloudy and they were gorgeous, as always. This one was particularly hungry and kept coming to the fence to see if there was any food available, which allowed me several strokes of his velvety nose! Love that nose!! We then took advantage of the photo opportunity on the snowman seat – it was a bit of a squeeze! I did have to ...

Teabag Folded Christmas Tree

Image
Mr L’s parents are going on a cruise over Christmas and New Year.  Since they won’t be at home, they won’t have a Christmas tree so I decided to make them a card with a dimensional tree on it so they have a little Christmas tree in their cabin over the festive season.  Whilst surfing around on YouTube, I watched a great video by Jan Brown on how to make a tree using a teabag folding technique.  I’ve never done any teabag folding so I decided to CASE Jan’s card and give teabag folding a go. I started by cutting out 5 squares of patterned paper (I used Stampin’ Up! First Frost DSP) comprising squares of 1½”, 2”, 2½”, 3” and 3½”.  Since the DSP is only 6” square, I had to use two sheets so went with 2 different patterns. The next step was to fold each piece in half once, and then on each diagonal.  The first folds go down to make valley folds and the diagonal folds push up into mountain folds. The side folds were pushed inwards to make a triangular shape. Ne...

Brightly Gleaming

Image
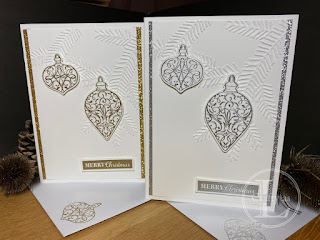
A couple of quick cards this week made using Stampin’ Up! Brightly Gleaming set.  I wanted to create some clean and simple style cards predominantly using white and metallics. First, I stamped two of the bauble images twice, embossed each pair in gold and silver and cut them out using the matching punches.  For my backgrounds, I wanted some texture so I embossed my card using the long-retired pine bough folder. Next, I cut some strips of gold and silver glitter card to edge my card fronts and liners and heat embossed the sentiment from the set. I heat embossed the smaller decoration onto the envelope and the liner and stuck the liner into the card base, adding the glitter strips to the edges. I repeated the glitter edging on the card front pieces. The last job was to add foam dimensionals to adhere the baubles and sentiments. The resulting cards were simple but elegant that I’d be happy to have on my mantlepiece.  

Pigment Tree Tags

Image
  It’s been quite a hectic week for me this week.  After returning relaxed and refreshed from my holiday the previous week, this one has been full on.  It started with a trip to see a consultant about my arm.  We are possibly a stage closer to getting the problem sorted in that the consultant believes that the root cause of my arm pain is actually in my neck.  A course of anti-inflammatory meds and a comprehensive neck mobilisation exercise routine are now under way.  Fingers crossed this will resolve the problem. I have been at work nearly all week and when I wasn’t, I was in my craft room making stuff for the charity craft event yesterday.  Mr L decided to come along to help at the craft event which made it much more fun for me.  I was really pleased with our stall and even more pleased with the £55 profit we made, all of which we donated to The Cat Welfare Group. One of my projects this week involved using Stampin’ Up! Pigment Sprinkles....