Posts

Showing posts from January, 2020

Word Art

Image
Pictures made up of words are all the rage now and I’m a huge fan.  I hope one day to be able to produce such things with my own calligraphy but for now, I’m happy to use my Cricut to create these works (or words!) of art.  I posted my latest project in the Cricut Facebook group and had a lot of comments asking how I did it, which prompted this blog post.  Apparently, there is a website or app you can use to arrange your words but personally, I think that takes all the fun and creativity out of the project. First, I drew in a heart the size of my intended project in Cricut Design Space.  I then listed words that I wanted to include in the piece.  Then it was simply a job of changing the fonts, sizes and alignments and fitting the words into the heart shape.  Where there were gaps too big to leave blank but too small for words, I added little images like hearts, stars, paw prints, cats and aeroplanes.  Once I was happy with the layout, I then changed t...

Music Maestro!

Image
I am a big music fan, both playing it and listening to it.  I believe my music playing has given rise to my very eclectic music tastes; from Beethoven to Bon Jovi!  When I spotted the Music From The Heart set in the new mini-catalogue, it was a no-brainer to add it to my collection. I wanted to make a card for my friend's birthday.  We met when in a choir so what better stamp set to use than a musical one?!  I used Blushing Bride and Very Vanilla cardstock. I randomly stamped the various musical notes and the treble clef using Blushing Bride ink and also heat embossed a few with copper embossing powder.  The musical symbols were also stamped onto the liner and envelope. There’s a lovely Happy Birthday sentiment in the set which was mounted on a small piece of Copper Foil paper. After making this ladies’ version of the card, I wanted to try out a colour scheme for a masculine version. Pretty Peacock and Old Olive, together with a bit of copper, fitted th...

Fabric Corner Bookmark

Image
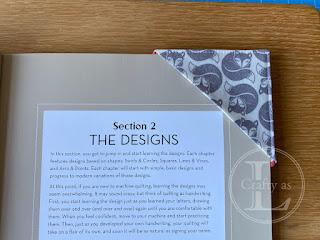
This was a little project I happened across last month which I decided to make for my Mum to go with the books I’d got her for Christmas.  It’s a really straightforward make; if you can sew a straight line, this will be no problem. Start with three 4” squares of fabric, two for the square and one for the corner, together with one square and a half square of interfacing. I used iron-on interfacing which I applied to the back of one of the pair of squares and the triangle of interfacing to the front corner square.  The front piece was folded in half and pressed.  The pieces were layered, square – triangle – square, pinned and sewn around with a ¼” seam allowance, leaving a gap for turning.  I clipped the corners to give a neater finish once turned. Once turned the right way out, the bookmark was pressed, turning in the seam allowance of the turning gap, and top stitched all the way around. The finished bookmark sits neatly on the corner of the book – no more f...

My New Toy

Image
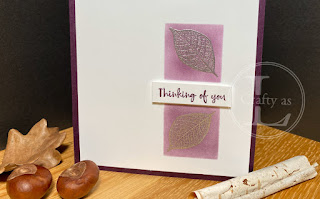
  Happy New Year! I hope that you had a good time over the festive season.  I was working a night shift on New Year’s Eve but since I was working with Mr L, it was OK.  This week I’ve been playing with my new toy I had for Christmas – one of those ‘To me, from me’ gifts!!  It’s a Cricut Maker cutting machine.  After my friend lent me hers for a couple of weeks, I had to have one.  I started by cutting out some vinyl letters to put on the festive radiator bed I made for Leia.  So cute! There’s a lot to learn to get the most out of it, in particular how to use the Design Space to create the projects.  To practice ‘slicing’, I decided to make some window templates for my card making.  The beauty of this is that the shapes can be lined up and cut accurately. I tried the template with circles, squares, hearts, stars and rectangles. For my card, I used the square template and applied Blackberry Bliss ink with a sponge dauber. Once the ink was...