Posts

Sparkly Snowflake

Image
  Having bought the Snowflake Splendour DSP, I thought I’d better make an effort to use it!  The pack handily gives the coordinating colours so it’s easy to choose a colour scheme for your project.  I used Balmy Blue and Highland Heather as I like to try some non-traditional Christmas colour schemes for a bit of a change. First, I die cut a circle of Balmy Blue glimmer paper and Whisper White card.  I then cut the snowflake into the glimmer paper using the large snowflake die from So Many Snowflakes and glued this on top of the white circle. The background was cut from a sheet of the DSP and adhered to the card base. I use the stamps from Snowflake Wishes to decorate the card liner and envelope and for my greeting. The last job was to assemble the card, adhering the snowflake element to the top.  I could have popped it up on foam dimensionals but left it flat for easier posting. For my second card, I used Highland Heather and a retired glimmer paper whi...
At An Angle

Image
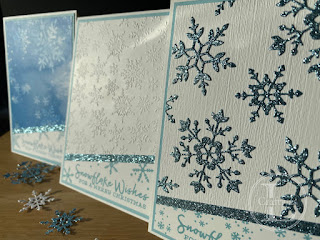
Sometimes, a jaunty angle can really add a new dimension to a project.  When I first tried this card, I cut it straight across and it looked… well… distinctly average.  However, make a diagonal cut and the whole thing is transformed.  I give you three options, depending how much work you want to put in! To begin, I stamped the greeting from Stampin’ Up! Snowflake Wishes on the bottom of my card front, just so I had an idea of how much to chop off.  I found a nice angle if I lined up the bottom right corner with the top of the grid section on my trimmer and the top right corner against the stop rail.  This also allowed me to repeat the cards at more or less the same angle. The top section was embossed using the Winter Snow folder and I covered the join with a ¼” strip of Balmy Blue glimmer paper, trimming the ends flush with the white panel. The whole panel was mounted onto a Balmy Blue layer and then onto a white card base. For an easier option, I cut a p...

Circle Christmas Tree

Image
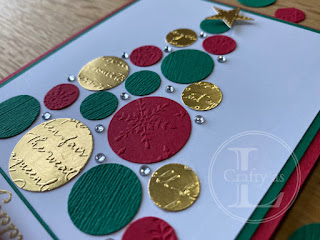
  The idea for this card came from seeing one of those Christmas tree ornaments made from baubles.  It got me thinking how I could make one using circles.  Here’s the result!  I think this would be a fun card to make with children. I began by drawing a triangular tree shape on my card top layer.  I used a tree stamp but any rough triangular shape will do.  Then, after dry embossing a selection of card in Shaded Spruce, Real Red and gold foil, I punched circles of various sizes.  If you wanted to use die cut circles, you’d have to cut first then emboss. The circles were roughly arranged in the tree shape.  To help me remember the placement for gluing, I took a quick shot of the layout and then removed the circles to erase the triangle. I glued all the circles in place, stamped and heat embossed my greeting, mounting it on a layer of Shaded Spruce and a length of Real Red ribbon.  To finish, I added a die cut star to the top on foam tape a...

Messy Eaters

Image
Do you have a messy eater in your family? I can ask this as I am one myself! This is largely borne by our slovenly ways of eating our tea from lap trays in front of the TV rather than sitting at the table.  To resolve this problem, instead of making us eat at the table, I made myself a bib.  I got my pattern from the website shown at the end however, since Craftsy ceased a few months ago, it’s no longer available.  The shape is fairly simple though so it’d be easy to draught yourself.  This is my original. I made this one for my sister (we’re a family of messy eaters, apart from my Mum!) for a funny birthday gift – she had asked for one so I was confident she wouldn’t be offended.  Like me, she is a big cat fan so cat-themed fabric had to be used.   After washing and drying the fabrics to pre-shrink them, I started by cutting out a front, some quilt wadding (extra absorbency!) and a backing (cut out the opposite was to the front). After attaching t...

Festive Floating Window

Image
  I saw this card style on a YouTube video by Scrimpingmommy and thought it’d be fun to try.  As it transpired, I got completely carried away with it and made 4 bases ready for decorating!  I used Stampin’ Up! Perfectly Plaid, Stitched Stars and Brightly Gleaming for my decorative elements.  Although I've made Christmas cards, this style of card can be used for any occasion. My card bases are 5¾” x 8¼”, a little less than half a sheet of cardstock, and scored at 4⅛”.  For this card, the front needs to be cut into three so I cut mine equally at 1⅜”.  For the window section, I cut a piece of acetate 1¾” wide by a smidge under 5¾”.  I discarded the centre portion and applied thin adhesive tape to the top and bottom edges of the acetate. Next, I cut some layers from card and DSP to decorate the top and bottom panels of the card. The easiest way to line up the acetate panel is to clip the bottom section to the card base, line up the acetate with the ed...

Glitzy Golden Forest

Image
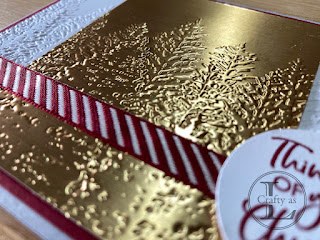
This week’s star of the show is the Stampin’ Up! Evergreen Forest 3D embossing folder.  It’s super detailed and has so much dimension that it deserves to be the focal point of the card.  I paired it with the new Brushed Metallic cardstock for added glitz! To begin, I embossed a top layer of white card and a skinnier panel of metallic card.  I deliberately made my metallic panel longer so that I’d have some wiggle room when assembling the two together. As the embossing is so deep, it’s easy to ‘feel’ when the panels are aligned and the branches match.  Once aligned, I glued first the top half, holding the bottom in place, then lifted the bottom to adhere that.  I used lots of liquid glue to get into all the nooks and crannies of the trees.  Once dry, I trimmed off the excess metallic card. I wanted a pop of colour on the card so I applied a strip of adhesive tape across the panel to attach some coordinating ribbon. Lastly, I mounted the panel onto a C...

Snowflake Shaker

Image
One of the dies in the So Many Snowflakes cuts out a stitched window, which is crying out to be made into a shaker card!  To make the scene through the window, I used the Snow Front stamp set. The first job was to cut out the window.  I eyeballed the position of the die to get it more or less in the centre. As my cutting plates are somewhat manky, the card was marked a little so I ran it through the Winter Snow embossing folder to disguise the marks.  Remember to stamp the sentiment before embossing! Next, I stamped my scene onto a smaller piece of card.  I drew around the die lightly to help with positioning my scene and erased the pencil marks afterwards.  Although the scene is navy in this picture, I changed my mind and did another in Basic Grey – to avoid any confusion in the later photos! To make the shaker element, I glued a piece of acetate onto the back of the window and then applied foam strips around the window.  It’s important that the str...