Posts

Fancy Fold: Triple Step Card

Image
  I saw this design on Pinterest whilst searching for fancy fold ideas.  As both cards I saw were on foreign websites, I couldn’t get the name of the design so I’ve called mine the Triple Step Card as I think it looks like 3 steps! I’ve made a template so I can remember what to do in future! It’s in inches but if you wanted to use cm and an A4 piece of card, cut the card base to 22½cm x 13½cm and instead of 2”, cut and score at 4½cm intervals.  Actually, the metric sized card would probably fit in a shop bought 6” square envelope – mine was a bit tight! For added interest, I wanted to add mats and layers to decorate my card.  My cut pieces were as follows: Top layers: two 3½” x 3½” and seven 1½” x 1½” pieces Mat layers: two 3¾” x 3¾” and seven 1¾” x 1¾” pieces To begin, I stamped my images using Versamark and added white embossing powder before setting with my heat gun.  I used the SU! Hand Drawn Blooms stamp and Crumb Cake card. ...

Another Anniversary

Image
A few weeks ago, Mr L and I celebrated our wedding anniversary at home, unusually for us.  We normally like to go away somewhere sunny for our anniversary but obviously that’s not been an option this year.  We often go to Thailand as we love the food as well as the weather so we celebrated with a Thai takeaway.  It was delicious although not quite the same as eating with your feet in the sand and the sound of waves lapping at the shore.  Oh well, maybe next year. For my card for Mr L, I used my Cricut.  There was a project in Design Space of a heart shaped jigsaw so I cut out a bunch of these in black and white, together with some purple as this was our wedding colour. I wasn’t quite sure what I was going to do so I cut out plenty so I could play around with them. After adhering the black frame, I decided to stack the jigsaw pieces but dry embossed the top layer to add some interest without it getting to busy. The lettering was from black vin...

Quaint Quilling

Image
Have you heard of quilling? It’s been around for hundreds of years and used to be the pastime of genteel ladies during the Georgian and Victorian times and was also practised by nuns and monks to decorate religious artefacts.  Modern papers and adhesives have changed the work produced but the techniques are based on old ideas. My book showed some Charles Rennie Mackintosh style roses and they looked to be the easiest of the Closed Loose Coils, since they started with a fold rather than rolling.  I glued a strip of pale and dark pink together at the end and started the folding. Once I’d got to the end, I released the tension and then glued the other ends in place to secure the rose shape.  I made several of these and some with darker pink strips.  The leaves were made using a different technique called Wheatear Coils.  As I haven’t done this before, I experimented with trying to make the leaves in different ways.  The flowers didn’t seem to sit ...

A Whaley Good Birthday

Image
I really like the Whale of a Time DSP from Stampin’ Up! It makes it very simple to create a stunning background for cards. However, to avoid it looking like I’d just stuck a bit of paper on my card, I cut my DSP into panels and matted them.   Using the coordinating punch, I cut out a whale and glued it onto a whale cut from navy card to give more stability.   I heat embossed my sentiments in silver and also added the bubbles on the centre panel above where the whale would be.     The inside sentiment is from the Whale Done stamp set together with the shoal of fish, which I also stamped on the envelope.   The final job was to assemble the various elements.  The panels were glued onto the card base and I added foam behind the whale and the sentiments for some dimension.        

Jigsaw Love

Image
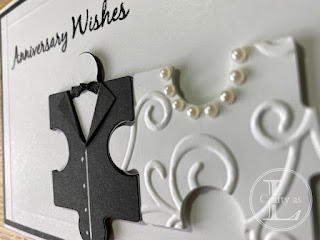
  It was my parent’s wedding anniversary last week.  They are avid jigsaw doers so we bought them a couple of new ones, one of which is Van Gogh’s The Starry Night.  That will keep them busy a while! To coordinate with their gifts, I decided on a jigsaw-based card.  I’ve made similar cards with hearts as the bride and groom.  I used my Cricut to cut out the pieces. For the ‘bride’, I dry embossed the piece and added a pearl necklace before gluing the 4 pieces together. For the ‘groom’ I chopped off the bobble, then cut down the centre and folded back the two triangles to form the lapels of the jacket.  I drew on the buttons with a white gel pen and the bow-tie is a small piece of ribbon with a knot tied in it. The pieces were glued together, adding in a white layer for the shirt. I like clean and simple background for these style cards so I simply scored a frame from the reverse and then added my greeting using black ink and cle...

Fancy Fold: The Bridge Fold

Image
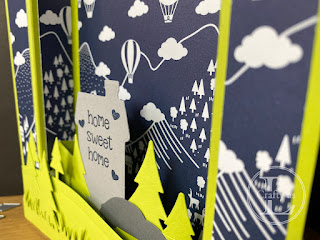
  I do love a fancy fold card.  They always look impressive and aren’t always as tricky to make as you’d think.  This week’s design is called the bridge fold and was made for friends who have just moved into a new home.  It folds flat to fit inside a square envelope and can be simple or a little more complicated with an extra layer to add more dimension. To begin, I cut a 5¾” x 6” square and with the 6” length at the top of the score board, scored at 1”, 2”, 4” and 5”.  I added some very old DSP depicting country scenes in navy and white as this really popped with the lime green card base. Next, I die cut some hills, trees, grass, a house and a card and stamped my house with the greeting. My middle layer was cut to just under 5” and score at ½” at each end. I arranged the house, car and trees and the glued it into place, folding the lugs backwards.   The ‘bridge’ section was built by adding some trees and then finally the grass,...

Valentine Watercolour

Image
  I’ve been painting this week; a Valentine’s card for Mr L and an actual picture! There are some wonderful YouTube tutorials available for beginner painters and I’m a big fan of Karen Rice’s paintings, style and teaching. My card was a line and wash using another Anita Jeram stamp.  Those rabbits are so cute! I lifted out the paint in the sky to create the heart shaped clouds. When I die cut the panel, I had to use the partial die cutting technique and the die marked the panel so I had to add the ribbon, which unfortunately hides most of the cloud.  I decorated the envelope using a white gel pen. My painting was done following Karen Rice’s Silver Birch Trees Step By Step video.  I was first drawn to this particular tutorial because there’s no drawing involved.  The trees are masked using strips of tape (I used framing tape) and then the first stage of painting is done over the top.  There are some fun techniques to try duri...